Quantcast
Channel: VMware vSphere Blog
Viewing all 626 articles
Browse latest View live

vSphere Authentication, Microsoft Active Directory LDAP, and Event ID 2889

$
0
0

VMware AppDefense IconIf you’re running VMware vSphere and using Microsoft Active Directory (AD) for authentication you’ve likely been party to the confusion around the LDAP Channel Binding & Signing changes that were proposed by Microsoft, first as a change to the shipping defaults, and now as a recommended hardening step. We at VMware support hardening IT systems, especially ones like Active Directory that are such rich targets for attackers. However, changing existing systems has nuances, so this post is intended to help answer a lot of the questions that continue to bubble up, and fill in gaps between the resources out there.

What is the change that Microsoft wants Active Directory admins to make?

Microsoft would like Active Directory administrators to require LDAP signing & LDAP channel binding. These improve the security of connections to the LDAP servers that are part of Active Directory by helping to prevent “man in the middle” attacks where an attacker could intercept communications between the systems.

We wrote about these changes in our post, “VMware vSphere & Microsoft LDAP Channel Binding & Signing (ADV190023).” That post has been updated to reflect current guidance.

Does VMware vSphere support this change?

It will depend on your configuration. Supported versions of vSphere have been tested and this is what we have found:

  • AD over LDAP: If your authentication is configured as “AD over LDAP” these changes to Active Directory will break your authentication. This is expected – AD over LDAP is not natively secure. Switch to AD over LDAPS or Identity Federation instead.
  • AD over LDAPS: You are fine, your authentication communications are secure.
  • Integrated Windows Authentication (IWA): Not completely compatible. Authentication is secure and will continue working but you will be unable to search the Active Directory, because searching is done over an LDAP (not LDAPS) connection that does not sign the connections. This means that adding new AD users and groups to SSO may be problematic. We are investigating improvements to Integrated Windows Authentication that might help with this, but there is not a timeframe for this. If you have immediate needs please consider switching to AD over LDAPS. You may also be seeing Event ID 2889 log entries — please read below for more information.
  • Identity Federation: You are fine, your authentication communications are secure.

My Active Directory Domain Controllers have auditing enabled and are getting Event ID 2889 log entries on connections from our vCenter Server. Does this mean it’s insecure?

It depends on what method you’re using for authentication:

  • AD over LDAP: Yes, it is insecure. Switch to a connection type that protects communications with TLS, like AD over LDAPS or Identity Federation.
  • AD over LDAPS: You will not see Event ID 2889 log entries for this method.
  • Integrated Windows Authentication (IWA): Check out VMware KB 78644. Integrated Windows Authentication uses GSSAPI & Kerberos to authenticate users and uses credential sealing with SASL to protect credentials. It also uses Kerberos tokens to authenticate the LDAP connection it uses for searching Active Directory. As such, it is not sending credentials in the clear. In addition to authentication, in IWA configuration, vSphere queries Active Directory via LDAP on port 389/tcp for other, non-credential data, such as group membership and user properties. It uses sealing (encryption) to satisfy the protection against the man-in-the-middle attack, but Windows logs Event ID 2889 anyway. For more details please see the “Logging anomaly of Event ID 2889” section of Microsoft’s How to enable LDAP signing in Windows Server
  • Identity Federation: You will not see Event ID 2889 log entries for this method.

We connect our ESXi hosts to Active Directory, is that secure?

Yes. That uses the same techniques for authentication as Integrated Windows Authentication. We continue to recommend that ESXi management activities be directed through the Role-based Access Controls (RBAC) present in vCenter Server, rather than administration activities happening directly on ESXi hosts.

I read that Integrated Windows Authentication is deprecated in vSphere 7. How will I connect to Active Directory?

Deprecation means we intend to remove the feature, but it is still there & fully supported for now. We cover this thoroughly in our post “vSphere 7 – Integrated Windows Authentication (IWA) Deprecation.

How can I switch my authentication methods?

You can remove the old authentication method and then recreate it with a different protocol using the same domain information. A great example of this is shown in TAM Lab 048, done by Bill Hill, one of our Technical Account Managers. His video shows switching vSphere from LDAP to LDAPS.

We always encourage vSphere Admins to test changes before they make them in their production environments. A great way to do that is with nested ESXi. Deploy a small vCenter Server for testing and install ESXi in a VM for that vCenter Server to manage it (when you’re configuring the new VM choose “ESXi 6.5 and newer” from the list of operating systems). Once it is set up you can shut it all down and take a snapshot, so that if the environment gets messy you can restore it to a working & clean state. While we do not support nested ESXi directly, it is how the Hands-on Labs work, and how many of us do our testing. It’s a great way to test things like authentication.

What does VMware recommend?

Moving forward, AD over LDAPS and Identity Federation are the two primary recommendations for connecting vSphere to Active Directory.

Conclusion

When it comes to vSphere & security we’re working to make it easy for vSphere admins to be secure, and to make vSphere secure by default. Change can be tough, but security is a process, and as our adversaries change their tactics we need to grow, too, in order to protect our systems and data.

As always, thank you for being our customer, and please let us know how we can help make your lives and infrastructure more secure.

The post vSphere Authentication, Microsoft Active Directory LDAP, and Event ID 2889 appeared first on VMware vSphere Blog.


Answer Your Questions in the VMware Communities

$
0
0

Beyond the documentation and opening an official support case, VMware has quite a few resources available to our customers who are looking for answers to questions. One of the oldest resources is the VMware Communities forums, where there are years of archives, thousands of customers, and dedicated support engineers that monitor the discussions and contribute helpful information and advice when needed.

When there’s a new vSphere release, like vSphere 7, one of the biggest questions is “how do I upgrade?” The upgrade process in vSphere 6.7 and 7.0 is streamlined and very stable, but there are still questions out there about what happens to external Platform Services Controllers, hardware compatibility, and the process of upgrading. To help folks who are thinking about an upgrade the Communities now has a dedicated “vSphere Upgrade & Install” community for these sorts of discussions.

How do I get started in the Community?

First, it is absolutely alright to read posts and just absorb what people are asking. If you log into the Communities site with your my.vmware.com login you can set preferences for notifications when there are new posts. Use the Follow button on the right-hand side to track what you’re interested in. The “Actions” menu also allows you to follow the discussion using an RSS feed reader, too.

If there is something you’d like to ask or answer, go for it! The top of the discussion page makes it easy to ask a question. Remember that if you have a question there are probably hundreds of other people wondering the same thing. By asking the question not only do you help yourself, you also help others. You also help VMware find gaps in our own documentation and content.

So come on over and check out the vSphere Upgrade & Install Community, as well as the hundreds of others inside the VMware Communities!

– The VMware Global Support and Communities Team

The post Answer Your Questions in the VMware Communities appeared first on VMware vSphere Blog.

vSphere 7 – Why Upgrade? Here’s What Beta Participants Think!

$
0
0

VMware vSphere IconBefore I joined VMware in late 2018 I was a VMware customer for over 15 years. One of the many things I looked forward to was participating in the vSphere Beta Program. It was a chance to see new features and offer feedback to the product managers and engineering teams more directly. It also helped me prepare for upgrading my environments. Every new release of vSphere has features aimed at helping a vSphere Admin do their job better, faster, and with less overhead & hassle, so it always made sense to thoughtfully upgrade after some testing with the released product.

One of the reasons I have always liked VMware, as a company, is that constructive feedback is always appreciated. The truth about software companies, whether it is VMware or others, is that few of the people involved in the development of the products see the products like a true vSphere Admin does. vSphere Admins are in the trenches, dealing with applications and users and compliance auditors and ancient storage arrays and the whole mess. It is very important that we ask them what they think, and we encourage them to always tell us the truth. Now that vSphere 7 has been released we did just that, asking people in the beta program to answer some questions.

Are you likely to upgrade to the latest version?

Graph showing responses to the question "Would you upgrade to vSphere 7?"

Whoa. From my perspective the vSphere 7 beta was one of the most stable ones I have run in my many years, but it is stunning to see 285 of 307 vSphere Admins answer “yes” to the question of whether they’d upgrade to it. Even more so, it is not the typical bell curve you’d see, as 252 of those responses were enthusiastic yes. Of course, a survey is one thing, real life will be different, especially with COVID19. Still, the beta community tends to be somewhat vocal, and the respondents volunteered to complete the survey, so if people were angry or disappointed I would expect them to speak up like they usually do.

Let’s look at what they said when asked WHY they’d upgrade.

What is the top feature worth upgrading for?

Graph showing responses to the question "What is the feature that you would upgrade for?"

The results here are a real “who’s who” of vSphere 7 features. No question here that people are looking forward to the lifecycle management, upgrade planning, and Kubernetes features in vSphere 7. I really appreciate the enthusiasm from the “ALL OF THEM” respondents, too. Not everybody answered this question, which is typical for a freeform text field in a survey, though. To gauge whether the positive response is real I read through the other comment fields, and while some folks had a few issues it appears most were resolved with beta refreshes. That’s a very positive thing by itself!

It’s worth mentioning that the vSphere Technical Marketing team is blogging about all of these features through May, with deeper dives through the summer, if you want to learn more. And if you want to be part of ongoing beta programs here at VMware please reach out to your account teams who can help you set that up.

Conclusion

I think the data speaks for itself, but if there is a conclusion to be made it is that vSphere 7 is a solid release. Should you upgrade to it? Yes, but thoughtfully. It is very important to make sure that all the components in your environment, like backup systems, hardware, storage, and so on are compatible. The VMware Compatibility Guide is a great tool for determining hardware readiness, and if your servers aren’t on there yet ask your vendors, as they are the ones that do the testing.

In the meantime you can do what the VMware Hands-on Labs do and run vSphere 7 nested inside another vSphere environment. Did you know you can set the guest OS type to ESXi, and that ESXi has VMware Tools? While it isn’t officially supported, it’s great for testing at any time, especially since you can take a snapshot of the environment and reset it if you do something bad to it. It’s a very good way to practice the upgrade process to develop confidence in it.

Don’t forget the VMware Test Drive, either. Test Drive is a great way to experience quite a few VMware products in an environment that’s already configured.

As always, thank you for being our customers. This whole post is about feedback, and we mean it when we say that if you have some please let us know.

Customer quote about vSphere Lifecycle Manager

(Thank you to Liz Wageck & Kristine Andersson for the data and work with the beta community)


We are excited about vSphere 7 and what it means for our customers and the future. Watch the vSphere 7 Launch Event replay, an event designed for vSphere Admins, hosted by theCUBE. We will continue posting new technical and product information about vSphere 7 and vSphere with Kubernetes Monday through Thursdays into May 2020. Join us by following the blog directly using the RSS feed, on Facebook, and on Twitter. Thank you, and please stay safe.

The post vSphere 7 – Why Upgrade? Here’s What Beta Participants Think! appeared first on VMware vSphere Blog.

Answer Your Questions in the VMware Communities

$
0
0

Beyond the documentation and opening an official support case, VMware has quite a few resources available to our customers who are looking for answers to questions. One of the oldest resources is the VMware Communities forums, where there are years of archives, thousands of customers, and dedicated support engineers that monitor the discussions and contribute helpful information and advice when needed.

When there’s a new vSphere release, like vSphere 7, one of the biggest questions is “how do I upgrade?” The upgrade process in vSphere 6.7 and 7.0 is streamlined and very stable, but there are still questions out there about what happens to external Platform Services Controllers, hardware compatibility, and the process of upgrading. To help folks who are thinking about an upgrade the Communities now has a dedicated “vSphere Upgrade & Install” community for these sorts of discussions.

How do I get started in the Community?

First, it is absolutely alright to read posts and just absorb what people are asking. If you log into the Communities site with your my.vmware.com login you can set preferences for notifications when there are new posts. Use the Follow button on the right-hand side to track what you’re interested in. The “Actions” menu also allows you to follow the discussion using an RSS feed reader, too.

If there is something you’d like to ask or answer, go for it! The top of the discussion page makes it easy to ask a question. Remember that if you have a question there are probably hundreds of other people wondering the same thing. By asking the question not only do you help yourself, you also help others. You also help VMware find gaps in our own documentation and content.

So come on over and check out the vSphere Upgrade & Install Community, as well as the hundreds of others inside the VMware Communities!

– The VMware Global Support and Communities Team

The post Answer Your Questions in the VMware Communities appeared first on VMware vSphere Blog.

Introducing the 2nd Generation of VMware Cloud on Dell EMC

$
0
0

It’s been a busy couple of years for VMware Cloud on Dell EMC.  We announced the concept as Project Dimension at VMworld 2018 and then announced VMware Cloud on Dell EMC’s initial availability at Dell World last year.  The focus has always been to deliver a cloud experience to customers on-premises.  This gives customers the best of best worlds: the simplicity and agility of the public cloud with the security and control of on-premises infrastructure.  Originally, we were focused on edge locations, but as we went through initial availability, we began turning our attention to datacenter use cases as we heard demand for it from customers.  However, while VMware on Dell EMC worked for datacenters, it wasn’t properly optimized for them.  That changes today!

Today I am very excited to introduce the 2nd generation of VMware Cloud on Dell EMC to support high density and high-performance datacenter use cases.  Let’s dive right into all the new capabilities that make this release a great fit for datacenters.

New enterprise-scale rack

This release introduces a new, full-height 42 rack unit infrastructure rack, which includes redundant Dell EMC network switches and smart power distribution units, and SD-WAN remote management devices.  With this release, this new rack can support up to 16 instance nodes.


As you can see from the diagram, the first rack R1 includes features like a UPS, which R2 doesn’t, as we assume that there is a UPS at the datacenter level.

New node types for memory- and storage-hungry workloads

This release broadens the number and breadth of Dell EMC VxRail instance types now offered for VMware Cloud on Dell EMC. Our latest VxRail hyper-converged host is based on dual 2nd generation Intel SP processors, providing 48 cores, and paired with 768 GB RAM and 23 TB of NVMe all-flash storage.  This new host type is optimal for hosting workloads with heavier CPU, memory, and storage demands such as Database, AI/ML applications, and Virtual Desktop type workloads.

All of our current host type including the new introduction are displayed in the following table:

  G1s.small M1s.medium M1d.medium
Chassis Form Factor VxRail E560F 1U VxRail E560F 1U VxRail E560F 1U
CPU sockets and cores 1 x 24 1 x 24 2 x 24
vCPU 48 (24 Cores) 48 (24 Cores) 96 (48 Cores)
RAM 256GB 384GB 768GB
vSAN Disk Groups 1 (800GB SAS) 2 (800GB SAS) 2 (1.6TB NVMe)
All flash Storage 11.5TB (SATA) 23TB (SATA) 23TB (NVMe)
Networking 2 x 10Gb 2 x 10Gb 2 x 25Gb

With three different host types and two different rack types to choose, corporations now have the freedom to design the most optimal system for their specific workloads and applications.

Support for business continuity via VMware Horizon

Virtual desktops are a critical capability for enabling business continuity in today’s environment. VMware Horizon enables enterprises to offer their remote workforces more secure access to their desktops and applications—especially valuable in highly regulated industries such as healthcare and financial services. VMware Cloud on Dell is now fully certified for VMware Horizon to deliver virtual desktops on-premises, at the edge or in the datacenter.

Validated backup and recovery solutions

Data Protection is a critical requirement for modern workloads and IT strategy. Organizations are looking to ensure that their data is properly backed up with full search capability. As part of this release, we have introduced two new certifications:

  • Dell EMC PowerProtect Cyber Recovery solution, the industry’s leading solution for data protection
  • Veeam Availability Suite

Both of these solutions give organizations enterprise class data protection and recovery capabilities.

Get your apps onto VMware Cloud on Dell EMC quickly

In this release, we will feature bulk workload migration capabilities through VMware HCX as a technical preview*. VMware HCX enables customers to migrate hundreds of live workloads at once, with no downtime, to dramatically reduce time to deployment and simplify operational complexity. This is a highly utilized feature on VMware Cloud on AWS and within datacenters when corporations have a strong need to move large numbers of workloads from one environment to another.

Self-service expandable capacity

A big part of VMware Cloud on Dell EMC’s cloud experience is being able to order new racks via our online self-service order interface.  Customers make the order and a few weeks later, one or more racks show up where they want.  However, after the racks were ordered, there wasn’t an easy way to add additional nodes.  With this release, we’ve now added support to expand node capacity from the self-service order interface.  Customers can now start small and easily expand capacity as their application needs demand.

Hybrid Cloud Management

VMware has a portfolio of solutions to support customers’ hybrid cloud deployments – VMware Cloud on AWS, VMware Cloud on Dell EMC, and in the near future, VMware Cloud on AWS Outposts. A common hybrid cloud control plane fuels all three products underneath and provide a single pane of glass for visibility and control.  The VMware Cloud Console provided this for VMware Cloud on AWS SDDCs.  In this release, we’ve extended it to bring visibility and management to VMware Cloud on Dell EMC SDDCs as well.

The above screenshot shows the VMware Cloud Console managing SDDCs in both VMware Cloud on AWS (Frankfurt region) and VMware Cloud on Dell EMC (at a location in Dallas, TX)!

Learn more

I am very excited about the announcement of 2nd generation of VMware Cloud on Dell EMC and will participate in a special TheCUBE digital event tomorrow, Thursday May 21st, at 8am PST.  Please check it out!

Other resources:

  1. Follow the latest news of VMC on Dell EMC on Twitter: @VMWonDellEMC
  2. Watch product videos, download data sheets, and more on the VMware Cloud on Dell EMC product page
  3. Read the press release

* There is no commitment or obligation that features in technical preview will become generally available.

The post Introducing the 2nd Generation of VMware Cloud on Dell EMC appeared first on VMware vSphere Blog.

Latest Release of VMware Cloud on Dell EMC Delivers Scalability for the Data Center

$
0
0

VMware Cloud on Dell EMC is a complete hardware and software SDDC rack that is easy to order so you can quickly provision infrastructure for your on-premises applications. It is fully assembled, cabled, and configured before it arrives – ready to connect to your network. VMware takes care of the lifecycle management, so your valuable IT resources can focus on business applications instead of patching and updating software and firmware in the data center.

The latest release of VMware Cloud on Dell EMC – known as “D3” – brings capabilities that are perfect for enterprise data center use cases: more resources, rapid physical expansion, improved monitoring, and bulk migration of workloads from older VMware vSphere environments.

Join us on Thursday, May 21, 2020 – 8:00 AM PDT for a special TheCUBE digital event – including conversations with leading industry analysts, key executives, and technical experts. 

More Resources for Business Applications

One of the biggest changes in this release is the addition of a new full height 42U rack, designated as R2, to complement the initial 24U half-height R1 rack that is primarily intended for edge, manufacturing, and remote office deployments.

The full height R2 rack omits the backup battery found in its shorter sibling, as the expectation for deployment of the R2 rack is that it will be in a data center environment with reliable power infrastructure. In fact, the R2 rack offers greatly enhanced power capacity: up to 4 single-phase or 2 three-phase circuits. More kilowatts enable you to now order the rack with up to 12 or 16 hosts, respectively. You’ll also be glad to know that those power cables can exit from either the top or the bottom of the rack to align with your particular data center setup. The following table summarizes the differences.

Comparison of R1 and R2 racks

Growing Portfolio of Physical Host Configurations

Now with the latest VMware Cloud on Dell EMC release, there are three different host sizes to offer a broad range of resource configuration to suit workload requirements. The new M1d.medium has double the CPU and memory, plus faster NVMe flash storage. Please see the following table for details on the current host portfolio.

Three VxRail host configurations

Easy Capacity Expansion

In this release, it’s easy to order additional hosts for your existing SDDC rack deployments. Using the web-based portal that is part of the VMware Cloud Services platform, you can initiate an order for additional hosts, track the delivery progress, and arrange for deployment and integration. The additional capacity is added to your cluster through automated workflows, so you don’t need to worry about any complex configuration procedures. There is also an integrated calculator that clearly illustrates the additional resources that will be added, as shown below.

Adding hosts to an existing cluster

Easier to Move Applications to the New SDDC

After your new rack is up and running, one of the logical next steps is to move existing workloads off of aging or underperforming infrastructure. With the addition of VMware HCX, orchestrating bulk migration of applications with little or no downtime is amazingly efficient.

Data Protection for Workloads

Once you’ve tested and deemed your VMware Cloud on Dell EMC rack ready for production workloads, you can leverage data protection solutions from the VMware ecosystem to keep your business information securely backed up. The first partner products certified for this amazing new on-prem, fully managed data center are now ready. Get in touch with your Dell Power Protect or Veeam account teams to learn more about version compatibility and integration processes.

Takeaways

VMware Cloud on Dell EMC continues to expand capabilities to accommodate the demands of enterprise workloads in your data center. The full-height rack is capable of running a larger number of higher-performance VxRail servers, along with the ability to expand the number of hosts in an existing rack. The SDDC is fully equipped with VMware vSphere, vSAN, and NSX-T – and when updates are released, VMware takes care of the lifecycle management so your valuable IT staff can focus on supporting business-critical applications.

For more information, see the VMware Cloud on Dell EMC product website, follow us on Twitter, or download the Technical Overview paper.

The post Latest Release of VMware Cloud on Dell EMC Delivers Scalability for the Data Center appeared first on VMware vSphere Blog.

vSphere 7 – A Closer Look at the VM DRS Score

$
0
0

With vSphere 7, we released the greatly improved Distributed Resource Scheduler (DRS) logic. We received numerous requests from customers to provide more information about the VM DRS Score. This blog post details the new DRS algorithm, with a focus on the VM DRS Score.

DRS works to ensure that all workloads in a cluster are happy. ‘Happy’ meaning workloads can consume the resources that they are entitled to. This depends on a lot of factors like cluster sizing, ESXi host utilization, workload characteristics, and the virtual machine (VM) configuration with a focus on compute (vCPU/Memory) and network resources. DRS achieves VM happiness by calculating and executing intelligent workload placements and workload balancing across a cluster.

In previous vSphere releases, DRS used a cluster-wide standard deviation model measurement to optimize workload ‘happiness’ as shown in the diagram above. In essence this means DRS had a focus on the ESXi host utilization baseline, a specific threshold range that is configurable using the DRS migration threshold. The re-vamped DRS logic takes a very different approach from its predecessor. It optimizes VM happiness by measuring VM happiness!

VM DRS Score

In vSphere 7, DRS measures VM happiness by computing a VM DRS Score per VM. The VM DRS Score for any given VM/workload is calculated every minute, on all the ESXi hosts in the cluster. The reduced time in between DRS calculations alone (1 minute versus 5 minutes in previous vSphere releases) provides a far more granular approach for balancing workloads. When another ESXi host is able to provide a better score for the VM, DRS will recommend and possible execute a live-migration, depending on DRS settings. If DRS operates in fully automated mode, DRS is allowed to initiate a vMotion to live-migrate the workload. When DRS is configured to run manually or partially automated, manual operations are required to run DRS or to apply the DRS recommendations.

The VM DRS score is calculated based on the goodness model of DRS in vSphere 7. The goodness modelling enables DRS to compute the goodness (happiness) of a VM on any given host in the cluster. Looking closer into the VM DRS Score, it is simply the goodness of the VM on its current host expressed as a percentage. To understand how DRS calculates the VM DRS Score, we need to understand the goodness modelling in vSphere 7.

Goodness Modelling

The fundamental concept of the new DRS logic is that VMs have an ideal throughput and an actual throughput for each resource (CPU, memory, and network). When there is no contention, the ideal throughput of that VM is equal to the actual throughput. We talk about resource contention if multiple VMs are in conflict over access to a shared compute or network resource. In the situation when there is contention for a resource, there is a cost for that resource that hurts the actual VM throughput. Based on these statements, here are some equations:


Goodness (actual throughput) = Demand (ideal throughput) – Cost (loss of throughput)

Efficiency = Goodness (actual throughput) / Demand (ideal throughput)

Total efficiency = EfficiencyCPU * EfficiencyMemory * EfficiencyNetwork

Total efficiency on host = VM DRS score


This means that the VM DRS Score is a combination of the efficiencies of each resource. To determine the efficiency of a resource, all we need to calculate is the resource cost. There are several factors that contribute to the cost. These costs are described below for each resource.

CPU Costs

All costs are charged to the VM. The costs for CPU resources include:

  • CPU cache cost – We monitor co-scheduling of VMs because that could possible incur CPU cache contention.
  • CPU ready cost – If a VM’s CPU demand cannot be satisfied on the host because the host is overcommitted, the VM potentially run with a higher CPU Ready time (%RDY).
  • CPU tax cost – If a VM causes overcommitment of a host’s CPU. For example, the host would not be overcommitted if the VM did not exist on that host, it has an impact on the cost.

The total CPU cost is the sum of the above costs.

Memory Costs

The memory costs include:

  • Memory burstiness cost – If there is insufficient memory headroom on a host to accommodate a burst in memory demand, we charge a cost to the VMs running on the host. The cost increases as the headroom decreases.
  • Memory reclamation cost – If a VM’s memory demand cannot be satisfied on the host because the host is overcommitted, the VM will be swapping pages to disk. DRS charges this as a cost to the VM.
  • Memory tax cost – If a VM causes overcommitment of a host’s memory (ie, the host would not be overcommitted if the VM did not exist on that host), we charge a cost to it.

The total memory cost is the sum of the above costs.

Networking Cost

  • Network utilization cost – If a VM has a high networking bandwidth demand, and the host’s network usage is beyond a threshold, we charge a cost to the VM. The cost increases linearly with the increase in host network utilization.

Migration Cost

When DRS determines that another host can provide a better VM DRS Score, the last step before recommending and executing a live-migration, is checking the migration cost for the VM. The overall predicted vMotion time is factored in into the gain of the VM DRS Score. The longer the overall vMotion time, the shorter the potential gain (benefit) on the VM DRS Score will last. This will possible have an impact on DRS recommending a migration for the VM.

To verify the cost benefit of a balancing operation by live-migration the VM to another host, DRS computes the migration cost as the amount of CPU cycles it takes to perform the live-migration. The more memory that has to be copied as part of the vMotion process, the more CPU cycles are spent on trace fires and putting the data on the (network) wire.

This can lead to a situation that another ESXi host is capable of providing a better VM DRS Score, but that the benefits are negated because of a potential high migration cost. Resulting in DRS not recommending a live-migration for this VM.

Insights on Metrics

Now that we have a cost for the CPU, memory, and network resources, we can use the equations listed in goodness modelling to compute the VM DRS Score. Based on the outcome of the VM DRS Score calculations, DRS makes a placement decision. Both for initial placement and load balancing, making sure the most optimal ESXi host is chosen for the workload.

It’s great to see an environment with all DRS Scores in the upper bucker (80% – 100%). However, a VM running a lower score is not necessarily not running properly. It is about the execution efficiency, taking all the metrics/costs into consideration. A lot of the metrics used for the VM DRS Score calculation can be reviewed directly in the vSphere Client. Either clicking on ‘View all VMs’ in the Cluster Summary page and DRS pane or by viewing the VM DRS Score page in Cluster > Monitor. This overview provides a lot of detail. When a VM is running in a lower score bucket, these metrics provide a quick look into what is happening.

To Conclude

When you upgrade to, or install vSphere 7 in your infrastructure, you’ll immediately benefit from the new and improved DRS logic! Even though we took a closer look at the new VM DRS Score construct, the beauty of DRS, is that it requires little to none knowhow for customers to benefit from its capabilities. The out-of-the-box experience by just enabling DRS on your clusters already provides the ability for your workloads to run as optimal as possible, resulting in increased workload performance!

(a special thanks to the DRS engineering team for providing the information)

More Resources to Learn

The post vSphere 7 – A Closer Look at the VM DRS Score appeared first on VMware vSphere Blog.

Join Us for an Exciting Announcement About Running AI/ML Workloads with vSphere 7

$
0
0

vSphere 7 is already here but are adding even more value to the platform. Are you running AI/ML (Artificial Intelligence/Machine Learning workloads)? Let VMware show you how to create an optimized and efficient infrastructure for these workloads that leverages hardware accelerators like GPUs.

We are very excited about this milestone. Please attend our special Crowdchat event to see why.

In addition, and through our close partnership with Dell, we are also bringing solutions to market that will combine both hardware and software for even more business differentiation. VMware’s General Manager of the Cloud Platform Business Unit, Krish Prasad, will join Josh Simons in the Office of the CTO to bring out this exciting news along with the executive team from Dell.

Join us on Tuesday, June 2nd, 2020

Visit the event page to learn more and sign up. Our event can also be accessed from the VMware homepage or off the vSphere page itself.

The post Join Us for an Exciting Announcement About Running AI/ML Workloads with vSphere 7 appeared first on VMware vSphere Blog.


vSphere 7 – vSphere Pods Explained

$
0
0

In this blog post I’m going to dive into what makes up a “vSphere Pod”. If you read my previous blog on the vSphere Pod Service, I touched on the different components that make up the service. One of those components was the vSphere Pod itself. Let’s dive in!

What is a vSphere Pod? It’s always best to describe up front what you are talking about. In the previous blog I said the following:

The vSphere Pod Service provides a purpose-built lightweight Linux kernel that is responsible for running containers inside the guest.

Wait a second? ESXi? Linux? What’s really under the covers? Is ESXi Linux? (NO! IT IS NOT!) Maybe a graphic would be a good place to start.

Components of a vSphere Pod. ESXi VMX Linux Kernel Container Engine Container

The video shows an ESXi server.

Running on that is a VMX customized with code changes to support running containers. Running on the VMX is a Linux kernel provided by ESXi. Running on the kernel is a Container Engine. These three components together are referred to as a “CRX”.

Finally, one or more Containers are running on the Pod. Ok, what does this all mean to you? Is is a VM? Is it not a VM? Why is Linux there? Let’s go into details.

CRX

CRX stands for “Container Runtime for ESXi”. In a nutshell, it’s a virtual machine that is highly optimized to run a Linux kernel that itself is highly optimized to run containers. As mentioned above, the three components, the customized VMX, the Linux kernel and the Container Engine, are considered a “CRX. To understand what it does we need to look at VMX processes. If you look at the running processes in ESXi you’ll see several them marked as “VMX” processes. Here’s an example:

You’ll see that this VMX process is running the VM “mgt-dc-01.cpbu.lab”. Associated with that process are the 2 vCPU’s, the SVGA device and the MKS device used for things like VMRC or Web Console.

Just what parts of the VMX are “modified”? Well, some of those modifications are just default VMX settings like “svga.present = “FALSE””. Some more changes were code changes to support a CRX. Some of those changes to support a CRX are:

  1. Direct Boot support. Typically, a VM would boot an OS off a virtual disk (VMDK). This requires a BIOS. But we wanted to make the Pod not only boot faster but more like a container. So, the CRX required code changes such that it bypasses BIOS and executes the pre-loaded Linux kernel directly.
  2. A VM expects several things to be in place. A “home” directory on a datastore provides a place to write logs, VMX and VM swap files. It also needs an operating system to boot from, whether it’s a VMDK, ISO file or PXE boot. To make the CRX do the things we needed it to do we had to change some of these assumptions. That required some code changes to VMX.
  3. No CRX’s will receive unwanted drivers. A good example is that the CRX doesn’t need stuff like keyboards, mice and video. That’s now forbidden in the code.

Security built in

Now, I mentioned a pre-loaded Linux Kernel. Typically, that then begs the question many will ask “How do I update this kernel?”. Well, you don’t. Directly. The kernel used by the CRX to support containers is pre-packaged in a VIB and distributed as part of the ESXi distribution. Patches and updates to this kernel will come as part of an update/upgrade to ESXi. In fact, the CRX is hard-coded to only accept a Linux kernel that comes via a VIB file. That means you can’t modify the kernel. And for those of you that followed me through my seven years of supporting vSphere Security, you’ll be happy to know that this means the kernel is not only tamper proof but that if you enable Secure Boot and TPM 2.0 you can prove that your vSphere Pods are booting “clean”.

In addition to these very cool features there’s even more control put on a CRX. For example, when the VM is in “CRX Mode” we limit the changes that can be made to the configuration. Many VMware Tools operations are disabled. CRX Mode is a “hidden” GuestOS type. It’s not available via the UI or API. You can’t create a CRX via these methods “by hand”. When the VM (CRX) is set to the proper (hidden) GuestOS type then the appropriate settings and restrictions are enforced.

As I’ve mentioned before, this kernel is highly optimized. It includes a minimal set of drivers. You might say “Just Enough Kernel”. It uses para-virtualized devices like vSCSI and VMXNET3.

Once the kernel is “booted” it starts a minimal “init” process. This populates the /dev hierarchy and initializes the loopback network device. After that the application is started.

Operational Efficiencies and Security

Is it better to run five containers on one vSphere Pod or five separate vSphere Pods? Well, the answer, as you can imagine, is “it depends”. There are many design decisions to consider. One of those is security vs lifecycle management. Five containers in a pod are weakly isolated to each other by design and collaborate to provide a single service that’s lifecycle-managed as one entity.

On the opposite side of the spectrum is where security usually sits. They typically insist on many levels of isolation. If one of those containers has a bug, then you could potentially compromise the other containers.

Somewhere in the middle are the business requirements. If that one container is compromised then great, it’s isolated. But multiple containers are usually seen as one entity, a service. So while it’s isolated it’s still not “up”.

One of the advantages to running five containers on a pod is that if I give each container 1GB of memory (5GB total) then that memory can be “shared”. If one container needs more memory and the other containers haven’t consumed their allotment, then the memory is available for that container.

From a resource perspective, if we run five separate Pods, each with one container and 1GB of memory then if a container needs more memory it won’t have access to that shared memory pool. This could cause a bottleneck. However, the upside is that each container is running in its own Pod and a vSphere Pod IS a VM, so you gain the already proven isolation of virtual machines and NSX networking. Not to mention that there are already tools out there for monitoring VM performance bottlenecks.

These are some of the design tradeoffs that you and your development team will have to make. You may wish to try both scenarios to see which one meets your security and operational needs. vSphere with Kubernetes gives you those options.

Even More Security

Speaking of security and isolation, vSphere Pods really stand out here. Let’s review how containers work on bare metal today. See the following image:

bare metal containers

In a bare meta environment all containers are running on a single kernel with a shared file system, shared storage, shared memory and shared networking. Your isolation is dependent on Linux kernel primitives in software.

Now, when you look at the image below, the use of vSphere Pods where if the business requirements mandated, you could use one container per Pod to provide the BEST isolation of CPU, Memory and Networking. You’re leveraging the already robust virtual machine isolation. You’re booting a Linux kernel that’s unique to the Pod (and not the same Linux kernel instance used by 100’s of containers on a Bare Metal install!) and you have the capability to use enterprise class networking isolation with VMware NSX. All with no performance penalty.

A screenshot of a cell phone Description automatically generated

Performance

I mentioned performance above. In August of 2019 we posted a blog post on what was then called “Native Pod” performance. (Native Pod was a code name of sorts; the actual name IS now “vSphere Pod”) In this blog post one of our engineers, Karthik Ganesan and the PM for vSphere with Kubernetes, Jared Rosoff, showed how vSphere Pods have up to 8% better performance than bare metal Linux Kubernetes nodes. If you read through the blog post, you’ll see that much of this performance gain is due to the ESXi scheduler and the fact that vSphere Pods are independent entities. The scheduler does its best to ensure that each Pod is on a CPU that’s closest to the memory of that CPU. Read the blog post to get all the details! It’s fascinating work. You may ask if there’s any update since August. What I’ll say is that we are always working on optimizations. When we have more good news to announce we’ll do it here.

Wrap Up

So, to wrap this up, the question you may be asking is “When do I use vSphere Pods?”. The answer to that, as I’m sure you can image, is, again, “It depends”. Let’s break it down to make it clearer.

  • Do you need a fully upstream conformance Kubernetes environment? More details on the vSphere Pod Service and conformance will be coming soon in another blog article. This will help you make your decision.
  • Do you require 3rd party integrations like Helm?
  • Then you want to use TKG clusters running on vSphere with Kubernetes. This gives you the most flexibility. In this scenario the containers will run on standard VM’s. Today that VM is based on VMware Photon.
  • Do you need absolute network, CPU, memory, filesystem isolation?
  • Do you have an application that you’ve tested in a vSphere Pod and it works?
  • Do you have performance requirements that are met by vSphere Pods?

Then I think you’ve answered your own question. The bottom line is that you have options. You have flexibility to run your applications where they run best.

For more information and guidance on when to use a vSphere Pod vs a Tanzu Kubernetes Cluster, please check out the documentation page on this subject. As with everything in this space, things move fast so these guidelines may change over time.

I hope this has been helpful to you. I only came into the Kubernetes world a short time ago and I’m really excited to see the changes happening in how systems will be managed in the very near future. I hope you’ll join me in this journey together. It’s going to be a fun ride!

If you have any ideas on vSphere with Kubernetes topics that you’d like to learn more about from a vSphere Administrator standpoint then please reach out to me on Twitter. I’m @mikefoley and my DM’s are open.


We are excited about vSphere 7 and what it means for our customers and the future. Watch the vSphere 7 Launch Event replay, an event designed for vSphere Admins, hosted by theCUBE. We will continue posting new technical and product information about vSphere 7 and vSphere with Kubernetes Monday through Thursdays into May 2020. Join us by following the blog directly using the RSS feed, on Facebook, and on Twitter. Thank you, and stay safe!

The post vSphere 7 – vSphere Pods Explained appeared first on VMware vSphere Blog.

vSphere 7 – ESXi System Storage Changes

$
0
0

We’ve reviewed and changed the lay-out for ESXi system storage partitions on its boot device. This is done to be more flexible, and to support other VMware, and 3rd party solutions. Prior to vSphere 7, the ESXi system storage lay-out had several limitations. The partition sizes were fixed and the partition numbers were static, limiting partition management. This effectively restricts the support for large modules, debugging functionality and possible third-party components.

That is why we changed the ESXi system storage partition layout. We have increased the boot bank sizes, and consolidated the system partitions and made them expandable. This blog post details these changes introduced with vSphere 7 and how that reflects on the boot media requirements to run vSphere 7.

ESXi System Storage Changes

Partition Lay-out in vSphere 6.x

The partition sizes in vSphere 6.x are fixed, with an exception for the scratch partition and the optional VMFS datastore. These are created depending on the used boot media and its capacity.

Consolidated Partition Lay-out in vSphere 7

To overcome the challenges presented by using this configuration, the boot partitions in vSphere 7 are consolidated.

The ESXi 7 System Storage lay-out only consists of four partitions.

  • System boot
    • Stores boot loader and EFI modules.
    • Type: FAT16
  • Boot-banks (x2)
    • System space to store ESXi boot modules
    • Type: FAT16
  • ESX-OSData
    • Acts as the unified location to store extra (nonboot) modules, system configuration and state, and system virtual machines
    • Type: VMFS-L
    • Should be created on high-endurance storage devices

The OSData partition is divided into two high-level categories of data called ROM-data and RAM-data. Frequently written data, for example, logs, VMFS global traces, vSAN EPD and traces, and live databases are referred to as RAM-data. ROM-data is data written infrequently, for example, VMtools ISOs, configurations, and core dumps.

ESXi 7 System Storage Sizes

Depending the boot media used, the capacity used for each partition varies. The only constant here is the system boot partition. If the boot media is larger than 128GB, a VMFS datastore is created automatically to use for storing virtual machine data.

For storage media such as USB or SD devices, the ESX-OSData partition is created on a high-endurance storage device such as an HDD or SSD. When a secondary high-endurance storage device is not available, ESX-OSData is created on USB or SD devices, but this partition is used only to store ROM-data. RAM-data is stored on a RAM disk.

ESXi 7 System Storage Contents

The sub-systems that require access to the ESXi partitions, access these partitions using the symbolic links. For example: /bootbank and /altbootbank symbolic links are used for accessing the active bootbank and alternative bootbank. The /var/core symbolic link is used to access the core-dumps.


Review the System Storage Lay-out

When examining the partition details in the vSphere Client, you’ll notice the partition lay-out as described in the previous chapters. Use this information to review your boot media capacity and the automatic sizing as configured by the ESXi installer.

A similar view can be found in the CLI of an ESXi host. You’ll notice the partitions being labeled as BOOTBANK1/2 and OSDATA.

Boot Media

vSphere supports a wide variety of boot media. This ranges from USB/SD media to local storage media devices like HDD, SSD and NVMe, or boot from a SAN LUN. To install ESXi 7, the following boot media requirements must be met:

  • Boot media of at least 8GB for USB or SD devices
  • 32GB for other boot devices like hard disks, or flash media like SSD or NVMe devices.
  • A boot device must not be shared between ESXi hosts.

Upgrading to from ESXi 6.x to ESXi 7.0 requires a boot device that is a minimum of 4 GB. Review the full vSphere ESXi hardware requirements here. As always, the VMware Compatibility Guide is the source of truth for supported hardware devices.

Note: if you install ESXi 7 on a M.2 or other non-USB low-end flash media, beware that the storage device can be worn out quickly if you, for example, host a VM on the VMFS datastore on the same device. Be sure to delete the automatically configured VMFS datastore on the boot device when using low-end flash media. It is highly recommended to install ESXi on high-endurance flash media.

More Resources to Learn


We are excited about vSphere 7 and what it means for our customers and the future. Watch the vSphere 7 Launch Event replay, an event designed for vSphere Admins, hosted by theCUBE. We will continue posting new technical and product information about vSphere 7 and vSphere with Kubernetes Monday through Thursdays into May 2020. Join us by following the blog directly using the RSS feed, on Facebook, and on Twitter. Thank you, and stay safe!

The post vSphere 7 – ESXi System Storage Changes appeared first on VMware vSphere Blog.

Signing Certificate is Not Valid – Security Token Service Certificate Issue in vSphere

$
0
0

A serious situation is developing for some customers running vSphere 6.5 and newer where the Security Token Service (STS) certificate is expiring after its two year lifespan and causing problems for authentication on vCenter Server. This post is intended to help vSphere Admins identify & repair the problem proactively.

When the STS certificate expires users attempting to log into the vSphere Client will not be able to log in, and will see the error:

HTTP Status 400 – Bad Request Message BadRequest, Signing certificate is  not valid

To quote the vSphere documentation, the Security Token Service “is a service inside vCenter Server that issues, validates, and renews security tokens.” Any time a user logs into vCenter Server they will be issued one of these tokens as part of the Single Sign-on process, which is then used for authentication whenever a request is made.

vSphere protects all communications between services with encryption. To enable TLS encryption you need a certificate, and that certificate is usually issued from the VMware Certificate Authority (VMCA). The VMCA is a part of vCenter Server that automates issuing certificates to these services. Because of industry-wide changes to certificate expiration standards, some certificates issued on some versions of vSphere only had a lifespan of two years, rather than the usual ten-year lifespan for that particular certificate. Normally this would not be a big problem, but three other issues have conspired to complicate this. First, vSphere upgrades do not refresh the STS certificate, so a two-year certificate may have been carried forward during an upgrade and is likely nearing expiration now. Second, there is not an alarm on STS certificate expiration like there is for other certificates, warning of the expiration.

Third, when that certificate expires, vSphere does the right thing and stops trusting the communications with the service, because it no longer has a valid certificate. Unfortunately, that means that logins to vCenter Server, as well as other management operations like certificate management, stop until the STS certificate can be regenerated. Users suddenly start getting the “Signing certificate is not valid” error above at login, and vSphere Admins cannot use the certificate-manager tools to reset the certificates.

How do I know if I am affected?

VMware KB article 79248, “Checking Expiration of STS Certificate on vCenter Server,” has the details on how you can check whether you are affected or not. If you are running vSphere 6.5 or 6.7 the older Flash-based vSphere Web Client is the easiest way to check. The procedure is documented in KB article 79248, and it will look similar to:

Image of the vSphere Web Client and STS Certificates

That KB article also has a Python script that can be run on the vCenter Server to check the certificate lifespan. See below for an illustration of using the “wget” command on the vCenter Server Appliance to retrieve a script and execute it.

There are also some Community-generated assets as well. VMware Code has “Get-STSCerts.ps1” which is a user-contributed example of a way to check the certificate validity through PowerCLI. As with other things on code.vmware.com it isn’t supported by VMware directly, but is the community helping others, which we appreciate very much!

Please note that all of these scripts need to be run against the appliance or system where the VMCA is running. If you have external Platform Services Controllers (PSCs) it will be one of those. If your PSCs have been converged, or those functions are part of vCenter Server, then you will need to run the script there. If there are questions or concerns please engage VMware support.

If this happens to me, what will be affected?

Logins to vCenter Server will be affected, so any system or solution that needs to authenticate will have trouble. Similarly, numerous vSphere management operations that need to verify the validity of a security token would also have trouble (SSO operations, console accesses, etc.). However, workloads running in guest VMs will remain online and accessible, vSphere HA and DRS will continue to function and so on. The ESXi consoles also continue functioning, so in an emergency you can access guest VM consoles and manage workloads that way.

What do I do if I am affected?

First, always feel free to open a support case with VMware’s Global Support Services if you would like assistance resolving problems like this, especially if you have production systems that are down. Our Support Engineers can open a Zoom call with you and restore functionality quickly.

Second, there are two VMware KB articles written to help guide folks handling this situation:

“Signing certificate is not valid” – Regenerating and replacing expired STS certificate using shell script on vCenter Server Appliance 6.5/6.7 (76719)

“Signing certificate is not valid” – Regenerating and replacing expired STS certificate using PowerShell script on vCenter Server 6.5/6.7 installed on Windows (79263)

Both contain scripts that will assist you in fixing this problem. Those scripts are listed in the “Attachments” sections of the KB articles.

If you are using a vCenter Server Appliance you can copy the URL of the attachment and use the “wget” command on the vCenter Server Appliance to download it. Also note that recent editions of Microsoft Windows 10, as well as Apple MacOS 10, have SSH built in. Here is an example of me downloading and renaming the file:

Example of Windows SSH to run the STS script

To get the URL for the “wget” command I right-clicked the attachment in the KB article, chose “Copy Link Address…” and then pasted it in the Powershell window in Windows. This will only work if your vCenter Server has outbound access to the internet, but many people allow that for patching. If your environment does not permit that you will likely need to use the “scp” or “wget” commands from the vCenter Server Appliance itself to retrieve the file from a place on your local network.

We always encourage vSphere Admins to test changes prior to executing them in their production environments, and to ensure they have a backup of their vCenter Server and Platform Services Controllers prior to any work. While it isn’t supported directly, ESXi can run as a guest OS along with vCenter Server, and that makes for a wonderful test environment. It’s how the Hands-on Labs operates, for instance.

What is VMware doing about this?

As you’ve seen we’ve identified a few areas of possible improvement, with certificate expiration length, alarms, and upgrade processes, and we’re looking at how to make those improvements to the product. Our goal in vSphere continues to be making it easy to be secure, and reducing vSphere Admin time spent on administration tasks, so any time we learn of issues like this fixing them is of great concern to us.

As always we thank you for being our customers, and encourage you to reach out through your account teams with feedback or improvement suggestions if you have them. Help us help you!

The post Signing Certificate is Not Valid – Security Token Service Certificate Issue in vSphere appeared first on VMware vSphere Blog.

Announcing vSphere Bitfusion – Elastic Infrastructure for AI/ML Workloads

$
0
0

I am excited to be announcing vSphere Bitfusion today and be delivering it by the end of July 2020 to customers. This has been VMware’s goal since the acquisition of Bitfusion late in 2019. It is now an integrated feature of vSphere 7 and will also work with vSphere 6.7 environments and higher (on the Bitfusion client side – server side will require vSphere 7).

Our customers have been growing by leaps and bounds in terms of the deployment of AI/ML apps and more of those apps are being put on VMware than ever before. We want to accelerate this trend and now have an optimized platform that allows the use of hardware accelerators, such as a GPU, in a way that has never been offered before. vSphere Bitfusion now has a vCenter Server plugin to allow management and configuration from within the vCenter UI.

Let me also address some of the key questions.

What is vSphere Bitfusion?

vSphere Bitfusion delivers elastic infrastructure for AI/ML workloads by creating pools of hardware accelerator resources. The best-known accelerators today are GPUs which vSphere can now use to create AI/ML cloud pools that can be used on-demand. GPUs can now be used efficiently across the network and driven to the highest levels of utilization possible. This means it allows for the sharing of GPUs in a similar fashion to the way vSphere allowed the sharing of CPUs many years ago. The result is an end to isolated islands of inefficiently used resources. End-users and service providers (wanting to off GPU as a Service for example) are going to see big benefits with this new feature.

Image of how Bitfusion Shares GPUs


What operating systems does Bitfusion run on?

Bitfusion runs on Linux for both client and server components. The client side has support for Red Hat Enterprise Linux, CentOS Linux, and Ubuntu Linux while the server side runs as a virtual appliance built on PhotonOS from VMware with vSphere 7.

Does Bitfusion work for desktops, too?

This Linux-based technology is for AI/ML apps running TensorFlow or PyTorch machine learning software and does not apply to graphics or rendering.

Do I have the right workload or environment for Bitfusion?

Walk through the following questions to see if the environment you operate is a good fit:

  • Are you running CUDA applications?

Bitfusion is a CUDA application — it uses the CUDA API from NVIDIA that to allow programmers to access GPU acceleration. Bitfusion technology uses GPUs by intercepting CUDA calls, which means that it does NOT address VDI or screen graphics use cases. It is intended for AI/ML applications using AI/ML software such as PyTorch and Tensorflow. It works well in ML environments that focus upon training and inference.

  • Are you hoping to address low GPU utilization (idle GPUs)? Inefficient GPU use (apps using only a portion of the GPU compute)?

Utilization and efficiency are the major benefits of Bitfusion — greater value from the investment in GPU hardware.

  • Can you meet networking requirements of 10 Gbps+ and 50 microseconds latency or less between the application nodes and GPU nodes?

Where can I find more information?

On June 2, 2020 we are holding an event with Dell to introduce Bitfusion. Please join us, or go to the link afterwards to view the recording! The event will also be available for replay if you cannot make the live broadcast.

VMware is not only discussing Bitfusion but also how we are working with Dell to deliver specific solutions for AI/ML with features like Bitfusion and also with the VMware Cloud Foundation.

VMware also has two additional blog posts on this announcement, on our AI/ML blog:

Can’t wait to get started with Bitfusion? Send us a note at askbitfusion@vmware.com and we can help you get going with the next steps and getting your journey started.

Other Helpful Links:

Go Bitfusion!

As always, thank you.

– Mike Adams, Senior Director, CPBU,  AI/ML Market Development

The post Announcing vSphere Bitfusion – Elastic Infrastructure for AI/ML Workloads appeared first on VMware vSphere Blog.

Announcing Extension of vSphere 6.7 General Support Period

$
0
0

By — Paul Turner, VP Product Management, Cloud Platform Business Unit, VMware


VMware is committed to bringing great products to market that meet our customers’ short and long term needs. This means listening to our customers when designing compelling new products and when we provide world class support throughout the product lifecycle.VMware vSphere Icon


In these challenging times, many customers have reached out to share how their businesses have been impacted by Covid-19. The current business environment has created a climate of uncertainty leading to challenges for IT operations and strategic planning.  While these customers look to resume regular business at some point in the near future, they need stable, non-disruptive operations now to help with that transition to a desired future state.


To help customers with that transition, we are extending the general support period for vSphere 6.7. Originally, vSphere 6.7 was scheduled to reach EoGS (End of General Support) on November 15, 2021. We are extending this date by 11 months, to October 15, 2022.


The original EoTG (End of Technical Guidance) date of November 15, 2023 still applies for vSphere 6.7. There is no change in supportability dates for any other vSphere release.


vSphere 7, released earlier this year, is the biggest enhancement to ESX in over a decade. It includes major new capabilities such as running modern containerized applications natively on vSphere, improved operations capabilities such as workload-oriented DRS, and enhanced intrinsic security.  However, we know it takes time to plan and execute upgrades for vSphere, given how fundamental it is to our customers’ entire IT infrastructure footprint. This is especially true in the current environment.


Our intent for this added period of supportability for vSphere 6.7 is to offer customers worry-free stability and an added buffer period for planning future upgrades as they resume regular operations moving forward.


If you have any questions about this announcement, please reach out to your VMware Representative, your VMware Reseller Partner, or contact VMware Support.


You can learn about the latest innovations and benefits of vSphere 7 on the product website.


Resources:

The post Announcing Extension of vSphere 6.7 General Support Period appeared first on VMware vSphere Blog.

vSphere 7 with Kubernetes Network Service Part 2: Tanzu Kubernetes Cluster

$
0
0

(By Michael West, Technical Product Manager, VMware)

VMware Cloud Native Apps IconvSphere 7 with Kubernetes enables operations teams to deliver both infrastructure and application services as part of the core platform.  The Network service provides automation of software defined networking to both the Kubernetes clusters embedded in vSphere and Tanzu Kubernetes clusters deployed through the Tanzu Kubernetes Grid Service for vSphere.

In Part 1 of this series, I looked at the Supervisor Cluster networking and recommend this blog and demonstration as a pre-requisite for getting the most out of Part 2.  I am going to explore automated networking of the Tanzu Kubernetes cluster through the vSphere Network service – including a video walkthrough at the end of this blog.


vSphere 7 with Kubernetes Services

In Part 1, I discussed the services that are enabled on the Supervisor cluster.   The Tanzu Kubernetes Grid Service for vSphere will provide lifecycle management for DevOps teams wishing to provision their own Tanzu Kubernetes clusters.  Not only does the vSphere Network service orchestrate the Network infrastructure to the cluster nodes using NSX, but implements Calico as the network overlay within the cluster itself.  For a technical overview of vSphere 7 with Kubernetes, check out this video.


VMware Cloud Foundation Services


Kubernetes Custom Resources

Kubernetes is not just an orchestrator of containers, but also an extensible platform that allows the definition of custom resources that can be managed through the Kubernetes API.   A custom resource is an endpoint in the API that holds configuration for any object of a certain Kind.  It is an extension of the API for objects that wouldn’t be in a default installation.  Through the API, among other things, you can create, update, delete and get the objects.  On their own, these resources don’t do anything other than let you store and retrieve information.   If you want to do something with that data, you must define a controller that watches for changes in a custom resource and takes action.  Example:  The vSphere Virtual Machine service is made up of a set of custom resources and controllers.  When a Virtualmachine resource is created in the Supervisor cluster, the virtual machine controller is responsible for reconciling that custom resource into an actual VM by calling the vCenter API.

I have gone through this description because the enablement of Tanzu Kubernetes clusters – and the associated networking – is build on the creation and reconciliation of many custom resources and their corresponding controllers.  I previously created a video that describes the overall process for deploying TK clusters, along with some of the custom resources that are used.


Tanzu Kubernetes cluster

The TK cluster is orchestrated by a set of custom resources that implement Cluster API.  Cluster API is an opensource project in the Kubernetes Lifecycle SIG that manages the lifecycle of Kubernetes clusters using the Kubernetes API.  That API is running in what Cluster API docs refers to as the management cluster.  The management cluster in our environment is the Supervisor Cluster.  The Cluster API implementation includes many custom resources.   I am summarizing the capability by referring to the following three controllers, plus the NSX Container Plugin, when in fact the implementation includes many more.

Tanzu Kubernetes Cluster controller is watching for a custom resource called tanzukubernetscluster and takes the steps to create a set of custom resources that are expected by Cluster API.  This resource implements the easiest way to get a kubernetes cluster by applying a straightforward yaml specification.

CAPW controller  is an abbreviation for Cluster API for Workload Control Plane (WCP) controller.  WCP is how VMware engineers refer to the capability enabled through the Supervisor Cluster.  The CAPW controller is the infrastructure specific implementation of Cluster API.

VM Service controller  is watching for custom objects created by CAPW and uses those specifications to create and configure the VMs that make up the TK cluster.

NSX Container Plugin (NCP) is a controller, running as a Kubernetes pod in the Supervisor cluster control plane.  It watches for network resources added to etcd through the Kubernetes API and orchestrates the creation of corresponding objects in NSX.

Note that each of these controllers run as pods in the control plane of the Supervisor Cluster.


Tanzu Kubernetes Cluster Node Networking


Virtual Network Custom Resource

As the custom resources associated with the cluster nodes are being reconciled, CAPW creates a VirtualNetwork custom resource that holds the network configuration information for the cluster.

NCP is watching for that resource and will reconcile the active state of the environment with the desired state defined in this resource.  That means call the NSX API and create a new network segment,Tier-1 Gateway and IP subnet for the cluster.


Virtual Network Interfaces Custom Resources

As the VM service controller is creating the Virtual Machines for the cluster, it creates a VirtualNetworkInterface resource for each of the VMs.   NCP will create the interfaces on the previously created network segment and update the information in the VirtualMachineNetworkInterface resource.  The VM Service Controller uses that information to configure the virtual NICs on the VMs and add the appropriate IP, MAC and gateway information.


VM Network Interfaces attached to NSX Segment and T1-Gateway


Ingress into Tanzu Kubernetes Cluster

Now that our cluster node VMs are created and have node level network access, we need to configure ingress into our cluster.  The IPs that we just assigned are part of the pod CIDR that was defined at Supervisor cluster creation and are not routable from outside the cluster.

In order to get Ingress, we must create a Loadbalancer with Virtual Servers that are configured with the endpoints of the Control plane nodes.  The Loadbalancer gets an IP from the Ingress CIDR also defined at Supervisor Cluster creation.

The CAPW controller creates a VirtualMachineService custom resource and the VM Service Controller creates a Load Balancer custom resource and a Kubernetes Load Balancer Service.  NCP will translate the Load Balancer custom Resource into an NSX Load Balancer and the Kubernetes Load Balancer service into the NSX virtual servers that hold the endpoint information.  Those endpoints are then updated into the Kubernetes Load Balancer service.

If you are new to custom resources in Kubernetes, this is a lot of information.  The video at the bottom of this blog will show you a little about how it works.

Controllers and Custom Resources


Tier-1 Gateway and Load Balancer


Overlay Networking with Calico

Now our cluster nodes have connectivity and a load balancer to allow traffic to be routed to the control plane nodes of our cluster, but there is no connectivity to pods or services defined within the cluster.  Tanzu Kubernetes clusters use the Container Network Interface (CNI) as the way to connect network providers to Kubernetes networking.  This is a plugin framework that allows for multiple providers.  Initially, Calico is the supported CNI for TK clusters.  Additional CNIs will be added in the future.

Calico runs an agent on each of the nodes in the TK cluster.  The agent has two primary components; Felix and Bird.   Felix is responsible for updating the routing table on the host and really anything else related to providing connectivity for pods or services on the hosts.  Bird is a Border Gateway Protocol (BGP) client.  It is responsible for advertising the routes updated by Felix on a particular node to all of the other nodes in the cluster.


Felix and Bird Update Tables and Advertise Routes


Pod to Pod Communication

One of the requirements for Kubernetes networking is that communication between pods in the same cluster should happen without NAT.  Calico has been implemented with IP-in-IP tunneling enabled.   When pods are created they get a virtual interface (Calixxxx) and an IP from a subnet assigned to the node.  Routing tables are updated by Felix with the IP subnets for each Node in the cluster.

For pod communication between nodes, the traffic is routed to the Tunl0 interface and encapsulated with a new header containing the IP of the destination node.  The node is also configured as a layer three gateway and the Tunl0 traffic goes out the NSX virtual interface, and across the NSX segment assigned to the cluster.  It is then routed to the appropriate node, unencapsulated at Tunl0 and finally delivered to the pod through its Calixxxx veth pair.  NAT would only occur for traffic headed out of the cluster to an external network.


Pod to Pod Across Nodes


Providing Ingress to pods running on TK cluster

TK clusters use the Load Balancer created on cluster deployment to provide Ingress from an external network to pods running in the cluster.  Users create a Kubernetes Load Balancer service on the cluster to provide Ingress.

Because a user with Namespace edit privilege has the cluster admin role on the TK cluster, it might be possible for them to access any credentials stored there.  For that reason, we don’t want to access vCenter or NSX directly from the TK cluster.  Activities that require access – like creating NSX virtual servers or vSphere storage volumes – are proxied to the Supervisor cluster.

This is the process for proxying resources.  There is a TK cluster cloud provider running on the control plane of the TK cluster.  When the Kubernetes Load Balancer service is created on the TK cluster, the cloud provider makes a call to the Kubernetes API on the supervisor cluster to create a VirtualMachineService custom resource.  As described previously, the VirtualMachineService is reconciled into a new Kubernetes Load Balancer Service on the Supervisor Cluster.  The NCP then reconciles that service into the NSX Virtual Server and endpoints needed to access the service.  This results in the user accessing the service through a new IP on the original cluster Load Balancer.


Let’s see it in action!!

That was a lot to retain in a single blogpost.  I look at this in more detail in the video.  For more information on vSphere 7 with Kubernetes, check out our product page:  https://www.vmware.com/products/vsphere.html


The post vSphere 7 with Kubernetes Network Service Part 2: Tanzu Kubernetes Cluster appeared first on VMware vSphere Blog.

Announcing the vSphere 7 Hands-on Labs

$
0
0

VMware Hands-on Labs are hosted lab environments where anyone can try VMware products with no installation or experience required. Each lab is accompanied by a lab manual which guides the user through a set of exercises used to demonstrate product capabilities and use cases. VMware Hands-on Labs are available for free to anyone and are great tools to learn a new product or feature or even study for an exam. And, since these are fully functional lab environments, users have the ability to go off-script and explore, test, and learn as they see fit.

Today we’re announcing three brand new vSphere 7 Hands-on Labs (HOLs for short). These HOLs focus on our latest vSphere offering and allow users to check out its new capabilities without having to download and install in their environments. The new labs are:

These vSphere 7 Hands-on Labs have about three hours of brand new exercises and content to help users learn all about our new vSphere 7 release. If you are interested in vSphere 7 with Kubernetes, we’ll be releasing a fresh, new dedicated vSphere 7 with Kubernetes lab soon.

Also, we just launched a VMware Cloud Foundation 4 Hands-on Lab that is built on vSphere 7. So there is plenty of content to check out and utilize to get your knowledge and skills updated. Leave a comment below to let us know what you think of the new labs!

The post Announcing the vSphere 7 Hands-on Labs appeared first on VMware vSphere Blog.


vSphere 7 – Storage vMotion Improvements

$
0
0

The vMotion feature is heavily updated in vSphere 7, resulting in faster live-migrations while drastically lowering the guest performance impact during the vMotion process together with a far more efficient way of switching over the virtual machine (VM) between the source and destination ESXi host. vSphere 7 also introduces improvements for the Fast Suspend and Resume (FSR) process, as FSR inherents some of the vMotion logic.

FSR is used when live-migrating VM storage with Storage vMotion, but also for VM Hot Add. Hot Add is the capability to add vCPU, memory and other selected VM hardware devices to a powered-on VM. When the VM is powered-off, adding compute resources or virtual hardware devices is just a .vmx configuration file change. FSR is used for to do the same for live VMs.

Note: using vCPU Hot Add can introduce a workload performance impact as explained in this article.

The FSR Process

FSR has a lot of similarities to the vMotion process. The biggest difference being that FSR is a local live-migration. Local meaning within the same ESXi host. For a compute vMotion, we need to copy the memory data from the source to destination ESXi host. With FSR, the memory pages remain within the same host.

When a Storage vMotion is initiated or when Hot Add is used, a destination VM is created. This name can be misleading, it is a ‘ghost’ VM running on the same ESXi host as where the source VM is running. When the ‘destination’ VM is created, the FSR process suspends the source VM from execution before it transfers the device state and the memory metadata. Because the migration is local to the host, there’s no need to copy memory pages, but only the metadata. Once this is done, the destination VM will be resumed and the source VM is cleaned up, powered off and deleted.

As with vMotion, we need to keep the time between suspending and resuming the VM to be < 1 second to minimize guest OS impact. Typically, that was never a problem for smaller VM sizings. However, with large workloads (‘Monster’ VMs), the impact could be significant depending on VM sizing and workload characteristics.

How is Memory Metadata Transferred?

During a FSR process, the most time is consumed in transferring the memory metadata. You can see the memory metadata as pointers for the VM to understand where the data in global system memory is placed. Memory metadata is using Page Frames (PFrames), which provides the mapping between the VM its virtual memory and the actual Machine Page Numbers (MPN), which identifies the data in physical memory.

Because there’s no need to copy memory data, FSR just needs to copy over the metadata (PFrames) to the destination VM on the same host, telling it where to look for data in the system memory.

In vSphere versions prior to vSphere 7, the transfer of the memory metadata is single threaded. Only one vCPU is claimed and used to transfer the PFrames in batches. All other vCPUs are sleeping during the metadata transfer, as the VM is briefly suspended. This method is okay for smaller sized VMs, but could introduce a challenge for large VMs, especially with a large memory footprint.

The single threaded transfer doesn’t scale with large VM configurations, potentially resulting in switch-over times over 1 second. So, as with vMotion in vSphere 7, there’s a need to lower the switch-over time (aka stun-time) when using FSR.

Improved FSR in vSphere 7

So, why not use all the VM its vCPUs to transfer the PFrames? Remember that the VM is suspended during the metadata transfer, so there’s no point in letting the vCPUs stay in an idle state. Let’s put them to work for speeding up the transfer of the PFrames. The VMs memory is divided into segments and each vCPU is assigned a memory metadata segment to transfer.

In vSphere 7, the FSR logic moved from a serialized method, to a distributed model. The PFrames transfer is now distributed over all vCPUs that are configured for the VM, and the transfers run in parallel.

The Effect of Leveraging all vCPUs

The net result of leveraging all the vCPUs for memory metadata transfers during a FSR process, is drastically lowered switch-over times. The performance team tested multiple VM configurations and workloads with Storage vMotion and Hot Add. Using a VM configured with 1 TB of memory and 48 vCPU’s, they experienced a switch-over time cut down from 7.7 seconds using 1 vCPU for metadata transfer, to 500 milliseconds when utilizing all vCPUs!


The FSR improvements strongly depend on VM sizing and workload characteristics. With vSphere versions up to 6.7, there was a challenge with the 1 sec SLA when using Storage vMotion or Hot Add operations. Running vSphere 7, customers can again feel comfortable using these capabilities because of the lowered switch-over times!

More Resources to Learn


We are excited about vSphere 7 and what it means for our customers and the future. Watch the vSphere 7 Launch Event replay, an event designed for vSphere Admins, hosted by theCUBE. We will continue posting new technical and product information about vSphere 7 and vSphere with Kubernetes Monday through Thursdays into May 2020. Join us by following the blog directly using the RSS feed, on Facebook, and on Twitter. Thank you, and stay safe!

The post vSphere 7 – Storage vMotion Improvements appeared first on VMware vSphere Blog.

vSphere 7 with Kubernetes – Shared Infrastructure Services

$
0
0

(By Michael West, Technical Product Manager, VMware)


The early adoption of Kubernetes generally involved patterns of relatively few large clusters deployed to bare metal infrastructure.  While applications running on the clusters tended to be ephemeral, the clusters themselves were not.  What we are seeing today is a shift toward many smaller clusters, aligned with individual development teams, projects or even applications.  These clusters can be deployed manually but more often are the result of automation – either static scripts or CI/CD pipelines.  The defining characteristic is that not only are the applications running on the clusters short lived ie. ephemeral, but the clusters themselves follow the same pattern.VMware Cloud Native Apps Icon

Though Kubernetes clusters may be deployed as on-demand resources, they often need access to core infrastructure services like logging, metrics, image registries or even persistent databases.  These services will tend to be long lived and ideally shared across many clusters.  They also might have resource, availability or security requirements that differ from the “workload clusters” that need to consume them.  In short, infrastructure services may be deployed and managed separately from the workload clusters, but must be easily accessible without the need to modify the application services that rely on them.

Separating application and infrastructure services into separate clusters might seem obvious, but connecting workloads from one cluster to services running in another within Kubernetes can be a little tricky.  This blog and attached demonstration video describe Kubernetes services and how to set up cross cluster connectivity that will allow workload cluster’s applications to consume infrastructure services running on separate clusters.

What is a Kubernetes Service?

As most of you are probably aware, a Kubernetes Service provides a way to discover an application running on a set of pods and expose it as a network service.   Each service gets a single DNS name and provides routing to the underlying pods.  This solves the challenge of ephemeral pods with changing IPs and potential DNS caching issues.  Services are created with a specification that includes a “Selector”.  This Selector includes a set of labels that define the pods that make up the service.  The IPs of the pods that make up the service are added to a Kubernetes object called an Endpoint.   Endpoints are updated as pods die or are recreated with new IPs.   When a service needs access to another service, it does a DNS lookup to the DNS server running within the cluster, then accesses the service via the returned ClusterIP.

In this case the web-app pod needs to access the db service running in a different namespace on the same Kubernetes cluster.   The pod calls the service by specifying the “servicename.namespace.svc.cluster.local” in a DNS lookup.  The DNS server, usually something like core-dns running as a pod in the cluster, returns the cluster IP.  The web-app pod then calls the db service via that cluster IP.  Cluster IP is a virtual IP defined in the cluster.  It has no physical interface, but routing to the underlying pod IPs from this virtual interface is plumbed into the cluster nodes.  This plumbing is specific to the networking that has been implemented for your cluster.   The key points here are that the endpoint object is automatically updated based on the selector defined in the Kubernetes Service and the web-app pod doesn’t need to know anything about those IPs.


What if DB Service and Web-App Service are on different clusters?

If our organization wants to adopt a shared service model where our database services reside on centralized clusters, then web-app would be deployed on a separate cluster.  In the case of vSphere 7 with Kubernetes, the shared database service could be deployed to the Supervisor Cluster and take advantage of the vSphere Pod Service to be deployed as a pod running directly on the hypervisor.  This model provides the resource and security isolation of a VM, but with Kubernetes pod and service orchestration.  The Web-App could be deployed onto a Tanzu Kubernetes cluster.  The TK cluster is deployed via the Tanzu Kubernetes Grid Service for vSphere and provides a fully conformant and upstream aligned Kubernetes cluster for non-shared infrastructure components of the application.  Note that we could have just as easily used another TK cluster to run the database pods.  The point here is the separation of application components across clusters.


Once deployed onto the TK cluster, the web-app pod attempts to call the db service, but the DNS lookup fails.  This is because the DNS server is local to the cluster and does not have an entry for the db service running on the Supervisor Cluster.  Even if it did have an entry, the Cluster IP of the db service returned would not be a routable IP that could be accessed from the TK cluster.  We have to solve those two problems in order to make this work.


Exposing the db Service outside the cluster

The first thing that we need to do is provide ingress to the db service from outside the cluster.  This is standard Kubernetes service capability.  We will change the service to be of Type LoadBalancer.  This will cause NSX to allocate a Virtual Server for the existing Supervisor Cluster Load Balancer and allocate a routable ingress IP.  This IP comes from an Ingress IP range that was defined at Supervisor cluster creation.


Creating Selectorless Service with the Tanzu Kubernetes cluster

Once the db service is made accessible from outside the cluster, we need a way for the Web-App service to discover it from the TK cluster.  This can be done through the use of a Selectorless service.  Remember that the Endpoint object holds the IPs for the pods associated with a service and is populated via the Selector Labels.  In our example above, all pods labeled with app: db are part of the db service.   When we create a service without a Selector, no endpoint object is maintained automatically by a Kubernetes controller, so we populate it directly.   We will create a Selectorless Service and an Endpoint.  The endpoint will be populated with the Load Balancer VIP of the db service.


Now our web-app can look up the db service locally and the DNS will return the Cluster IP of the local service, which will be resolved to the Endpoint of the Load Balancer associated with the db service on the Supervisor Cluster.


Distributed Microservice application with shared infrastructure services.


Now let’s expand this concept to an applications with several services deployed across clusters.  ACME Fitness Shop is a demo application composed of a set of services to simulate the function of an online store.  The individual services are written in different languages and are backed by various databases and caches.  You can learn more about this app at https://github.com/vmwarecloudadvocacy/acme_fitness_demo.  We will deploy the application with the databases centralized to the Supervisor cluster and running as native pods directly on ESXi, while the rest of the application workloads are deployed to a TK cluster managed through the Tanzu Kubernetes Service for vSphere.

ACME Fit Services


The process is the same as in the previous example.  The database pods are deployed to the Supervisor cluster, along with Load Balancer services for each of them.

Selectorless services are created on the TK cluster, with the endpoints updated to the Virtual IPs of the corresponding Load Balancer service for the database running on the Supervisor Cluster.  The rest of the non-database application services are also deployed on this TK cluster.


Selectorless Services:


Endpoints for the Services:


Let’s see it in action!!

This video will walk through a simple example of shared infrastructure services and then actually deploy the ACME Fit application in the same way. For more information on vSphere 7 with Kubernetes, check out our product page:  https://www.vmware.com/products/vsphere.html


The post vSphere 7 with Kubernetes – Shared Infrastructure Services appeared first on VMware vSphere Blog.

AI/ML, vSphere Bitfusion, and Docker Containers—A Sparkling Refreshment for Modern Apps

$
0
0

We discuss in this article the use of containers for running AI and ML applications and why these applications might benefit from sharing access to remote and partial GPUs with VMware vSphere Bitfusion. The bulk of this blog, however, will be a detailed example of how to run a TensorFlow application in a containerized Bitfusion environment with remote GPU access.

Why Artificial May be the Real Thing

Artificial Intelligence and Machine Learning (AI/ML) applications are proliferating at an extraordinary rate because of their potential to perform “mental” tasks that traditional computation could not do well. They automate, at low cost, tasks that only people could perform before, not to mention tasks that could not be done at all. They may do these tasks with greater speed, consistency, and with no fatigue. If you need a general-purpose description, AI/ML works by throwing large collections of data (images, financial records, email chains or other text, statistical data on freeway traffic, etc., etc.) into the maw of statistical other computational models that gradually learn, “by themselves,” to identify trends and patterns in that type of data.

AI/ML applications make new products and services possible and make existing products and services better. Companies pursue AI/ML so they can be first to market and for fear of being left behind. Let’s list just a very few examples, let you draw your own conclusions, and leave it there.

Table 1: examples where AI/ML apps show results or promise

Consumer Corporate
Spam filters Fraud detection
Malware protection Inventory
Traffic navigation Shipping
Facial recognition (e.g. social media photos) Customer support
Product recommendations Sales and market opportunities
Personal digital assistants Search engine refinement


You’ll probably note that the division between the consumer and corporate apps is not that sharp.

The Container Challenge

What’s the deal with containers? They are part of that landscape that supports “modern apps”. The modern app, definitionally, can be a little fuzzy, but from a certain perspective you can think of it as just a list of demands that must be fulfilled so the app can keep its company from bankruptcy. It must run somewhere where it can be updated all the time. It must be broken into modular microservices (for modular testing, to isolate issues, to support frequent changes, to increase performance through concurrency). It must be fault tolerant. Each microservice must be written in the language and environment best suited for itself. It must be high-quality. This list goes on.

Containers help meet those demands. For example:

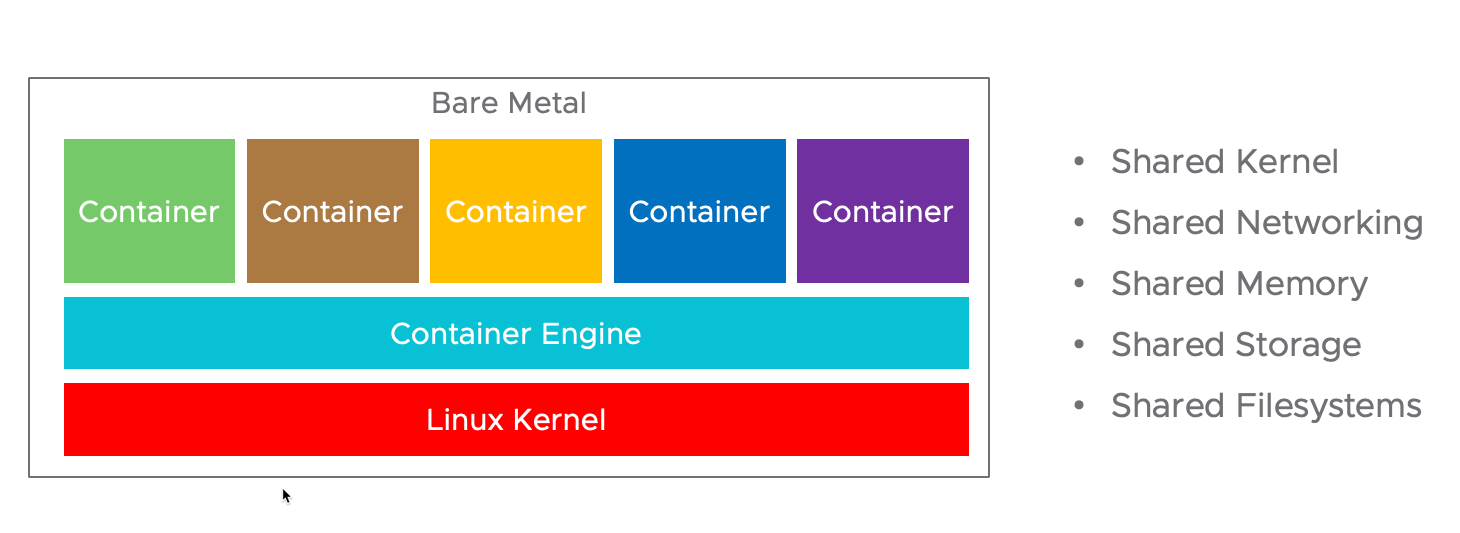
  • Each microservice runs its own container, with each container providing the unique system libraries, code, and tools that that service needs
  • Containers are lightweight; they do not consume the memory and compute power of a full OS or VM, so you can run more of them on a given set of hardware
  • They boot up instantaneously (to us humans, anyway—we are told time does elapse); making it easy (or easier) to kill and relaunch any service gone rogue, to launch new instances in response to demand, and to invisibly roll out updates.
  • They let you move the apps and services from place to place, from development to test to production. From private cloud to public cloud. But to the code running inside, nothing changes. You must work hard to introduce new problems and issues.

The Most Original Software Ever in the Whole Wide World

Since AI/ML is a new type of application, we should look at its requirements and make sure we can meet them. There are two requirements we are considering here.

You will likely want to run your app in containers. AI/ML applications often fall into the modern app camp. They interface with many other services all needing unique environments. Non-uniformity might be their call sign: non-uniform library dependencies for different models, non-uniform language requirements, non-uniform GPU requirements, non-uniform traffic, non-uniform scaling requirements. They may need to loop through training and inference at high frequency.

You will likely want to use hardware acceleration (a GPU, typically) to run your AI/ML application. The amount of computation to run these applications is one, two, or more orders of magnitude greater than traditional ones. An application running on a CPU might take an hour of time to do what you can do in 10 seconds on a GPU. Think of running thousands and thousands of operations on every pixel of thousands and thousands of high-definition pictures to get an idea of the scale. GPUs can perform the necessary type of math on hundreds of highly parallel cores. GPUs scale those orders of magnitude back down into a useful time domain.

Fortunately, it is easy enough to meet both of these requirements at the same time. You can buy GPUs, employ the software switches to pass them into container, and hand them over to the app running within.

But there is always one last requirement. Money.

Bitfusion Gives you Wings

GPUs have traditionally been difficult to share. As a piece of hardware sitting on a bus, only the software running local to that bus has been able to access it. If you move the software, you lose access. Even worse, two virtual machines, both running locally to a GPU, cannot share it. A GPU must be passed exclusively to one VM or the other. Compounding that, a single user, VM, or application seldom uses the GPU efficiently. It is not atypical for GPUs to sit idle 85% of the time. The industry average on this is hard to obtain, and it varies a lot from use-case to use-case. But if the price of a GPU seems high, it seems even higher when it is underutilized to this extent.

Enter VMware vSphere Bitfusion. It lets you share GPUs in two ways. Bitfusion sets up a pool of GPU servers, and gives GPU access, remotely, across the network, to applications or microservices running on client VMs or containers set up for each piece of software. GPUs, over the course of time, can “fly” from one application to another, being allocated and deallocated dynamically whenever an application needs hardware acceleration. Bitfusion also partitions GPUs into fractions of arbitrary size (it is the GPU memory that is partitioned), so the GPU can be used concurrently by multiple applications. All this raises the utilization and efficiency of the precious GPU resources.

These types of sharing address not only modern apps and acceleration requirements, but cost concerns too. You get to eat your cake, have it too, and give your sister a slice of her own.

The Brew that is True

At this point you are either itching to run an ML app in a container with Bitfusion or wondering how you ended up in an alternate universe reading a blog you are sure you already stopped perusing (if the latter, take the time, instead, to see if the humor in a 64 year-old movie holds up). So here is the fastest recipe we know to run a containerized TensorFlow benchmark using remote GPUs with Bitfusion. We will assume you have already followed the Bitfusion Installation Guide and created a Bitfusion cluster. (At the time of this writing Bitfusion is just a few weeks from release, and the example below will use beta code)

This recipe uses an NGC base image from NVIDIA. The NGC image comes with most of the software you need, has ensured the software versions are mutually compatible, and has tested everything for stability and completeness. The additional steps you need to take for Bitfusion are few.

We will use the TensorFlow_Release_19.03 NGC image. Its major components are Ubuntu 16.04, CUDA 10.1, and TensorFlow 1.13.0. For complete details see https://docs.nvidia.com/deeplearning/frameworks/tensorflow-release-notes/rel_19.03.html#rel__19.03.

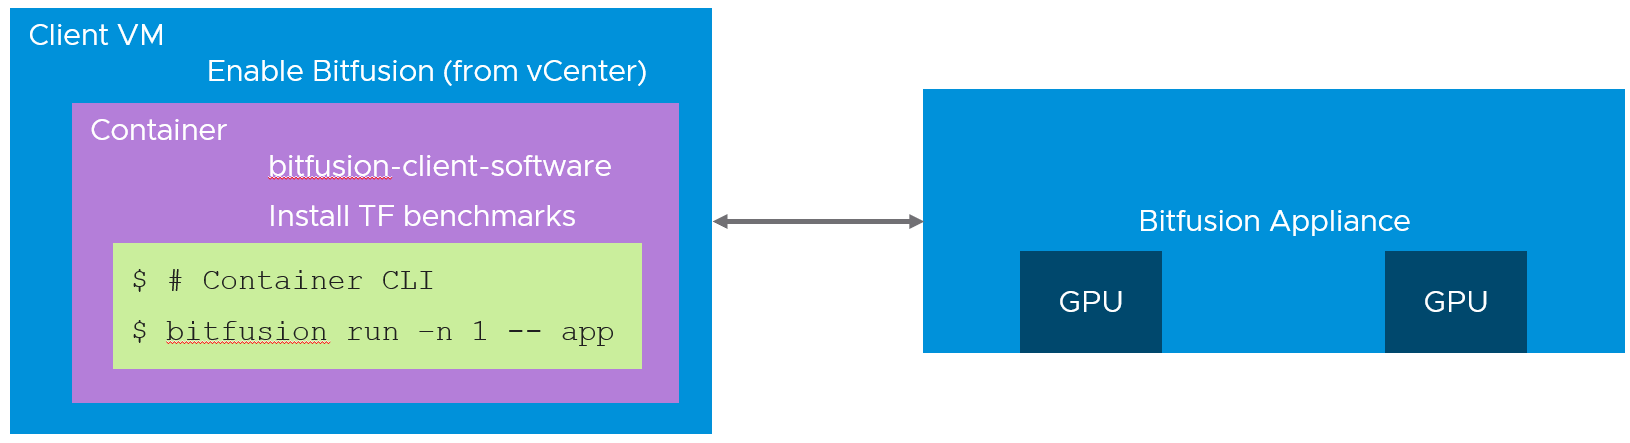
The goal here is to run a containerized ML application (TensorFlow) using virtual GPUs provided by Bitfusion. The major steps are:

  • Enable the Client VM to use Bitfusion
  • Install the Bitfusion client software in the container
  • Install the ML application (we’ll use the public TensorFlow benchmarks)
  • In the container, use Bitfusion to run the ML application
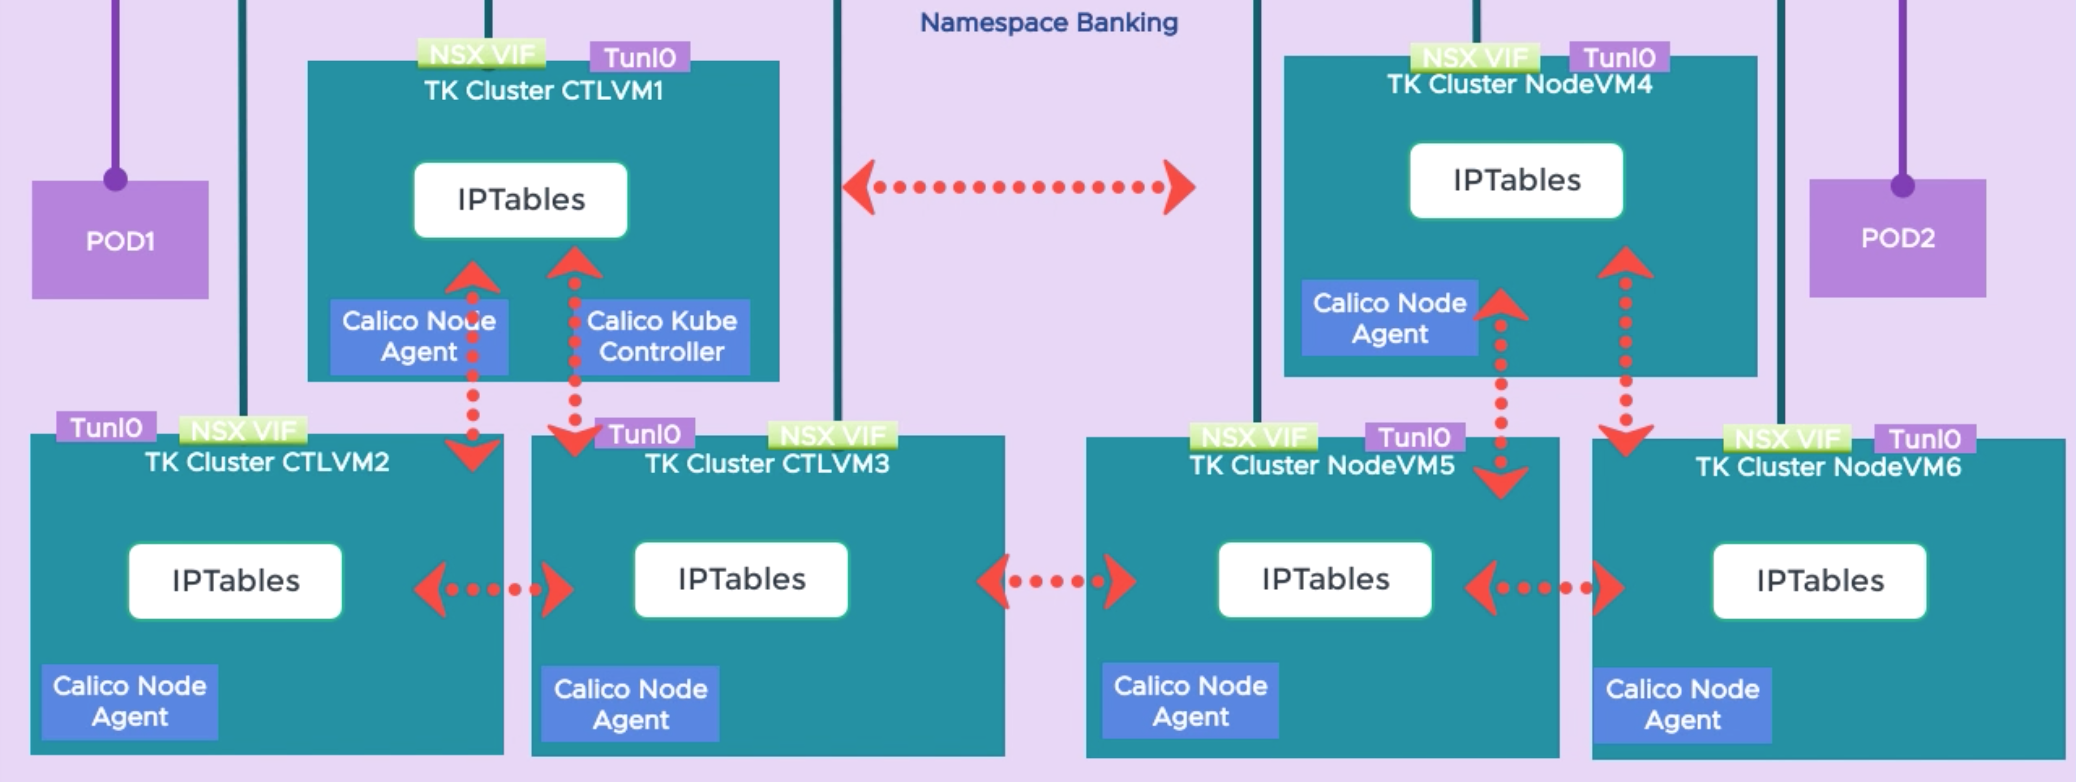
Image showing the nesting of a Bitfusion container in a VM and also the Bitfusion server

Figure 1: Bitfusion nested in container

For the sake of completeness, this document will also show how to install Docker, but we encourage you to visit the Docker website if you want the latest, official instructions.

The process demonstrated here will use a Dockerfile to create the container. You can follow the steps in the Dockerfile to do it by hand if that allows you to explore or modify the process for your situation.

The Dockerfile assumes the existence in your current directory of the Bitfusion client deb package (for Ubuntu 16.04).
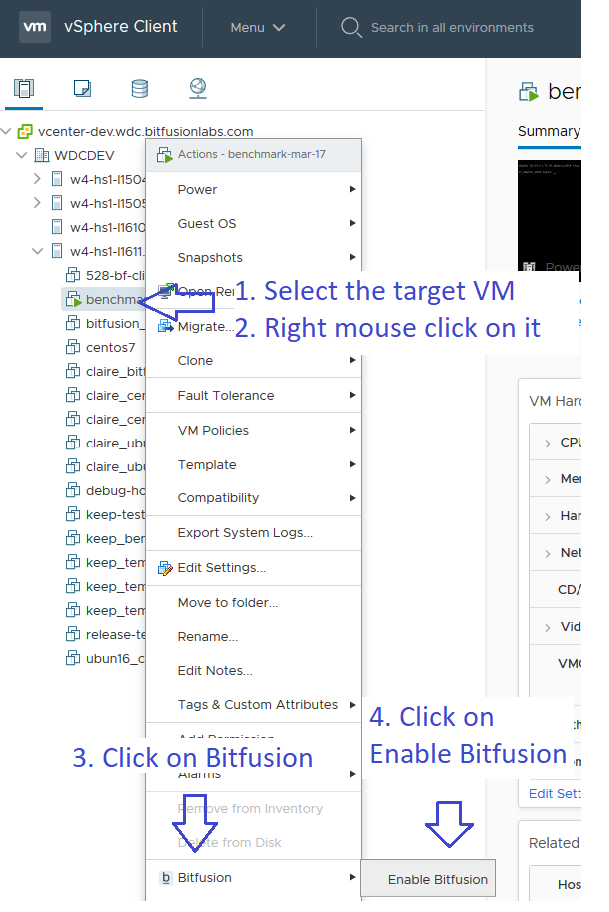
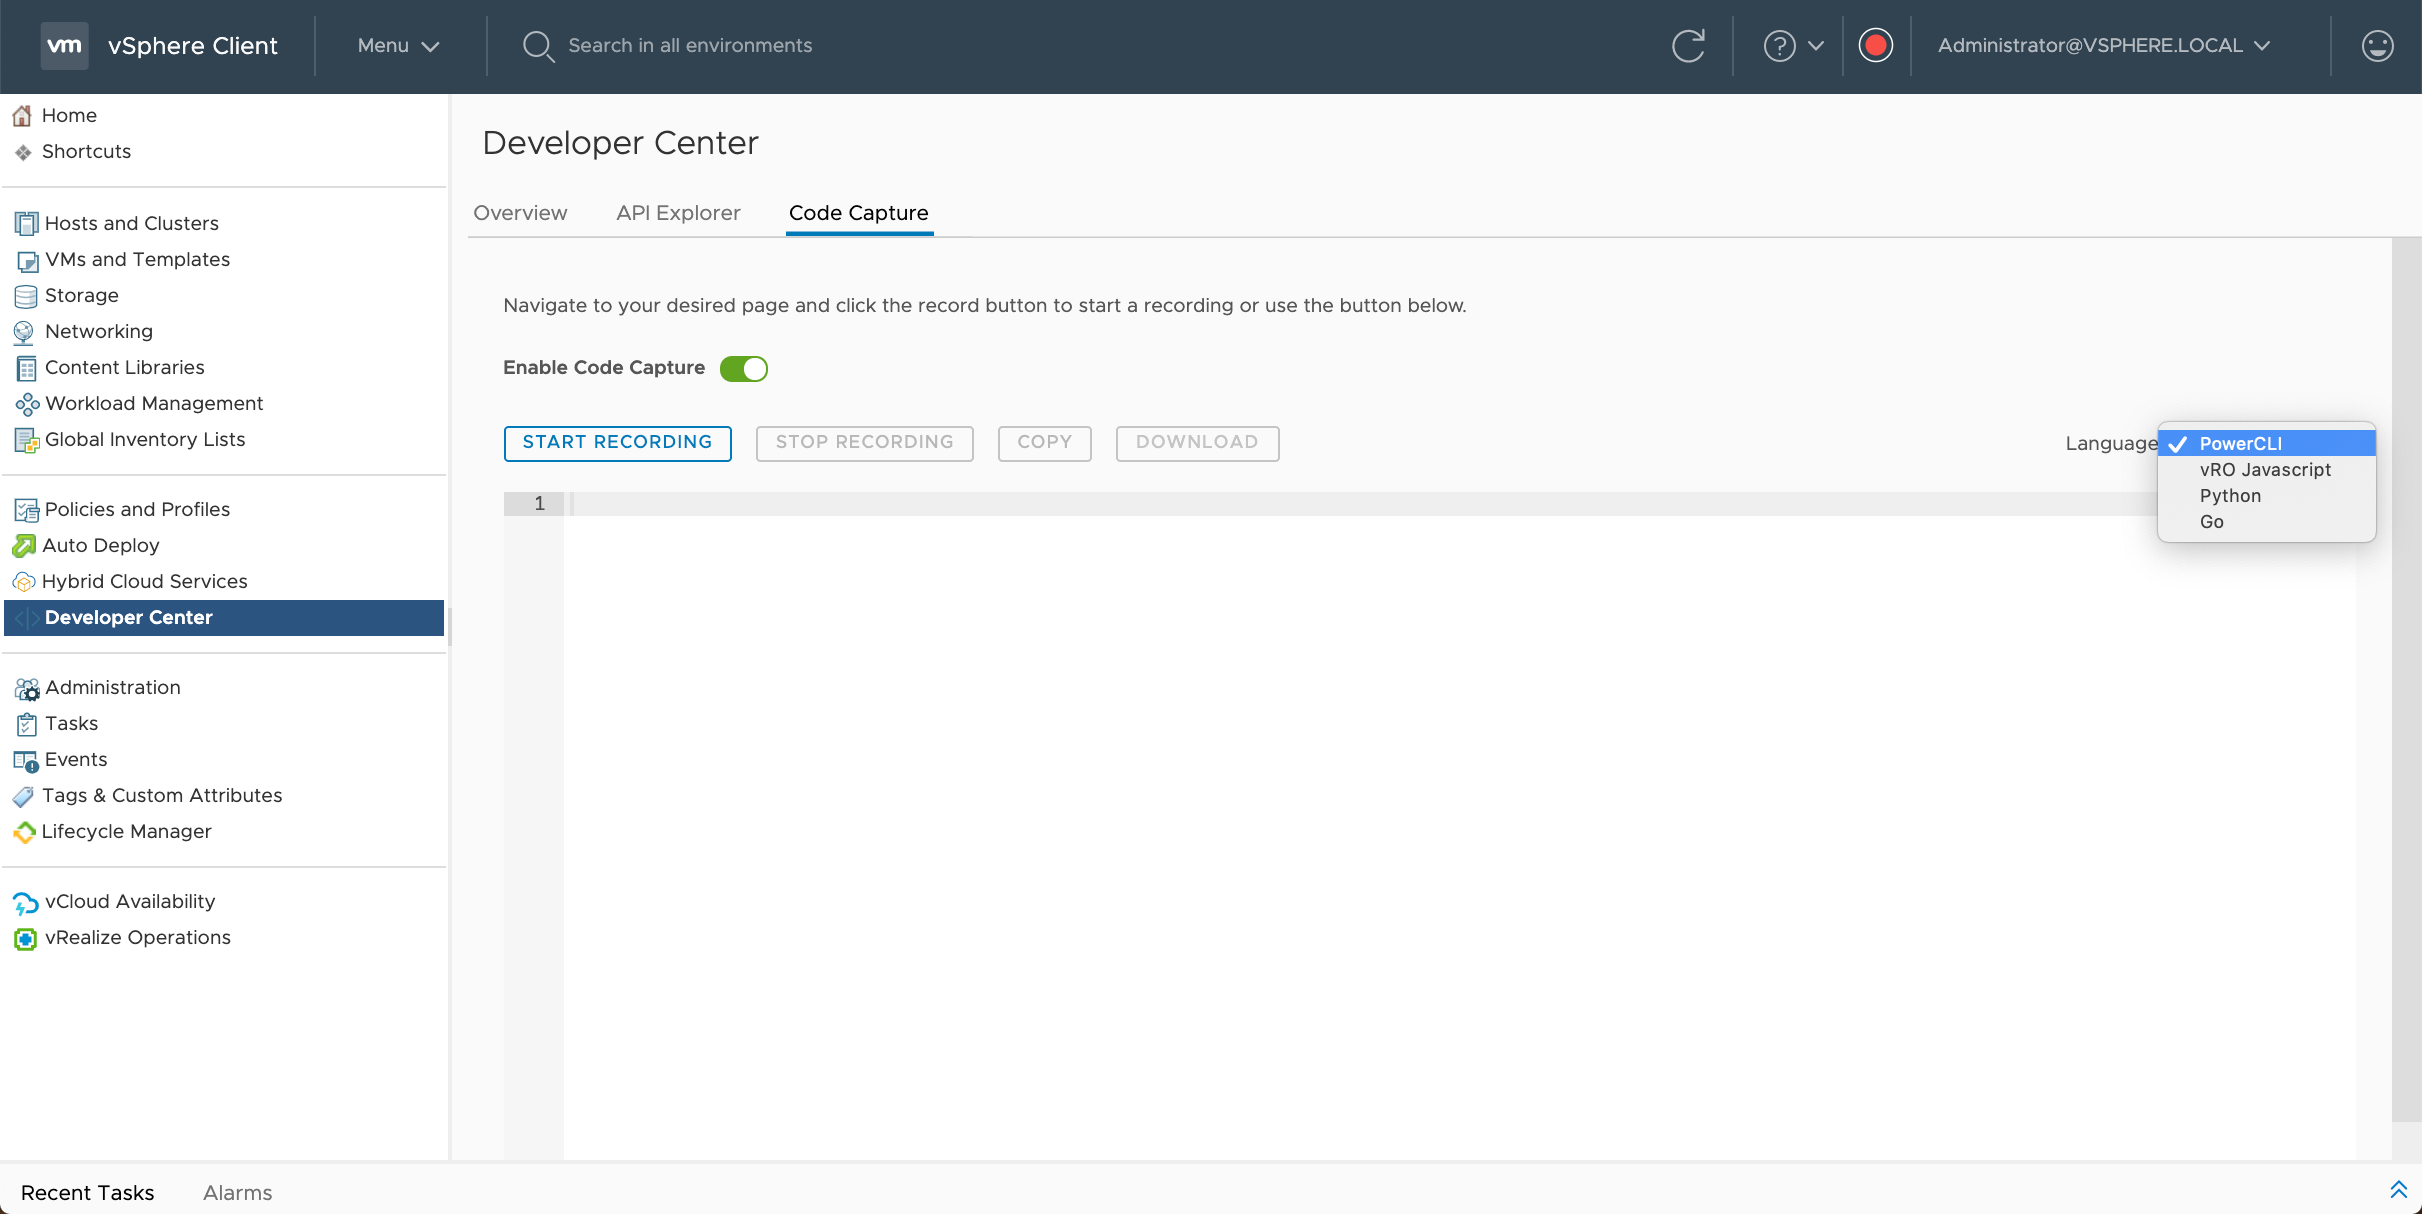
1. Enable Bitfusion

Use vCenter to configure and authorize the client VM where you will run your container:

  • In vCenter on the “Hosts and Clusters” view, select client VM (where you will run your container)
    rightclick → Bitfusion → select “Enable Bitfusion”
    In the dialog box, confirm with the “Enable” button
Image showing how to enable a Bitfusion client

Figure 2: Enable Bitfusion for client VM

2. Install Docker

Bitfusion runs on Ubuntu 16.04 and 18.04 and on CentOS 7 and RHEL 7 distributions. Below are instructions for installing docker. See the Docker website for details and official guidance.

A. Ubuntu

sudo apt-get update
sudo apt-get install -y docker.io
sudo systemctl start docker

# Make docker start on every reboot
sudo systemctl enable docker

sudo docker run hello-world
docker version
# Reports version 19.03.6 at this writing

B. CentOS and RHEL

# On CentOS you may need to install epel as a pre-requisite?
# sudo yum install -y epel-release

sudo yum install -y yum-utils
sudo yum-config-manager --add-repo \
   https://download.docker.com/linux/centos/docker-ce.repo
sudo yum check-update
sudo yum install -y docker-ce docker-ce-cli containerd.io
sudo systemctl start docker

# Make docker start on every reboot
sudo systemctl enable docker

sudo docker run hello-world
docker version # Reports 19.03.8 at this writing

3. Examine the Dockerfile

In one directory have two files. At this writing the Bitfusion package can be obtained from the VMware Bitfusion beta community site. After GA, packages will be available at a repository:

  • bitfusion-client-ubuntu1604_2.0.0beta5-11_amd64.deb
  • The Dockerfile (shown further below)

Here is the Dockerfile.

FROM nvcr.io/nvidia/tensorflow:19.03-py3

MAINTAINER James Brogan &lt;someone@somewhere.com&gt;

#  Set initial working directory
WORKDIR /home/bitfusion/downloads/

# Update package list
RUN apt-get update

# Install Bitfusion. Assumes deb for Ubuntu16.04
# resides in mounted directory, /pkgs
COPY bitfusion-client-ubuntu1604_2.0.0beta5-11_amd64.deb .
RUN apt-get install -y ./bitfusion-client-ubuntu1604_2.0.0beta5-11_amd64.deb
# Must run list_gpus to pull in env and tokens
RUN bitfusion list_gpus

# TF benchmarks
WORKDIR /home/bitfusion/
RUN git clone https://github.com/tensorflow/benchmarks.git
#  Set working directory
WORKDIR /home/bitfusion/benchmarks/
RUN git checkout cnn_tf_v1.13_compatible

#  Set working directory
WORKDIR /home/bitfusion/

Points to note:

  • Creates a container from NVIDIA’s NGC base image, tensorflow:19.03-py3
  • Installs the Bitfusion client software and tests its list_gpus command (this will also initialize the tokens and certificates needed to communicate with the Bitfusion servers)
  • Installs TensorFlow benchmarks from a public repo and checks out a compatible branch

4. Build the Image and Container

Below are two Docker commands. The first command builds an image we name, bfbeta-ngc1903-ub16-tf1-13. The second command, run, will give you a command line in the container instance of this image. The run command mounts two host directories in the container:

  • /data – this directory contains a data set of images. You may or may not have a similar dataset available to you.
  • /dev/log – this directory is not required, but is one means of avoiding warnings you’ll otherwise see when Bitfusion, inside the container, is prevented from logging to the syslog.

# The Docker build will take a couple of minutes, but only the first time
sudo docker build -t bfbeta-ngc1903-ub16-tf1-13 .

sudo docker run --rm --privileged --pid=host --ipc=host \
   --net=host -it \
   -v /data:/data \
   -v /dev/log:/dev/log \
   bfbeta-ngc1903-ub16-tf1-13


5. Run TensorFlow Benchmarks

After the previous step, your prompt will be inside the container and you will be root.

Now you can run TensorFlow benchmarks, invoking them directly or with convenience scripts. Two commands are show below, one assumes you have a data set, while the second uses synthesized data. Note: the bitfusion run command uses the -n 1 option to allocate 1 remote GPU for the benchmark, thus matching the number of GPUs that the benchmark itself expects to use due to its option, –num_gpus=1.

cd /home/bitfusion

# TensorFlow benchmark assuming an imagenet dataset
bitfusion run -n 1 -- python3 \
./benchmarks/scripts/tf_cnn_benchmarks/tf_cnn_benchmarks.py \
--data_format=NCHW \
--batch_size=64 \
--model=resnet50 \
--variable_update=replicated \
--local_parameter_device=gpu \
--nodistortions \
--num_gpus=1 \
--num_batches=100 \
--data_dir=/data \
--data_name=imagenet \
--use_fp16=False


# TensorFlow benchmark with no dataset (use synthesized data)
bitfusion run -n 1 -- python3 \
./benchmarks/scripts/tf_cnn_benchmarks/tf_cnn_benchmarks.py \
--data_format=NCHW \
--batch_size=64 \
--model=resnet50 \
--variable_update=replicated \
--local_parameter_device=gpu \
--nodistortions \
--um_gpus=1 \
--num_batches=100 \
--use_fp16=False

Obey your Wurst

Going against the best advice, everyone eventually asks, “What’s in the sausage?” In this case, the caution seems unwarranted. We’ve seen a wholesome mix of technologies stuffed in a wrapper of low-denomination bills. We can run a modern ML application, we can run it in the environment made for it—containers—plus, we can run it with hardware acceleration. And vSphere Bitfusion delivers this mix with shared GPUs, making everything very affordable and efficient. We also note that the steps to do this, or the Dockerfile to set this up, are simple and minimal.

The post AI/ML, vSphere Bitfusion, and Docker Containers—A Sparkling Refreshment for Modern Apps appeared first on VMware vSphere Blog.

vSphere Releases 7.0b and 7.0bs

$
0
0

Last week we released two new update versions for vSphere 7.0. When examining the vSphere Lifecycle Manager (vLCM) image repository, you’ll notice that two new ESXi base images are automatically downloaded, reflecting the downloads that are available on my.vmware.com.

There could be some confusion to why we released two versions. With vSphere 7 updates, we’ll also release security only releases (pre-security patches/updates). The rationale here is that there are customers that are unable to upgrade their systems with bug fixes until the changes have been qualified. The qualification process can take a long time.

At the same time, these customers need security fixes installed as soon as possible. Their rules of operation allow for the installation of security patches without long qualification testing. These customers have requested that a security only version of ESX patches be created for every ESXi minor version releases.

Name and Version Release Date Category Detail
ESXi 7.0b – 16324942 06/16/2020 Enhancement Security and Bugfix image
ESXi 7.0bs – 16321839 06/16/2020 Enhancement Security only image

The release notes include this information as well. The 7.0b version includes the security and bugfixes, the 7.0bs version only includes the security fixes.

Speaking of the new releases, another interesting update is that several Cisco hosts are now supported for vSphere Quick Boot. Consider to enable quick boot to save a lot of time patching your hosts using either vSphere Update Manager (VUM) or vLCM! Do note that enabling quick boot disables some security features like Trusted Platform Module (TPM).

The post vSphere Releases 7.0b and 7.0bs appeared first on VMware vSphere Blog.

vSphere 7 – APIs, Code Capture, and Developer Center

$
0
0

VMware vSphere 7 has been extremely popular since its release, bringing many new enhancements and features to virtual infrastructure (we’ve highlighted many of the updates on this blog!). There are some enhancements to the vSphere APIs, Code Capture, and the vSphere Developer Center features that make those easy-to-use tools even more powerful for people interested in automating their environments. I’d like to shine a light on all three of them in this post.

Let’s start with Developer Center, a single point of entry for developers and vSphere Admins that provides tools to manage and test APIs as well as capturing vSphere Client actions into usable code snippets. While in the vSphere Client the Developer Center shows off API Explorer & Code Capture as it did in vSphere 6.7, but with a few enhancements. The first thing noticeable is an updated Overview page describing Developer Center in more detail than in past vSphere versions and also highlighting its capabilities.

API Explorer

API Explorer was introduced in vSphere 6.5 and allows customers to browse and invoke vSphere REST APIs and provides information about the API endpoints. Accessing API Explorer has changed since its inception. In the past, it was recommended to browse to https://<vCenter-Server-FQDN>/apiexplorer (this method is still valid in vSphere 6.5, 6.7, and 7.0) login with the vSphere SSO Domain administrator credentials, then browse and use the APIs of a selected endpoint. In vSphere 6.7, API Explorer was moved to the Developer Center which allowed for APIs to be executed directly from within the vSphere Client versus using the older method of vSphere 6.5.

It’s also important to note that the available API endpoints in vSphere 6.7 are:

  • vAPI: calls for vSphere APIs
  • vCenter: calls regarding vCenter Server (Datastore/Cluster/VM settings/VCHA/etc)
  • Content: calls for Content Library
  • Appliance: calls for the VMware appliance (VCSA access/health/backup/etc)
  • CIS (Common Infrastructure Services): calls pertaining to tagging (tag creation/categories/association/etc)

In vSphere 7, API Explorer did not change much in functionality but it did add a few new API endpoints that were not available in vSphere 6.7. The API endpoints from previous versions (vAPI, vCenter, Content, Appliance, and CIS) are included in vSphere 7 along with two new endpoints:

  • ESX: calls regarding host operations (vSphere Lifecycle Manager/HCL/Host Settings/etc)
  • Stats: calls regarding vStats (WARNING!! These APIs are in Technology Preview and may not work in all environments)

With API Explorer open, you can choose an API endpoint from your environment and execute the REST API.  Details of the parameters, expected responses, and response status codes, exposed against the live environment. The APIs available will always depend on the role of the selected endpoint. In this example below, we can run a GET on the VM endpoint to show virtual machines in the environment.

When executed with API Explorer we can get a JSON file export of the data that will look similar to this. In the first image, we have the JSON export view of the VMs in this lab.

In the second image, we can see the vSphere Client view of VMs for comparison.


Code Capture

Code Capture or known sometimes still known as Onyx records user actions and is able to translate them into executable code. What started out as part of the vSphere HTML5 Web Client Fling, is now baked into the vSphere Client and has been since vSphere 6.7.

To begin using Code Capture it must first be enabled in the vSphere Client. After navigating to the Developer Center clicking on the Code Capture tab will bring up the below screen where the feature can be turned on.

Enabling Code Capture opens up the interface to begin recording your actions in the vSphere Client.

Select a starting output language from the following new choices in vSphere 7:

  • PowerCLI
  • vRO Javascript
  • Python
  • Go

Click Start Recording to begin.

We can now see that Code Capture is on and recording our actions in the vSphere Client and will output as PowerCLI when complete.

When done recording the desired actions, click Stop Recording or the red button in the top right of the vSphere Client to complete the “capture” of usable code. One of the great things added in vSphere 7 for Code Capture was the output of more than just PowerCLI code. When the output is displayed we can now toggle between the 4 available code types. This animation shows what this may look like. Pretty awesome in my book!

Wrap Up

vSphere 7 is full is many new features and enhancements, API Explorer and Code Capture are just two components with some great capabilities. To learn more about what’s new in vSphere, please visit our vSphere 7 page on our blog.

For more information on Developer Center, API Explorer, and Code Capture please visit these resources:


We are excited about vSphere 7 and what it means for our customers and the future. Watch the vSphere 7 Launch Event replay, an event designed for vSphere Admins, hosted by theCUBE. We will continue posting new technical and product information about vSphere 7 and vSphere with Kubernetes Monday through Thursdays into May 2020. Join us by following the blog directly using the RSS feed, on Facebook, and on Twitter. Thank you, and stay safe!

The post vSphere 7 – APIs, Code Capture, and Developer Center appeared first on VMware vSphere Blog.

Viewing all 626 articles
Browse latest View live


<script src="https://jsc.adskeeper.com/r/s/rssing.com.1596347.js" async> </script>