Quantcast
Channel: VMware vSphere Blog
Viewing all 626 articles
Browse latest View live

The Importance of Isolation for Security

$
0
0

VMware AppDefense IconI have wanted to write about the importance of isolation & segmentation in IT infrastructure for a while now, but with everything going on this year it felt like it would be redundant. However, over the last few months there have been several high-severity, high-profile CVEs (some ours, some others, and some in hardware, too) that are really shining a spotlight on the need to design IT infrastructure with more isolation in mind.

Before we get in real deep I’d like to start at the beginning. What do I mean when I say “isolation?” I like to start with the Principle of Least Privilege, which is the idea that a user or application should only have the privileges on a system that are essential for them to complete their intended function. In practice we often think of it as not giving people root or administrator rights on a system and using the permission models to give them rights to what they need to access. One privilege is the ability to access management interfaces on computer systems, and in general, people in an organization who are not system administrators do not need access to those interfaces. As such, we isolate them so that we can add controls like firewalls & ACLs as a security boundary. Should a desktop in your organization be compromised by malware, the attacker would need to do considerably more work to access infrastructure that has been isolated in this way.

The other information security principle that factors in here is called “Defense in Depth.” Defense in depth is the idea that multiple overlapping layers of security controls are used throughout an organization so that if one fails or is temporarily weakened the organization is not left defenseless. We can implement network-based firewalls to control access to our organization at a high level, and then use NSX-T to add very granular rules at the VM level to provide additional coverage should an attacker make it past the outer defenses. Should an attacker make it past those, too, we practice good account hygiene and have strong passwords or multi-factor authentication to prevent them from logging in. We patch our guest operating systems and applications so we don’t give attackers opportunities there, and we also send our logs out to a log collection & reporting tool like vRealize Log Insight which can alert us to failed authentication attempts and allow us to act. With all these levels of protection, when a vulnerability is discovered we are often afforded some time to fix it, because we can rely on the other defenses to cover us for a bit until we’re back at full strength. That is defense in depth.

All that said, adding isolation is to add separations between the components of an IT infrastructure so that we can add security controls to them more granularly, prevent people who don’t need access from having access (insider threats), and add layers to our defenses to slow down and counteract breaches that may occur.

Ways to Add Isolation to vSphere

Isolation in our infrastructure comes in many different forms. One form is the protections that CPUs and compute hardware provide so that one VM cannot snoop on what another VM is doing. CPU vulnerabilities over the last few years have demonstrated gaps in that, and have been mitigated with new hardware firmware and software techniques (see “Which vSphere CPU Scheduler to Choose” for more information on what vSphere offers to help this on vulnerable hardware). Patching your system firmware is a huge step toward resolving these types of issues, as well as other issues affecting hardware management.

Another form is where there are clearly defined boundaries between systems. Authentication and authorization are good examples of this. Organizations often rely on Microsoft Active Directory for their authentication, providing benefits for single sign-on and central account management. However, you lose isolation between the systems when you use Active Directory for authorization, too. Someone with privileges in Active Directory can affect who can access other parts of infrastructure, even if they’re not authorized to. This is most often seen where organizations use an Active Directory group to control access to vCenter Server. To add isolation between vSphere and Active Directory use a vSphere SSO group instead, adding Active Directory accounts to it. This way you still keep single sign-on and centralized control, but an attacker who gains access to Active Directory cannot simply add themselves to vSphere and log in. To compromise vSphere they will have to do more work to find and compromise a vSphere Admin’s account, which increases the odds their actions will be noticed by you!

The last big form of isolation is network segmentation. At a very basic level you can add additional network interfaces to your ESXi hosts, enabling you to separate management traffic from VM & workload traffic. If you imagine that adding a ton of extra NICs to a server is an unwieldy sort of thing you’d be right, which is why some clever networking folks created the idea of a “virtual LAN” or VLAN. VLANs do to a network link what ESXi does to compute hardware: virtualize it. VLANs are identified by a number, 0 through 4095, which is added to each network frame sent as a “tag” – why you will often hear it referred to as VLAN tagging. On a network switch, each port can be assigned to a single VLAN, or to multiple VLANs in what is known as a “trunk.” On the ESXi side of this you access these trunks by creating port groups and specifying which VLAN you want them to be part of:

Configuring a VLAN on a port group

Each VLAN can then be assigned its own IP address range, and security controls like firewalls and ACLs can be put in place to separate workloads, desktops, and the internet from the sensitive management interfaces for infrastructure.

What Networks Should I Isolate in a vSphere Deployment?

The VMware Validated Design is the reference architecture for deploying VMware products, and it wisely suggests separating:

  • vSphere Management (ESXi & vCenter Server)
  • vMotion
  • vSAN
  • NSX-T endpoint traffic (TEP)

as well as separate VLANs and IP ranges for workloads and applications, too, depending on your security needs (as an aside, if you are compliance-minded the Validated Design has excellent NIST 800-53 and PCI DSS kits, too – check the “Security and Compliance” sections). From there, you can add firewalls and ACLs to help control who is allowed into what services.

VMware is a software company, so it is understandable that we would not make hardware suggestions but based on my own experience I also suggest a separate hardware management VLAN. Servers often have very powerful “out of band” management capabilities that can be used for firmware management, hardware monitoring, and remote console & control, and being able to operate and secure those separately from vSphere is often extremely helpful (even just for troubleshooting). Enabling the out-of-band management capabilities in this way can also help avoid complexities and isolation issues in other ways. For instance, these management controllers can often present a virtual NIC to ESXi, allowing ESXi access to the management controller. Is this a good thing? Every environment is different, but it certainly complicates any isolation between those networks and introduces additional components and configuration to be assessed, managed, and secured.
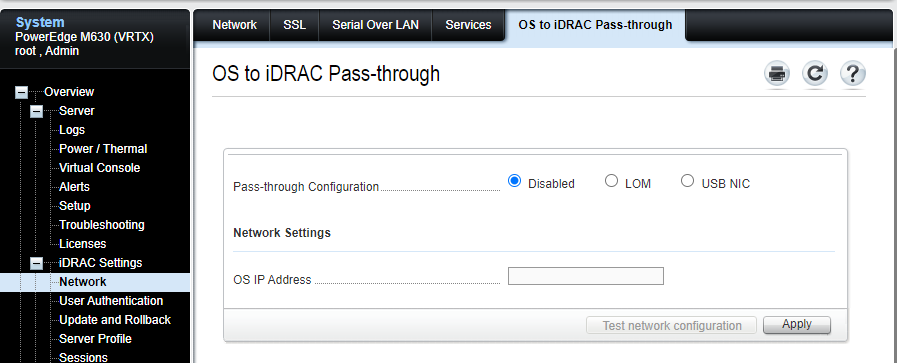
iDRAC OS Pass Through

Security Requires Constant Vigilance

Just over two decades ago Bruce Schneier wrote that “security is a process, not a product.” He is absolutely right, even to this day. VMware has some tremendous tools to help with security, and vSphere is at the core of many of the world’s most secure environments. In the end, though, the biggest boon to an organization’s security is thoughtful people who understand that achieving security is a constant & evolving process, and can wield those powerful tools to help their organizations practice & design for core principles like least privilege and defense in depth.

Stay safe, my friends.

The post The Importance of Isolation for Security appeared first on VMware vSphere Blog.


vSphere Bitfusion Now Generally Available!

$
0
0

This post was written and prepared by Jim Brogan.

VMware acquired Bitfusion in 2019 with intention of incorporating the Bitfusion software into VMware vSphere 7 as a feature.

The vSphere Bitfusion feature was announced on June 2, 2020 during the Dell Technologies Cloud AI/ML event. The Dell Technologies Cloud Crowd Chat AI/ML event and the Bitfusion Interview with Krish Prasad, VMware CPBU SVP and Josh Simons  Senior Director & Chief Technologist, High Performance Computing can still be viewed here.

vSphere Bitfusion software is now generally available to VMware customers and partners.  The install guide as well as in the vSphere 7 Technical Documents set can be found on the Hardware Acceleration with vSphere Bitfusion page.

Bitfusion uses a client/server model to enable the remote sharing of hardware accelerators such as Graphical Processing Units (GPUs). This type of capability works well for users running PyTorch and/or TensorFlow applications.vSphere BitfusionGet started by downloading vSphere Bitfusion now!

The post vSphere Bitfusion Now Generally Available! appeared first on VMware vSphere Blog.

Security with VMware Tools

$
0
0

VMware AppDefense IconVMware vSphere offers a number of tools to improve the security of guest operating systems, like UEFI Secure Boot, Virtualization-based Security (which enables Microsoft Device Guard & Credential Guard), vTPM, encrypted vMotion, VM encryption, vSAN encryption, and more. Let’s look INSIDE the guest OS at some options available through the VMware Tools.

Security is a process and a mindset, and to secure anything we need to consider the attacker’s perspective. Who is the attacker? Could be someone who has gained access to your organization’s network through malware or other means. Could also be what’s known as an ‘insider threat’ which could be a malicious employee, an employee being blackmailed, or even an ex-employee who continues to have access to the organization’s resources. The second question to think about is: what does the attacker want? It is likely that they want to gain access to data that is secured on a virtual machine. They may also be attempting to use one virtual machine to attempt to access another.

The longer an attacker works inside your organization’s environment the more likely it is they’ll be discovered, either by tools like those from VMware Carbon Black, log reviews and alarms from products like vRealize Log Insight, or just by an inquisitive admin hunting down what looks like anomalous behavior (like “The Cuckoo’s Egg” – great book, by the way). To avoid that, an attacker might choose to exfiltrate – “withdraw surreptitiously, especially from a dangerous position” – the whole virtual machine. This is an especially common goal when it comes to virtualized Microsoft Active Directory domain controllers. The attacker can simply take a copy of the virtual machine to their own infrastructure where they can attempt to break in and crack passwords without fear of discovery or lockout.

What can we do about it? We can use the vCenter Server role-based access control to help limit who has rights to clone & decrypt VMs, for instance. We can also use techniques I wrote about in my post “The Importance of Isolation for Security” to add layers of defenses, commonly called “defense in depth,” to help create additional obstacles for attackers. VMware Tools has some options that are intriguing as well.

Before We Begin

This post was written with VMware Tools 11.1.0 in mind. Many of these ideas show CLI commands and you can use the following executables:

C:\Program Files\VMware\VMware Tools\VMwareToolboxCmd.exe (Windows)
/usr/bin/vmware-toolbox-cmd (Linux, using the open-vm-tools packages)

The examples will reference the Windows executable, but you can simply replace that with the Linux command and use the same parameters.

Many of these options can be configured from the vSphere Client, too. However, if you are working to add isolation, setting them at the guest OS level reinforces these controls. An attacker that gains access to the vSphere infrastructure could simply reenable them, but it may be harder for them if the guest OS has them disabled, too.

Several Words of Warning

As with all things, please test changes, and do staged rollouts of changes like these (one machine, then 5, then 15, then 150, etc., waiting for a day or two between). Remember that just because you CAN do something, it does not mean you SHOULD. Security and usability are often intentionally at odds with each other and adding controls where they are not necessary might limit your ability to easily manage your VMs or implement tools. For instance, vRealize Operations Manager uses a number of these features to monitor and manage VMs, which is a net gain, as monitoring is very important to security, too (the ‘A’ in the CIA triad!). There are always tradeoffs & exceptions; please choose wisely.

Similarly, if you have administrator/root rights on a VM and reading this you should talk to your vSphere Administrators first before locking them out of things. While it can be used that way, this post is not meant to be a guide to thwarting your vSphere Administrators. Talk to them first, if only to give them the courtesy of a heads-up. You might find they are receptive to the ideas, so long as there is a way to change them in the future should the organizational needs change. You also might find that your vSphere Administrators are using some of these features to help with auditing, patching, reporting, and such, things that are important to your organization but you might not want to get involved with personally.

Last, while we always strive for accuracy, this is meant as a guide. Please engage your own professional security & compliance auditors when it comes to securing your environments. All environments are different, and the architecture and details of implementations matter immensely.

Ensure Time Synchronization

Time synchronization is very important for security. Cryptographic operations need accurate time to connect to other hosts, and accurate time means accurate timestamps in logs, which is important for diagnostics and developing timelines if a breach should happen. It is considered a best practice to not synchronize guest OS time to the ESXi hosts, but instead let the VMs sync with NTP or other time sources. It is also considered a best practice to use at least four NTP sources to achieve N+1 redundancy (three sources being the minimum, plus one extra for redundancy). Never configure two sources, because you cannot tell which one is correct!

To ensure that time synchronization is disabled in-guest use the command:

VMwareToolboxCmd.exe timesync disable

Control Updates to VMware Tools

It is important to keep VMware Tools updated, like you update other software. Issues are fixed, improvements are made, and features are added. vSphere Administrators can influence the VMware Tools upgrade process from the infrastructure itself which can be a huge timesaver. However, them doing so means that they are loading executables on virtual machines from the infrastructure itself, and this may be something that a VM or application admin may wish to control. Similarly, vSphere Administrators can control some VMware Tools features, which may or may not be of interest.

If your organization has an official way to update & configure VMware Tools that is not through the vSphere infrastructure (using a separate system management tool, for instance) you should consider disabling those infrastructure capabilities.

VMwareToolboxCmd.exe config set autoupgrade allow-upgrade false
VMwareToolboxCmd.exe config set autoupgrade allow-add-feature false
VMwareToolboxCmd.exe config set autoupgrade allow-remove-feature false

Prevent Customization of a VM

There are some interesting opportunities for both human error and attackers when you consider cloning a VM and applying a customization specification to it. Customization specs allow you to change administrator passwords, reset network settings, change domain membership, and even set commands to run once when someone logs in for the first time. The VMware Tools allow you to disable customization, and it is probably a good idea, in general, to disable it once a VM is deployed from a template, to prevent someone from being able to apply customizations to it either in your environment or in theirs.

VMwareToolboxCmd.exe config set deployPkg enable-customization false

Control Information Offered via AppInfo

Appinfo is a method to do application discovery through the VMware Tools. It is a great way to get information about running processes, and tools like vRealize Operations Manager use it to help monitor an environment (the vSphere Cloud Community blog has a post on using it). You can also use it to assess patching state, as it can return versions of the executables, too, which means an attacker who doesn’t necessarily have access to a VM itself may have an easier time determining which exploits to use to gain access. If you are not using it consider disabling it.

VMwareToolboxCmd.exe config set appinfo disabled true

Disable Guest Operations (Invoke-VMScript)

Guest Operations are a powerful management capability within vSphere, where a vSphere Admin can use the PowerCLI cmdlet Invoke-VMScript to interact with the guest operating system from the infrastructure itself. Invoke-VMScript uses guest authentication to enforce this, so someone trying to use it would need to know an account that has access to the host (consider domain-joined guests, though). Organizations often already have a way to issue ad-hoc commands to their managed guest OSes, and if so you might consider disabling this capability with the following command:

VMwareToolboxCmd.exe config set guestoperations disabled true

Consider Installed Modules

VMware Tools are meant to serve a wide community of VMware customers, running VMs on Workstation, Fusion, ESXi, and in the VMware Cloud, and the capabilities are different everywhere. For example, Workstation does not use the Service Discovery features, and ESXi does not implement Shared Folders. To help cope with this the VMware Tools developers have modularized a lot of the Tools so that customers can be granular about what they install.

On vSphere we strongly recommend the paravirtualized device drivers (vmxnet3 and pvscsi) for performance reasons, and the other drivers give you other functionality that makes like better without much tradeoff for security. However, other modules like Service Discovery, AppDefense, Shared Folders, and the like might not be necessary if you are not using those features (the VMCI component itself is what handles hypervisor-to-guest communications, including version reporting, Tools status, etc. so leaving that installed is a good idea). You can certainly customize the features from the VMware Tools Installer GUI, or through command line flags for a silent installation.

Is it bad to accept the defaults for the installation? No. Most of our customers do not need to deal with that level of granularity, and if you keep VMware Tools updated in a timely manner you are covered in most situations. For customers interested in higher levels of security, at the expense of added complexity, these are considerations that can be made. As I mentioned at the beginning, it’s possible to go too far with security and make your own lives, and the lives of all types of IT staff, difficult. Choose wisely, communicate well, test, and do staged rollouts.

Good luck and stay safe.

The post Security with VMware Tools appeared first on VMware vSphere Blog.

vSphere 7 – System Storage When Upgrading

$
0
0

In a previous blog post, vSphere 7 – ESXi System Storage Changes, we discussed the changes to the ESXi system storage layout. How the various partitions are consolidated into fewer, larger partitions that are expandable as well. A lot of inquiries came in for more information on what happens when upgrading to vSphere 7. Let’s take a closer look at what happens to the ESXi system storage when upgrading to vSphere 7.

Storage Requirements Upgrades

The boot media requirements differ between a new vSphere 7 install, and an upgrade to vSphere 7. As mentioned in the first blog post, there’s a requirement for boot media to run a 4 GB storage device at minimum, when upgrading to vSphere 7.  Even though 4 GB boot media devices are supported, let me emphasize that it is good practice to adhere to the boot media requirements for a fresh vSphere 7 installation (8 GB for USB or SD devices, 32 GB for other boot devices). 32 GB or higher boot devices are recommended, check out this KB article for more information.

All the scenarios in this diagram are supported when upgrading to vSphere 7. Again, the recommended boot device would be a high endurance disk or flash device.

Partition Layout

To quickly recap what’s in the previous blog post, let’s look at how the partition layout changed between vSphere 6.x and vSphere 7. The small & large core-dump, locker, and scratch disk are consolidated into the new ESX-OSData partition.

Whether you freshly install or upgrade to vSphere 7, the partition layout as shown in the diagram above is applied. This partitioning reflects what happens in the vSphere upgrade process when the ESXi system storage media is HDD or SSD. The (system storage related) upgrade steps are:

  1. Backup potential partner VIBs (kernel modules), contents of the active boot-bank, locker and scratch partitions to memory (RAM).
  2. Cleanup all system partitions, non-datastore partitions are not destroyed.
  3. If the upgrade media does not have an existing VMFS partition, the upgrade process creates a new GPT partition lay-out.
  4. Create partitions (book-banks and ESX-OSData)
  5. Restore the contents from RAM to the appropriate partitions.

Upgrade Scenarios

But what happens from a ESXi system storage perspective if you have ESXi installed on a USB or SD device together with a HDD/SSD or you when you have a USB-only system?

Upgrade Scenario : USB with HDD

When the storage media is a USB  or SD card, and the scratch partition is on HDD or SDD storage media, the upgrade process is as follows:

  1. Backup potential partner VIBs (kernel modules), contents of the active boot-bank, locker and scratch partitions to memory (RAM).
  2. Cleanup all system partitions, non-datastore partitions are not destroyed.
  3. If the upgrade media does not have a VMFS partition, create a GPT partition layout.
  4. Create partitions (book-banks and ESX-OSData)
    • The dedicated scratch partition is converted to the ESX-OSData partition
  5. Restore the contents from RAM to the appropriate partitions.

In this scenario, the scratch partition on the hard drive is converted to ESX-OSDATA. Its size is limited to 4 GB because of VFAT restrictions. This size might be too small for customers, who have large memory systems and require a large core dump file. In this case, customers can take the following actions:

  • Create a core dump file on a datastore. To create a core dump file on a datastore, see the KB article 2077516.
  • Assign scratch to a directory in the datastore. To assign the scratch location to a directory in a datastore, see KB article 1033696.

Upgrade Scenario : USB-only

Having a USB or SD-only device setup in your ESXi host, you can still upgrade to vSphere 7 if the storage device is at least 4 GB. Although a higher endurance and capacity device is strongly recommended. See this KB article for more insights storage endurance requirements. To support the 4GB minimum when upgrading to vSphere 7, there’s a couple of things happening with the storage partition layout.

Note: using vSAN in a cluster with ESXi hosts that have more than 512GB of memory require larger than 4 GB boot devices (when upgrading to vSphere 7) because of a larger core dump partition.

In the scenario of using a 4 GB boot device and no local disk is found, ESXi is running in a so-called ‘degraded mode‘. This means ESXi is not running in an optimal state, with some functionalities disabled. Also, running in a degraded state could mean ESXi loses its state on a power cycle. Solving this requires adding a local disk or flash device and run the instructions found in KB article 77009.

This diagram shows the typical setup when upgrading using USB boot media. This scenario is also applicable for a setup where the scratch location points to a datastore. For security reasons, ESX-OSData cannot exist in those locations. The upgrade steps using USB or SD media are:

  1. Request remediation of unavailable scratch volume:
    • The user is prompted to create a compatible scratch volume or add a spare disk. The upgrade process terminates if the user chooses to remediate.
  2. If remediation is ignored, then a fallback mode will be used:
    • ESX-OSData is created on USB.
      • USB flash MUST be >= 4GB otherwise upgrade will terminate because VMFS requires at least 1.3GB. This space is necessary for pre-allocation of the core file, vmtools and vSAN traces.
    • RAM-disk is used for frequently written data.
    • Subsystems that require persistence storage of data, implement an equivalent backup.sh capability to allow buffered saving of the data from RAM-disk to ESX-OSData
    • This is a highly degraded mode of operation with boot messages displaying so. The user must accept that there is potential for data to be lost because of the use of a RAM-disk which may be storing data that ESXi considers to be persistent across reboots.

The backup.sh script is run at regular intervals to save the system state and sticky bit files to the boot-bank.

First Boot Tasks

After the ESXi upgrade, or a new installation, the first boot tasks of the ESXi host are executed. These include:

  • Scan for unpartitioned disks and partition them as datastores.
  • Create symbolic links to file systems, ensuring that the necessary namespaces for subsystem are available.
  • Initialize subsystems to reference the correct storage location. For example, logs and core dump locations.

To Conclude

Thanks goes out to our engineering team for providing the information. The goal of this blog post is for you to have a better understanding of what is happening with the ESXi system storage when upgrading to vSphere 7. A key takeaway here is to make sure you meet the storage requirements when installing or upgrading to vSphere 7, and to use a recommended boot device.


The post vSphere 7 – System Storage When Upgrading appeared first on VMware vSphere Blog.

VMware Cloud on Dell EMC: A Guide to Key Sessions at VMworld 2020

$
0
0

Join us for VMworld 2020 and discover how the VMware Cloud on Dell EMC’s unique,  fully managed infrastructure subscription service empowers enterprises to scale their data center infrastructure in support of modern workloads and enables them to compute enable edge sites without need for localized IT Personnel 

VMworld 2020 Digital Edition VMworld Blog Registration

As we approach VMworld 2020, much has changed since last year’s conference. Due to the COVID-19 Pandemic, VMware will be bringing you VMworld ‘Digitally’ through an intensive 2-day agenda that strives to provide you with all the same informationally-rich learning opportunities as you would expect from a VMworld conference.  While all of us at VMware will miss interacting face-face with our attendees as we have in the past, Our number one concern is the well being of our loyal customers and followers. VMware hopes you and your family are well and safe during these uncertain times.

The VMware Cloud on Dell EMC Team will offer several different opportunities for  you to learn more about our innovative, subscription-based infrastructure service at this year’s VMworld event. These opportunities include a number of different breakout sessions led by VMware Cloud on Dell EMC experts and executives, a meet the experts round table discussion session, and significant team presence at several other virtual events during the two day conference.

Here is a list of the VMworld 2020 breakout and round table sessions offered for VMware Cloud on Dell EMC:

HCP1831: Customer Panel with VMware Cloud on Dell EMC –Wei Wang, Director, Product Marketing, VMware
HCP1803: Business Use Cases Showcase with VMware Cloud on Dell EMC –Wei Wang, Director, Product Marketing, VMware
HCP1804: Build a Killer Application with VMware Cloud on Dell EMC – Matt Morgan, VP Product Marketing, CPBU Business Unit, VMware
HCP1802: Extend Hybrid Cloud to the Edge and Data Center with VMware Cloud on Dell EMC – Varun Chhabra, VP Product Marketing, Dell Technologies
HCP1321: VMware Cloud on Dell EMC – Technology Integration and Workload Migration – Matt Herreras, Director Technical Marketing, VMware
HCP1834: Second-Generation VMware Cloud on Dell EMC, Explained By Product Experts – Manish Bhaskar, Group Product Manager, VMware
HCP2709: Expert Roundtable: Get Answers to Your Toughest VMware Cloud on Dell EMC Questions – Ken Smith, Sr. Product Marketing Manager, VMware

To view the full VMworld 2020 content catalog, please click here

Finally, we will be offering interested customers individual meetings with VMware Cloud on Dell EMC product experts. These sessions are typically an hour in length and provide an opportunity for the customer, their VMware account team, and
knowledgeable VMware Cloud on Dell EMC experts to explore how this service addresses their data center evolution and edge compute needs. To arrange one of these sessions, please reach out to your VMware account team to arrange or send us an email at vmcondellemac@vmware.com and we will set one up for you.
We hope to see you ‘virtually’ at VMworld 2020 and look forward to working closer together as we progress towards better days ahead.


The post VMware Cloud on Dell EMC: A Guide to Key Sessions at VMworld 2020 appeared first on VMware vSphere Blog.

vSphere Continuous Beta

$
0
0

vSphere continues to push new boundaries and accelerate the pace of innovation within VMware and for our customers. One of the best ways for us to test new ideas and functionality is through our close partnerships with our customers and broader ecosystem through our beta programs. We are announcing the next iteration of the vSphere Download Beta Program which we’re dubbing the vSphere Continuous Beta.

But the most important part is that the newest beta software was dropped on July 22, 2020 in the beta program community. And due to the nature of our continuous beta model, new builds and features will be posted to the community over time. The goal of this program is to deliver new features and functionality that are not tied to a specific release. As such, you may find yourself testing features we’ll see in an upcoming release, releases much further down the road, or features that simply might never make the cut to be released.

As mentioned earlier, being part of the vSphere Continuous Beta program helps VMware make better product decisions that are data-driven and based on the feedback we get from you. Once you are accepted into the program, you’ll not only have access to the latest beta software but also be asked to perform specific tasks within the software to test new features. You’ll then provide us feedback on those features, workflows, and experiences. And all that feedback helps to create a more stable and valuable product.

You’ll also have access to the Beta Community where you can post questions, feedback, and interact with vSphere Product Management, Technical Marketing, and Engineering directly.

To express interest in joining the vSphere download beta program, click here to sign up & apply. Note, we are unable to approve requests for non-company/work email such as gmail, hotmail, yahoo, comcast, etc.

Thank you for your interest in helping make vSphere even better!


The post vSphere Continuous Beta appeared first on VMware vSphere Blog.

Run Horizon Workloads on VMware Cloud on Dell EMC

$
0
0

Bring the Cloud Experience to Your On-Premises VDI Deployments

As an increasing amount of the global workforce moves to flexible, remote workspaces, the need for organizations to address the challenges of virtualization is higher than ever. There is mounting pressure to deliver a great user experience to workers that are distributed geographically and need access from a wide variety of devices. As deployments grow to support new users, a challenge that many organizations face is ensuring that the infrastructure can be efficiently managed at scale.

In the latest release, we announced support for VMware Horizon on VMware Cloud on Dell EMC. For those unfamiliar, VMware Cloud on Dell EMC delivers a cloud-like experience inside of your data center and offers the same management benefits and user experience of the public cloud.


Simplified Management

Customers can leverage Horizon’s Cloud Pod Architecture (CPA) and Unified Management Console to enable seamless integration between existing deployments and VMware Cloud on Dell EMC. These features allow organizations to monitor system health across numerous deployments through a single, centralized entitlement layer and unified management console.

Scale As Needed

Capacity issues and resource constraints can result in costly consequences for any organization. The VMware Cloud on Dell EMC portal offers sophisticated sizing tools , allowing you to right-size for current and anticipated needs. Your team can start small, with targeted departments or groups, and quickly add hosts as needed to support enterprise-wide deployments.


For organizations interested in escaping the costly and cumbersome process of refreshing, managing, and maintaining the infrastructure supporting VDI deployments, this solution offers a compelling value proposition. Stay tuned for more in the coming weeks. If you’d like to learn more, please explore the information below.

Still have questions? Drop us a line at vmcondellemc@vmware.com !

For More information on VMware Cloud on Dell EMC

Introduction to Horizon Integration: Visit

Overview Video: Watch

Solution Guide: Download

Technical Whitepaper: Download

Twitter: @VMWonDellEMC : Twitter Page

The post Run Horizon Workloads on VMware Cloud on Dell EMC appeared first on VMware vSphere Blog.

Load Balancing Performance of DRS in vSphere 7

$
0
0

The DRS performance team just released a great whitepaper on the load balancing capabilities in vSphere 7. New features of DRS in VMware vSphere 7 have been introduced to make VMware’s compute control plane even more robust and better in handling both traditional and modern application needs.

In this whitepaper, the authors cover the load balancing aspect of the new DRS, which is available in vSphere 7. 

More DRS Resources


The post Load Balancing Performance of DRS in vSphere 7 appeared first on VMware vSphere Blog.

VMC on Dell EMC Achieves ISO/IEC 27001:2013 Certification

$
0
0

VMC on Dell EMCBy Matt Herreras, Director, Technical Marketing for VMC on Dell EMC

VMware’s VMC on Dell EMC solution has just achieved a certificate of compliance for ISO/IEC 27001. This adds to our growing list of security certifications including SOC2 type-1. ISO/IEC is a combination of two international standards bodies: the International Organization for Standardization (ISO) and the International Electrotechnical Commission (IEC). These two standards organizations meet, debate, vote for, and publish compliance guidelines. These guidelines can then be leveraged by an accredited auditor. Auditors provide a certificate attesting to whether a customer has met the guidelines. ISO/IEC 27001 represents a family of guidelines designed to control risk in customer environments. Specifically, it deals with the controls that are necessary to contain risk to a customer’s information security management system (ISMS). The goal is to help customers mitigate risk to information systems and the data stored on them. The controls take a systematic approach to examining IT risks. They consider the threats and inherent vulnerabilities facing customers such as outages or attacks. For the purposes of this announcement ISO/IEC 27001:2013 pertains to a certification of compliance for VMC on Dell EMC.

VMC on Dell EMC is a full cloud solution deployed on VxRail and managed by VMware


VMC on Dell EMC is a joint solution from VMware and Dell EMC. It delivers a complete managed cloud solution in customer data center and edge locations. This unique offering from two giants in the tech industry takes the best of VMware’s managed cloud service and delivers it on Dell’s premier hyper converged appliance offering, VxRail. This offering has now achieved the important ISO/IEC 27001:2013 certification through the well-respected firm Schellman.

Schellman compliance auditor logo for ISO/IEC 27001

The ISO/IEC 27001: 2013 certification

What This Means for VMware Customers

Customers want to meet compliance standards as cost effectively and as quickly as possible. They do this to meet an objective, fulfill a mission, or seize a business opportunity. From an auditor’s perspective compliance is a sacred trust to ensure that the customer has properly implemented the controls or processes of specific guidelines. A customer and an auditor will work together to measure the customer’s systems and operations. The end result of this collaboration is that together the customer and the auditor can attest that the environment being measured is compliant. The certification VMware is announcing today will make it easier, cheaper, and faster for VMC on Dell EMC customers to achieve a desired compliance state. This is because by sharing the certification with an auditor the customer highlights the controls that are in place. They also provide a clearer understanding of shared responsibility with VMware.

Why This Certification Matters

Reaching a state of compliance in an IT environment depends on two important factors. The first is establishing a “known architecture.” The second represents the controls or processes contained in a specific set of guidelines. For IT environments there are many paths to a production ready state. Customers or professional services engineers will leverage a combination of learned experience, best practices, and product documentation to implement an architecture. When the customer takes control of the architecture they apply their existing operational model to managing it. While the environment may perform well and meet the reliability needs of the business it may also be challenging for that customer to provide a clearly documented account of their systems and operations.

Think of the challenge as a geometry problem. Pythagoras’s theorem states that a2 + b2 = c2.

Pythagoras's Theorem as a metaphor for compliance

Let’s say the customer’s IT architecture is a2 and ISO/IEC 27001:2013 represents b2. The compliance measurement is represented as c2 or the hypotenuse of angle C.  The fact that the compliance guidelines are published means that they can be measured. This helps, but what if it’s not easy to measure a2? Back to my point about the variance in how many IT environments are implemented and managed, documenting a measurable state of the architecture and operations equates to hard work on the part of the customer when preparing for an audit. But what if the fundamental architecture is a known state that has consistent infrastructure and operations? This scenario gives the customer a2. Better yet, if a customer can produce a third-party attestation or certificate that the architecture is compliant with ISO/IEC 27001:2013 then they can solve for c2 (a2 + b2 = c2). This is a key value of VMC on Dell EMC. It is a consistently implemented and operated SDDC managed by VMware. The fact that VMware can provide a certificate attesting to ISO/IEC 27001 compliance is a big advantage to customers.

Before I overextend my geometry metaphor, I should be clear that this does not mean VMware can guarantee all of a customer’s information systems are compliant. VMC on Dell EMC’s certification covers only what VMware and Dell EMC control. This is approximately 70% of the infrastructure and operations. The customer is still responsible for ensuring that virtual networking, virtual machines, operating systems, applications, data, and the operational processes under their control meet the guidelines. This shared responsibility is common across cloud providers and it is true for VMC on Dell EMC as well. I will make this last point with one more metaphor. When riding an elevator the rider can check the certificate of code compliance in the building office. However, not exceeding the elevator’s maximum load is the rider’s responsibility. Go here to learn more about VMC on Dell EMC’s documentation for shared security responsibility.

Conclusion

VMC on Dell EMC having achieved ISO/IEC 27001:2013 certification gives customers a logical and solid advantage (let’s call it a compliance theorem) when working towards complying with these guidelines. Compliance is not easy but we hope this will make it much easier for our customers to achieve.


The post VMC on Dell EMC Achieves ISO/IEC 27001:2013 Certification appeared first on VMware vSphere Blog.
Bitfusion Jupyter Integration—It’s Full of Stars

$
0
0

This little 2020 odyssey describes how to integrate Bitfusion into Jupyter, allowing an AI/ML application in Jupyter notebooks to share access to remote GPUs.

Buy Jupiter!

If you are working with artificial intelligence and machine learning (AI/ML), there is a good chance you are a fan of Jupyter Notebooks or Jupyter Lab. The Jupyter project provides a very flexible and interactive environment. You can enter blocks of code, run them individually, and use results from one block as input to  subsequent blocks. With Jupyter, you can iterate quickly through experiments, change configurations and run again, and you can integrate instrumentation and visualization. All your work is preserved or packaged as you would see it in a physical notebook, but one which lets you go back, change, and re-run any step of the work.

And, if you are running AI/ML applications, it is almost a certainty that you are a fan of GPU acceleration. Without acceleration, these applications run on geological timescales. On the other hand, GPUs are expensive resources that are 1) often idle and underutilized, and 2) difficult to share (which keeps them underutilized). VMware vSphere Bitfusion is a product that lets multiple client VMs, containers, and applications share remote GPUs from Bitfusion server VMs across the network. This sharing requires no modifications to the applications themselves. This blog demonstrates how to use remotely connected GPUs for AI/ML applications running in Jupyter notebooks.

Any block of code you create in a Jupyter Notebook needs to run on something, on some engine that handles your language and calls. This something in Jupyter parlance is called a kernel. For example, if a particular notebook needed to run python code, you should set up that notebook to run a python kernel. Jupyter lets you add personalized kernels to its menu of kernels. Then, each notebook can select the kernel it needs.

What we will do here is clone and modify the python kernel so that it launches with Bitfusion, and specifically, with a Bitfusion run command that allocates GPUs. You could create many such kernels: one that allocates a single GPU and another that allocates two GPUs. Or with Bitfusion partitioning, you could even create a kernel that allocates 31.4% of a GPU (meaning 31.4% of the GPU memory – remaining memory would be concurrently accessible by other clients).

By the Time I get to Venus

We’re going to take a journey of seven steps: three steps on the Bitfusion client machine (which will run Jupyter), three preparatory steps on a workstation (running a browser that interacts with Jupyter), and one last step to run an app within a notebook (from the browser on the workstation).

The setup in Figure 1 shows three machines: a Bitfusion GPU server, a Bitfusion client and a workstation. We are assuming we have already set up the Bitfusion server and client (the Installation Guide is on the Bitfusion landing page). We are further assuming we have installed the packages and dependencies to run TensorFlow benchmarks on the Bitfusion client.

The 7 steps are listed here:

On the Client:

  1. Install Jupyter Lab
  2. Make a Bitfusion kernel for Jupyter
  3. Launch Jupyter

On the Workstation:

  1. Set up port forwarding
  2. Browse to Jupyter through the local port
  3. Open the Bitfusion Notebook

Also on the Workstation:

  1. Run an application

For example purposes, we’ll assume:

  • Bitfusion client has address 172.16.31.209
  • Bitfusion client username is bf_user
  • Workstation port 8001 will forward to 8234 on the Bitfusion client
Bitfusion Jupyter Integration diagram

Figure 1: Setup for Bitfusion Jupyter Integration

Kernel Never Mars the Finish

The Jupyter service requires a Bitfusion kernel (and for our purposes, Python too) to allow apps and notebooks to finish their connection to the GPUs.

Perform these next steps, 1, 2, & 3, on a Bitfusion client command line.

1. Install Jupyter Lab

sudo pip3 install jupyterlab

Jupyter lab is a later release than Jupyter Notebook, but includes Jupyter Notebook

2. Make a Bitfusion Kernel and install in Jupyter

We will create a Jupyter kernelspec that brings up a Bitfusion environment by cloning a python3 kernel and modifying it for Bitfusion.

Install kernelspec python3 in Jupyter in ~/tmp.

ipython kernel install --prefix ~/tmp

Rename existing python3 kernel directory to bitfusion-basic (a name chosen to reflect the intent that this kernel bring up a simple Bitfusion use case, a single, full-sized GPU).

cd ~/tmp/share/jupyter/kernels/    mv python3/ bitfusion-basic

Edit kernel.json in the bitfusion-basic directory to add the contents highlighted in the New section below.

Original (python3/kernel.json):  {  "display_name": "Python 3",  "language": "python",  "argv": [  "/usr/bin/python3",  "-m",  "ipykernel_launcher",  "-f",  " {connection_file} "  ]  }    New (bitfusion-basic/kernel.json):  {  "display_name": “Bitfusion",  "language": "python",  "argv": [  “bitfusion",  "run",  "-n",  "1",  "/usr/bin/python3 -m ipykernel_launcher –f  {connection_file}"  ]  }

Install kernelspec bitfusion-basic in Jupyter

jupyter kernelspec install --user tmp/share/jupyter/kernels/bitfusion-basic/


3. Launch Jupyter

Launch Jupyter Lab assuming it has no browser support and assuming we want to specify the port. We’ll use port 8234 as a random example (the default is usually 8888).

jupyter lab --no-browser --port 8234  [I 22:46:39.532 LabApp] JupyterLab extension loaded from /usr/local/lib/python3.6/dist-packages/jupyterlab  [I 22:46:39.532 LabApp] JupyterLab application directory is /usr/local/share/jupyter/lab  [I 22:46:39.534 LabApp] Serving notebooks from local directory: /home/bf_user/tmp/share/jupyter/kernels/bitfusion-basic  [I 22:46:39.534 LabApp] The Jupyter Notebook is running at:  [I 22:46:39.534 LabApp] http://localhost:8234/?token=b2e777a34ff89bf86365fb3518312fa23cfabdcccafb1ddc  [I 22:46:39.534 LabApp]  or http://127.0.0.1:8234/?token=b2e777a34ff89bf86365fb3518312fa23cfabdcccafb1ddc  [I 22:46:39.534 LabApp] Use Control-C to stop this server and shut down all kernels (twice to skip confirmation).  [C 22:46:39.537 LabApp]        To access the notebook, open this file in a browser:          file:///home/bf_user/.local/share/jupyter/runtime/nbserver-11343-open.html      Or copy and paste one of these URLs:          http://localhost:8234/?token=b2e777a34ff89bf86365fb3518312fa23cfabdcccafb1ddc       or http://127.0.0.1:8234/?token=b2e777a34ff89bf86365fb3518312fa23cfabdcccafb1ddc

The URL you will paste into a browser later is the second to last line above.

The Mercury Rises

Okay, the pressure is on. The Jupyter server is up and running, now we need a way for our workstation browser to get there.

Perform these next steps, 4, 5, & 6, on the workstation.

4. Set Up Port Forwarding

To launch a browser from the workstation and work connect to Jupyter on the client, you will need to forward a workstation local port (8001 is our example) to the Bitfusion client/Jupyter server port (8234 is our example).

On a Linux workstation:

ssh -N -f -L localhost:8001:localhost:8234 bf_user@172.16.31.209

On an MS Windows workstation you can set up the tunnel using putty.

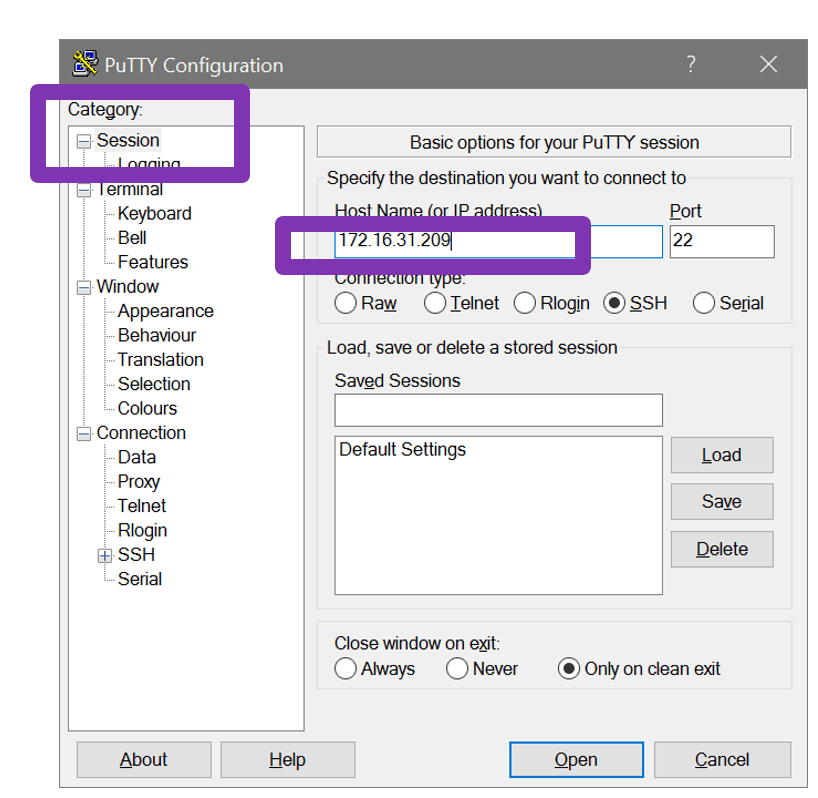
  • First, launch putty and set up an SSH session to the client
screenshot setting up PuTTY session

Figure 2

  • Second, set up the port forwarding information: click “Add”, then click “Open”
screenshot setting up PuTTY tunnel

Figure 3

  • Third, log in to the client to start the port forwarding over ssh
screenshot of PuTTY runtime

Figure 4

Leave the SSH login window up so the tunnel does not collapse.

5. Navigate to Jupyter

Image of Jupiter, Moon, Ship, and Sun

Launch a browser and go to the URL copied in Step 3, however, substitute the local port you have forwarded. In this example, remove port 8234 and use 8001 in its place.

Navigating to Jupyter URL

Figure 5

6. Open the Bitfusion Notebook

Now, you will see the main Jupyter page and you can open the icon for the “Bitfusion” Notebook, shown in Figure 6.

Jupyter menu with Bitfusion

Figure 6

Saturn Rings, and It Tolls for Thee (or He who Pays the Piper, Calls the Neptune)

We’ve finished all the preparations. Now we can run the GPU-accelerated AI/ML apps of our choosing, declare success, and erect an obelisk with our name inscribed on it for all time.

This step is performed on the workstation browser we set up above.

7. Run an Application

You are already in the Bitfusion Notebook, just run your machine learning applications. In the figures below we use the “!” prefix on our commands to escape to the shell environment on the Bitfusion client. We are assuming that datasets, the CUDA toolkit, and TensorFlow benchmarks have been installed there.

In the screenshot below, we run:

!nvidia-smi

Bitfusion notebook runs nvidia-smi

Figure 7

Here we start a TensorFlow benchmark run.

!python3 ./benchmarks/scripts/tf_cnn_benchmarks/tf_cnn_benchmarks.py --data_format=NCHW --batch_size=64 --model=resnet50 --variable_update=replicated --local_parameter_device=gpu --nodistortions --num_gpus=2 --num_batches=100 --data_dir=/data --data_name=imagenet

Bitfusion notebook run TensorFlow Benchmark

Figure 8

And here is the end of the output from the TensorFlow benchmark run.

Output of TensorFlow benchmark in Bitfusion notebook

Figure 9


Holst it Right There

Since Bitfusion runs as an application, not as part of an operating system or hypervisor, it is easy to integrate into tool chains and environments. Here, we have integrated it as a Jupyter kernel giving notebooks access to remote GPUs. And Bitfusion sharing means dynamic sharing – other clients will immediately be able to access GPUs once our notebook has finished.

In classical antiquity, there were seven wandering bodies amongst the fixed stars in the celestial sphere. We’ve taken a less-aimless, 7-point path in this blog, at last arriving on Jupyter. We may long dwell there, if its gravity is all they claim, so let’s take advantage of its opportunities and the opportunities Bitfusion offers, as well.

And finally – farewell, Pluto, we hardly knew ye.

These other articles on Bitfusion may also be of interest: Using Bitfusion in Docker ContainersBitfusion GPU Sharing for Multiple Concurrent AI/ML Apps

The post Bitfusion Jupyter Integration—It’s Full of Stars appeared first on VMware vSphere Blog.

vSphere Tags and Custom Attributes

$
0
0

In this blog we will talk about a feature in vSphere, that can make a vSphere administrator’s life quite easy in terms of managing, sorting and arranging vSphere objects.

I am referring to the “Tags and Custom Attributes” feature which can be accessed from the vSphere Client.

Searching and sorting objects in a large vSphere environment could get a bit tricky. This situation can be easily mitigated by associating metadata to the vSphere objects by using tags and custom attributes.


So, what exactly are tags?

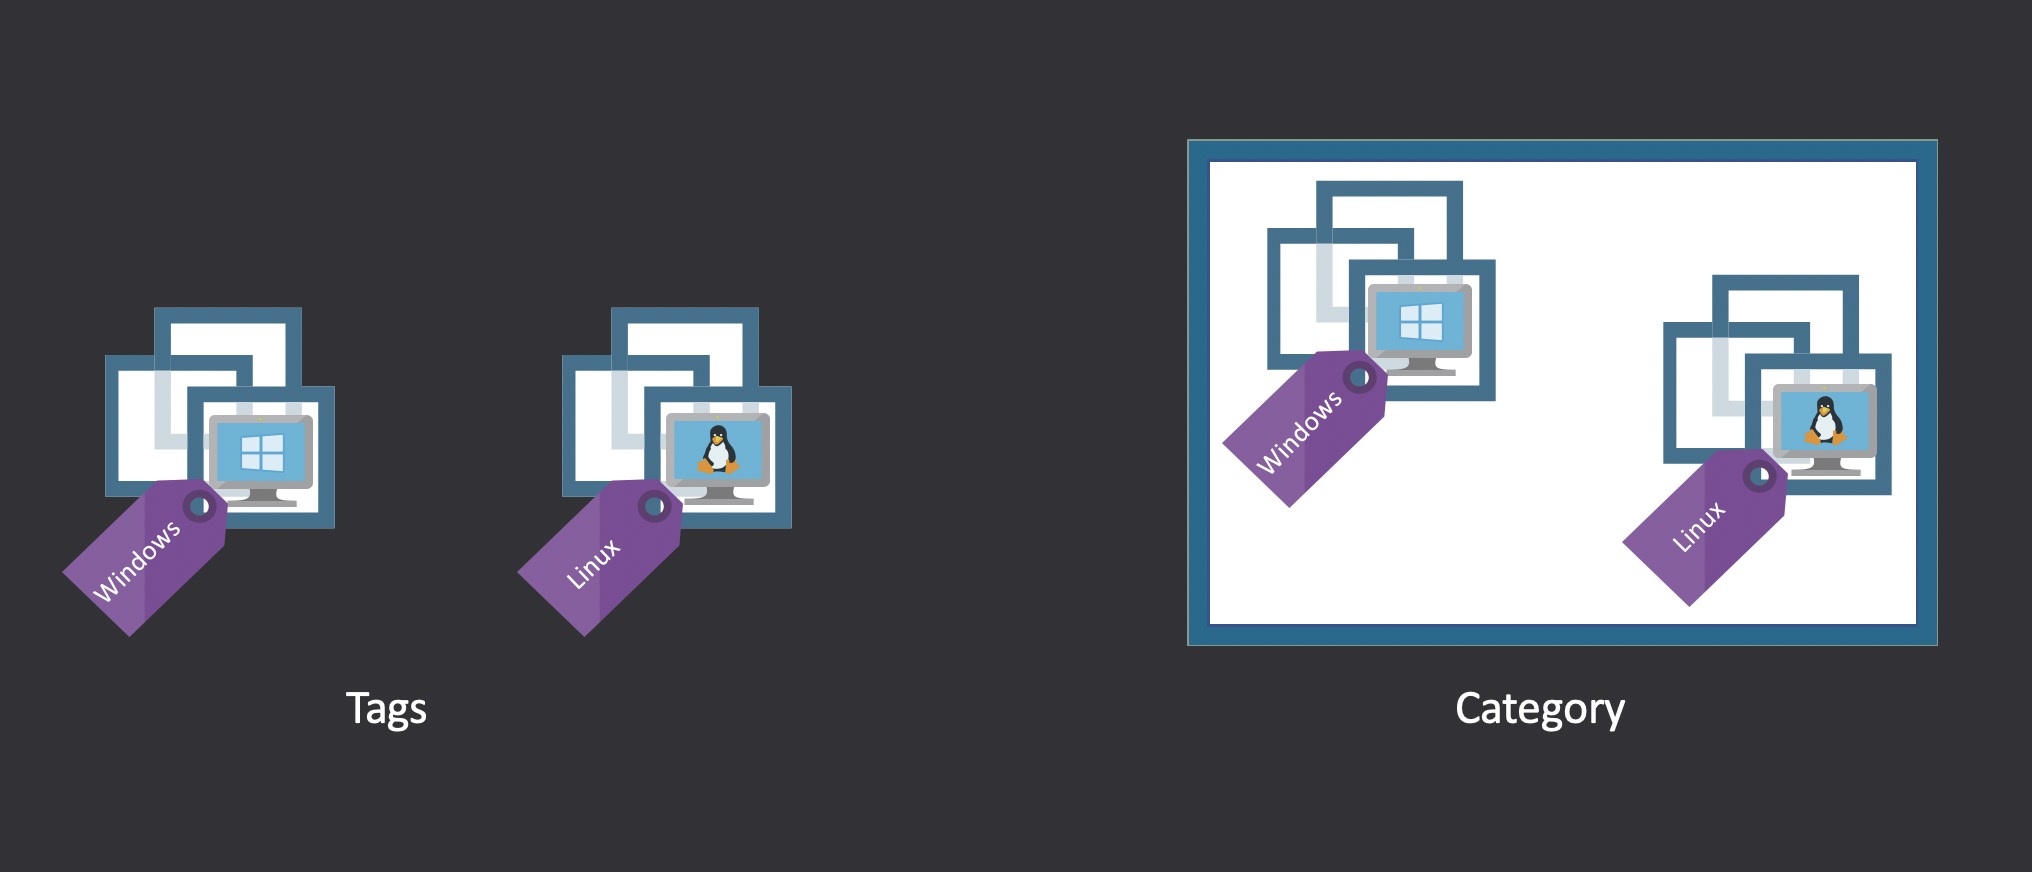
A tag is sort of a label which can be applied to an object in the vSphere inventory. A tag basically represents metadata of that object. After creating a tag, it is assigned to a category.

The category is a broader construct and is basically a collection of related tags.

A Category can be defined so that it can accommodate more than one tag. After creating a category, it can be associated to a corresponding vSphere inventory object viz. “Folder”, “Host”, “Virtual Machines” etc.

Let us take an example to understand tags and categories.

Consider a large-scale vSphere environment with multiple VMs running different operating systems like Linux, Windows etc. In-order to tag VMs by operating system, we will first create a category called “operating system” and will associate this category to “Virtual Machine” inventory object type. Post this we will create tags like “Windows”, “Linux” and will associate them to the “operating system” category.

Custom attributes

vSphere administrators can associate custom attributes (user defined) in a custom “keys” and “value” format to a variety of vSphere objects using the custom attributes option.

This feature comes in handy if there is a need to group objects based on attributes.

For example, consider a large group of database server VMs which is owned by 2 database administrators John and Larry. In this scenario custom attribute “owner” can be created which will either have John or Larry as its value to identify the ownership.

The fundamental difference between tags and custom attributes is that tags allow one to logically classify and arrange vSphere objects, however when using custom attributes vSphere object metadata can be stored right with the object itself in vCenter.

Apart from logical arrangement, searching tags and custom attributes can also be used for

  • Granting Permissions to vSphere objects
  • Configuration Management Database (CMDB)


vSphere APIs for Tags and Categories

APIs for tags and categories can be found under the vCenter server cis API endpoint. Please refer the following table to understand the API schema and how they can be used. For more details on API usage please refer to this link.

Category

Operation Method API
list GET

https://{server}/rest/com/vmware/cis/tagging/category

get GET

https://{server}/rest/com/vmware/cis/tagging/category/id:{category_id}

create POST

https://{server}/rest/com/vmware/cis/tagging/category

delete DELETE

https://{server}/rest/com/vmware/cis/tagging/category/id:{category_id}


list_used_categories POST

https://{server}/rest/com/vmware/cis/tagging/category?~action=list-used-categories


add_to_used_by POST

https://{server}/rest/com/vmware/cis/tagging/category/id:{category_id}?~action=add-to-used-by


remove_from_used_by POST

https://{server}/rest/com/vmware/cis/tagging/category/id:{category_id}?~action=remove-from-used-by


update PATCH

https://{server}/rest/com/vmware/cis/tagging/category/id:{category_id}


revoke_propagating_permissions POST

https://{server}/rest/com/vmware/cis/tagging/category/id:{category_id}?~action=revoke-propagating-permissions


Tags

Operation Method API
list GET https://{server}/rest/com/vmware/cis/tagging/tag


get GET

https://{server}/rest/com/vmware/cis/tagging/tag/id:{tag_id}


create POST

https://{server}/rest/com/vmware/cis/tagging/tag

delete DELETE

https://{server}/rest/com/vmware/cis/tagging/tag/id:{tag_id}

list_used_tags POST

https://{server}/rest/com/vmware/cis/tagging/tag?~action=list-used-tags


add_to_used_by POST

https://{server}/rest/com/vmware/cis/tagging/tag/id:{tag_id}?~action=add-to-used-by

remove_from_used_by POST

https://{server}/rest/com/vmware/cis/tagging/tag/id:{tag_id}?~action=remove-from-used-by

update PATCH

https://{server}/rest/com/vmware/cis/tagging/tag/id:{tag_id}

revoke_propagating_permissions POST

https://{server}/rest/com/vmware/cis/tagging/tag/id:{tag_id}?~action=revoke-propagating-permissions


To Conclude

Using tags and custom attributes, a vSphere admin can ensure that vSphere objects are organized and logically arranged. Tags and categories let vSphere administrators organize different vSphere objects like datastores, virtual machines, hosts, and so on. This makes it easier to sort and search for objects that share a tag, among other things.

This feature become even more handy in automation and CMDB use cases.

The post vSphere Tags and Custom Attributes appeared first on VMware vSphere Blog.
vLCM Support for vSphere Auto Deploy

$
0
0

vSphere Auto Deploy is a great feature that uses PXE boot infrastructure together with vSphere Host Profiles to provision and customize ESXi hosts. Depending on the ESXi host configuration, enforced by its attached Host Profile, state information is stored on the ESXi host itself or by the Auto Deploy server. When the Auto Deploy server manages the state information for ESXi hosts, it is referred to as a stateless installation.

With vSphere 7, the new vSphere Lifecycle Manager (vLCM) is introduced. vLCM is a powerful new approach to simplify consistency for ESXi host lifecycle management. Not only for the hypervisor itself, but also for the full stack of drivers and firmware for the server hardware powering your virtual infrastructure. This blog post details vLCM support for vSphere Auto Deploy.

Stateless vs Stateful

First, let’s zoom in on typical Auto Deploy configurations. To start using Auto Deploy, which is part of the vSphere Enterprise+ license, there’s some infrastructural components used. Think about a TFTP host for the boat-loader used by Auto Deploy, DNS and DHCP (configured with option 66 and 67), and a syslog target for logs and dumps next to your vSphere infrastructure that contains the Auto Deploy feature.

Customers have multiple options in Auto Deploy. There’s several configuration options how ESXi is run on the physical host. Options are:

  • Stateful Install: When a host is booted for the first time, the host profile configuration states Auto Deploy is to install ESXi on local host storage. All consecutive host boots, only the local storage is used until the image profile configuration is changed.
  • Stateless: Auto Deploy is used to install ESXi in memory on the target host. The state information of the ESXi host is managed by Auto Deploy. No local storage is required.
  • Stateless Caching: Similar to Stateless installations. However, the ESXi image and configuration is cached on local storage. If communication with the Auto Deploy server is disrupted, the host is able to boot using the cached data.

Using deploy rules that incorporates image profiles and host profiles determines how the hosts are running ESXi. The image profile provides the ESXi bits, the ESXi host configuration is applied using Host Profiles. The configuration of the Host Profile determines to use stateless caching or stateful installations, while stateless is the default.

Why does vLCM require stateful hosts?

With new features and capabilities, like vSphere Lifecycle Manager, vSAN, and NSX, the way VMware approaches ESXi host installations have changed. More and more features and capabilities rely on host local storage for additional kernel modules but also for state information like PCIe mappings, SSL certificates, etcetera. The way local storage is used is even changed in vSphere 7 to provide a flexible and futureproof platform. That is the reason that it’s highly recommended for ESXi hosts to have local storage. vLCM is a new feature that doesn’t support stateless installations anymore.

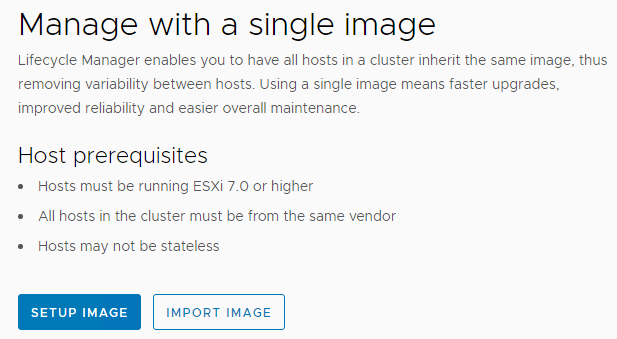
When ESXi hosts are upgraded to or installed with vSphere 7, they are still using vSphere Update Manager. vLCM however, is the path forwards using a desired state model. When customers enable vLCM (Manage with a single image) the following screen provides information about the prerequisites.

One of the prerequisites being that hosts may not be stateless, as they can be when using Auto Deploy. vLCM does support Auto Deploy, but for stateful installations only.


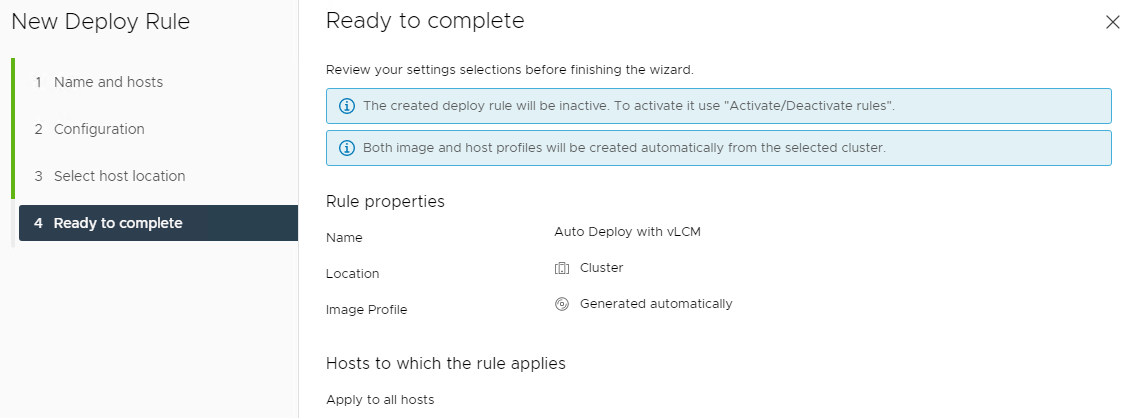
When configuring the Auto-Deploy “Deploy Rule”, select a vLCM managed cluster to be the “Host Location” to use Auto Deploy with vCLM. By doing so, there is no need to provide an Image Profile because vLCM will automatically create it from the selected cluster.


How to migrate from stateless to stateful?

What needs to be done to change a current Auto Deploy environment from stateless to stateful? This is as easy as re-configuring the Host Profile used in the deploy rules. Moving to a stateful installation does require host local storage, so verify if your host is equipped with local storage. Be sure to check the blog vSphere 7 – ESXi System Storage Changes to get a better understanding of what is required and recommended for ESXi host local storage in vSphere 7.


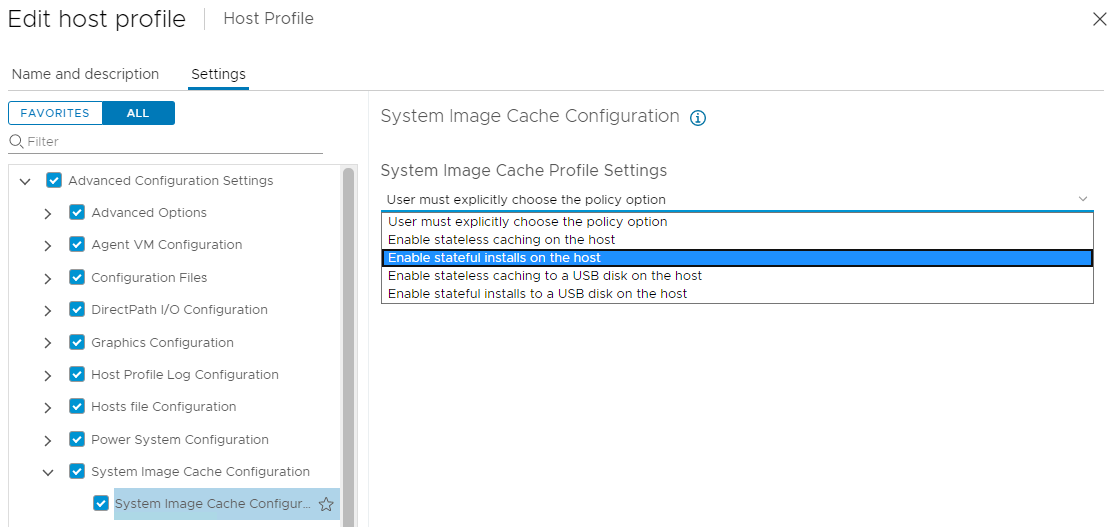
Select the Host Profile as used in the Auto Deploy Deploy Rule. This is where you need to change the System Image Cache Configuration to ‘Enable stateful installs on the host’. The process of changing the Host Profile configuration is shown here:

Now, when ESXi hosts reboot, the ESXi bits are installed on the host local storage. The installation is persistent, fully supported by vLCM and futureproof!

Other Resources to Learn

The post vLCM Support for vSphere Auto Deploy appeared first on VMware vSphere Blog.

vSphere Bitfusion Now Generally Available!

$
0
0

This post was written and prepared by Jim Brogan.

VMware acquired Bitfusion in 2019 with intention of incorporating the Bitfusion software into VMware vSphere 7 as a feature.

The vSphere Bitfusion feature was announced on June 2, 2020 during the Dell Technologies Cloud AI/ML event. The Dell Technologies Cloud Crowd Chat AI/ML event and the Bitfusion Interview with Krish Prasad, VMware CPBU SVP and Josh Simons  Senior Director & Chief Technologist, High Performance Computing can still be viewed here.

vSphere Bitfusion software is now generally available to VMware customers and partners.  The install guide as well as in the vSphere 7 Technical Documents set can be found on the Hardware Acceleration with vSphere Bitfusion page.

Bitfusion uses a client/server model to enable the remote sharing of hardware accelerators such as Graphical Processing Units (GPUs). This type of capability works well for users running PyTorch and/or TensorFlow applications.vSphere BitfusionGet started by downloading vSphere Bitfusion now!

The post vSphere Bitfusion Now Generally Available! appeared first on VMware vSphere Blog.

vLCM Support for vSphere Auto Deploy

$
0
0

vSphere Auto Deploy is a great feature that uses PXE boot infrastructure together with vSphere Host Profiles to provision and customize ESXi hosts. Depending on the ESXi host configuration, enforced by its attached Host Profile, state information is stored on the ESXi host itself or by the Auto Deploy server. When the Auto Deploy server manages the state information for ESXi hosts, it is referred to as a stateless installation.

With vSphere 7, the new vSphere Lifecycle Manager (vLCM) is introduced. vLCM is a powerful new approach to simplify consistency for ESXi host lifecycle management. Not only for the hypervisor itself, but also for the full stack of drivers and firmware for the server hardware powering your virtual infrastructure. This blog post details vLCM support for vSphere Auto Deploy.

Stateless vs Stateful

First, let’s zoom in on typical Auto Deploy configurations. To start using Auto Deploy, which is part of the vSphere Enterprise+ license, there’s some infrastructural components used. Think about a TFTP host for the boat-loader used by Auto Deploy, DNS and DHCP (configured with option 66 and 67), and a syslog target for logs and dumps next to your vSphere infrastructure that contains the Auto Deploy feature.

Customers have multiple options in Auto Deploy. There’s several configuration options how ESXi is run on the physical host. Options are:

  • Stateful Install: When a host is booted for the first time, the host profile configuration states Auto Deploy is to install ESXi on local host storage. All consecutive host boots, only the local storage is used until the image profile configuration is changed.
  • Stateless: Auto Deploy is used to install ESXi in memory on the target host. The state information of the ESXi host is managed by Auto Deploy. No local storage is required.
  • Stateless Caching: Similar to Stateless installations. However, the ESXi image and configuration is cached on local storage. If communication with the Auto Deploy server is disrupted, the host is able to boot using the cached data.

Using deploy rules that incorporates image profiles and host profiles determines how the hosts are running ESXi. The image profile provides the ESXi bits, the ESXi host configuration is applied using Host Profiles. The configuration of the Host Profile determines to use stateless caching or stateful installations, while stateless is the default.

Why does vLCM require stateful hosts?

With new features and capabilities, like vSphere Lifecycle Manager, vSAN, and NSX, the way VMware approaches ESXi host installations have changed. More and more features and capabilities rely on host local storage for additional kernel modules but also for state information like PCIe mappings, SSL certificates, etcetera. The way local storage is used is even changed in vSphere 7 to provide a flexible and futureproof platform. That is the reason that it’s highly recommended for ESXi hosts to have local storage. vLCM is a new feature that doesn’t support stateless installations anymore.

When ESXi hosts are upgraded to or installed with vSphere 7, they are still using vSphere Update Manager. vLCM however, is the path forwards using a desired state model. When customers enable vLCM (Manage with a single image) the following screen provides information about the prerequisites.

One of the prerequisites being that hosts may not be stateless, as they can be when using Auto Deploy. vLCM does support Auto Deploy, but for stateful installations only.


When configuring the Auto-Deploy “Deploy Rule”, select a vLCM managed cluster to be the “Host Location” to use Auto Deploy with vCLM. By doing so, there is no need to provide an Image Profile because vLCM will automatically create it from the selected cluster.


How to migrate from stateless to stateful?

What needs to be done to change a current Auto Deploy environment from stateless to stateful? This is as easy as re-configuring the Host Profile used in the deploy rules. Moving to a stateful installation does require host local storage, so verify if your host is equipped with local storage. Be sure to check the blog vSphere 7 – ESXi System Storage Changes to get a better understanding of what is required and recommended for ESXi host local storage in vSphere 7.


Select the Host Profile as used in the Auto Deploy Deploy Rule. This is where you need to change the System Image Cache Configuration to ‘Enable stateful installs on the host’. The process of changing the Host Profile configuration is shown here:

Now, when ESXi hosts reboot, the ESXi bits are installed on the host local storage. The installation is persistent, fully supported by vLCM and futureproof!

Other Resources to Learn

The post vLCM Support for vSphere Auto Deploy appeared first on VMware vSphere Blog.

Register for the Sept. 15th Announcement Event!

$
0
0


Calling all VMware vSphere, vSAN, and Cloud Foundation (VCF) fans!


On September 15th VMware will be announcing key updates to our core platforms. We are excited to share the news about Developer-Ready Infrastructure with you. For IT administrators, operators and decision makers – this is news you don’t want to miss!


Image of Deliver Developer-Ready Infrastructure Marketing Graphic


For news so big, one event just isn’t enough, which is why we are giving you two options to dive into the excitement on September 15th.


Announcement Event at the 2020 Boston VMUG Virtual UserCon


VMUG UserCons are created by VMware users for VMware users, facilitating education, empowerment and training. This is a free, one-day event, granting you endless insider access to VMware resources.

During this one-of-a-kind VMware User Group event, we will bring you exciting new announcements from VMware. Additionally, you’ll connect with thousands of VMware users, get insider access to the latest industry insights and gain a front row seat to product demonstrations and more.


Don’t miss the keynote session with Lee Caswell, VMware’s Vice President of Product Marketing, where he will discuss:

  • How to address challenges organizations face with application modernization
  • What’s new with vSphere, vSAN, and VMware Cloud Foundation
  • How you can deliver self-service infrastructure for developers


Additionally, VMUG’s one-of-a-kind virtual UserCon event agenda features breakout sessions giving you one-on-one time with vExperts and VMware users providing you first-hand insights into a multitude of VMware products.


Register for Boston VMUG Button


Live VMUG Webcast


Tune into the Live VMUG Webcast on September 15th, 1PM ET, to learn how you can “Up-level to Developer-Ready Infrastructure.” Topics will include:


  • Key updates for vSphere, vSAN, and VMware Cloud Foundation
  • How to use the same platforms to meet the infrastructure needs of developers and modern Kubernetes-orchestrated applications
  • Live demos and walkthroughs


Register for Live VMUG Button


Additional Resources

If you’re an IT professional who wants to be on the leading-edge, you won’t want to miss our announcement event starting at 9 AM EDT on September 15, 2020. Be sure to check out the following resources:


The post Register for the Sept. 15th Announcement Event! appeared first on VMware vSphere Blog.

#vSphereChat Recap: What’s New with vSphere Bitfusion and AI/ML?

$
0
0


With the recent announcement and GA of vSphere Bitfusion, what better way to learn about all the features and use cases than with a #vSphereChat? Joining us to answer ten rapid-fire questions were our very own experts: Jim Brogan, (@brogan_record), Mike Adams (@mikej_adams), and Niels Hagoort (@nhagoort). From operating systems to GPU partitioning to vSphere integrations, they covered it all! Keep reading to check out any of the tweets you may have missed.

Q1. For those who are not familiar with vSphere Bitfusion, what are some of the key features?

Jim Brogan

A1-1. As the early days of VMware when compute resource sharing was introduced, VMware vSphere Bitfusion introduces GPU sharing for ML applications such as TensorFlow and Pytorch. Bitfusion shares GPUs in two ways

A1-2. Remote access: clients can allocate GPUs from pools of GPU servers across the network, then run their ML application with no modification.  CUDA API calls are intercepted and run on the remote GPUs.

A1-3. GPU partitioning: Bitfusion can allocate an arbitrarily-sized slice of a GPU.  Allowing multiple applications and clients to share a physical GPU concurrently. An important aspect of this sharing is that it is done dynamically; no machines need to be spun up or down. GPUs are deallocated and returned to the pool when an application or session completes.

A1-4. Bitfusion has a vCenter GUI plug-in for management and visibility of the GPUs in the pool.

Q2. What operating systems does vSphere Bitfusion run on?

Jim Brogan

A2. Bitfusion works on RHEL 7, CentOS 7, Ubuntu 16.04, and Ubuntu 18.04

Q3. How does vSphere Bitfusion work with partners to deliver AI/ML solutions?

 Mike Adams

A3. We work with many types of partners to promote and utilize Bitfusion. First, we have had a long standing relationship with NVIDIA and work together to utilize GPUs. We also work with Dell and many of their server models that contain GPUs (C4140 as an example).

Q4. What are some of the best use cases for vSphere Bitfusion?

 Jim Brogan

A4-1. On the one hand, we don’t really focus on particular use cases, or verticals because Pytorch and TensorFlow applications don’t. On the other, we do focus on PyTorch and TensorFlow themselves, though other applications also work.

A4-2. But on the “third” hand, some of the exciting use-cases and verticals we like are image recognition and classification, risk analysis, GPUaaS, loss prevention, financial services, retail, manufacturing, automotive, and Higher Ed/Research.

A4-3. And looking at infrastructure use cases, rather than apps, edge computing is a particularly tough or expensive place to populate with high GPU counts–sharing on the edge is very interesting.

A4-4. I should mention that Bitfusion works for both training and inference.

Q5. What GPU problems does vSphere Bitfusion help solve?

Jim Brogan

A5-1. The principal problem is that you can’t buy GPUs for everyone who wants them, who needs them.  They are expensive and tied to a single machine. Until now, they were hard to share.

A5-2. It’s hard to get good numbers, but on average they would seem to sit idle 85% the time. With Bitfusion GPU sharing, everyone gets what they need.

Q6. Why is vSphere Bitfusion a better alternative to traditional hardware accelerators?

 Jim Brogan

A6-1. The first answer is always aimed at admins who have limited budgets and want to get more use out of the GPUs they already own.

A6-2. Many AI and machine learning (ML) apps do so much computation that they run forever if you do not have a GPU for hardware acceleration.

A6-3. On the other hand, when an expensive GPU is dedicated to a single machine, it is very difficult to keep it busy. Users can have work to do in between runs, and can go home in the evening.

A6-4. Even production environments can be very bursty.  So sharing can increase the utilization.

A6-5. But there are benefits for the users too. Users a) don’t have to coordinate with each other to share GPUs; b) they don’t have to shut down machines to pass GPUs to other machines; c) they don’t have to port their applications;

A6-6. d) they can use more GPUs than they could previously afford; e) they can experiment with more GPU models than they would previously have access to (e.g. T4 vs. V100)

Q7. Explain the value or benefit to partitioning GPUs.

 Jim Brogan

A7-1. Some apps do not use all of a GPU’s resources.  Some models are small, some inference jobs may leave lots of headroom. Partitioning GPUs lets multiple applications share the same GPU concurrently.

A7-2. A paper we released with GA gives a detailed inference use case.

A7-3. Another interesting benefit is give a large partition, say 75% of a GPU, to a long running application, but leave 25% of the capacity to smaller applications that can sneak in without waiting for the long-running app to complete

Niels Hagoort

A7. Exactly! Increased efficiency. A use-case could be to support more users in the test and development phase.

Q8. What integrations does vSphere Bitfusion have with vSphere?

Jim Brogan

A8-1. Bitfusion registers a plug-in with vCenter. vCenter, then, manages the machines using Bitfusion. It authorizes and configures clients to use Bitfusion servers. It can expand or modify the pool of GPU servers.

A8-2. It displays allocation and utilization statistics, history, and charts. It can terminate sessions, set limits on clients, set idle timeouts — all to help with fair use of the resources.

Niels Hagoort

A8. The beauty of the vSphere integration is that Bitfusion is completely managed from within the vSphere Client. No need to log into another UI!!

Q9. What’s the number one reason to deploy vSphere Bitfusion?

 Niels Hagoort

A9. I would say; Efficiency! Both from a cost and performance perspective!!

Mike Adams

A9-1. I like that one too. Sharing always leads to better efficiency.

A9-2. The ability to share GPUs. Everyone we talk to wants a shared service or GPU as a Service capability.

Q10. If vSphere Bitfusion was a sports car, which one would it be and why?

 Jim Brogan

A10-1. It would be a lot of fun to compare Bitfusion to a Maserati or something, but like other infrastructure technologies, a truer analogy isn’t as exciting, even though it may be extremely useful or important.

A10-2. Bitfusion is more like a rental agency with a garage full of Maserati’s or passenger buses.  It lets a lot of people use vehicles a lot more economically.

Niels Hagoort

A10. Tough question. <insert any hypercar here> Maybe a high performance, remote controlled car??


Whether you followed along in real time or caught up with this recap, we hope you enjoyed our latest vSphere Tweet Chat. Stay tuned to our Twitter account (@VMwarevSphere) for details about our next chat. Have a topic idea? Reach out to us anytime on Twitter!

vSphere-TweetChat-Recap-Bitfusion

The post #vSphereChat Recap: What’s New with vSphere Bitfusion and AI/ML? appeared first on VMware vSphere Blog.
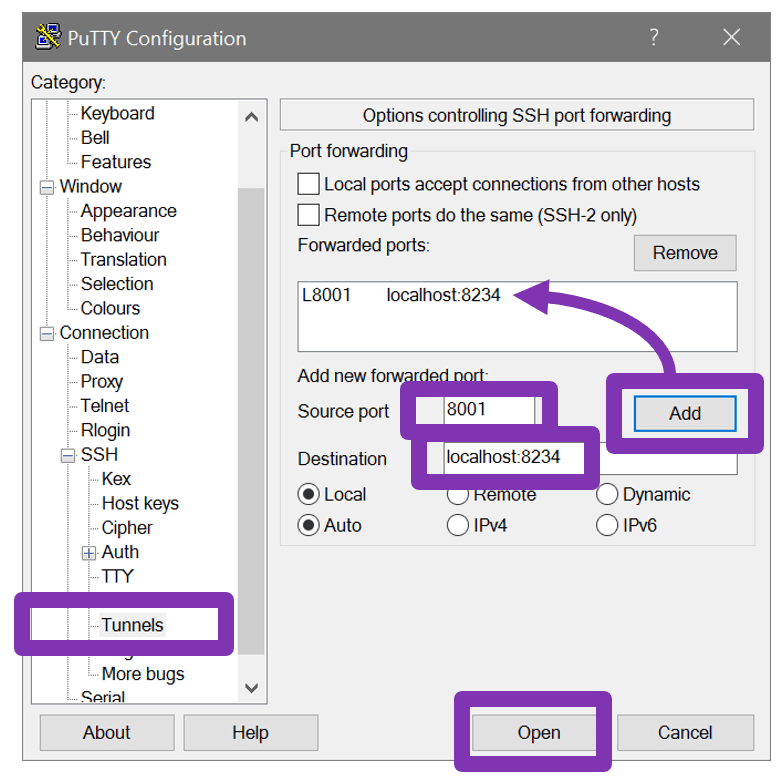
vSphere 7 – System Storage When Upgrading

$
0
0

In a previous blog post, vSphere 7 – ESXi System Storage Changes, we discussed the changes to the ESXi system storage layout. How the various partitions are consolidated into fewer, larger partitions that are expandable as well. A lot of inquiries came in for more information on what happens when upgrading to vSphere 7. Let’s take a closer look at what happens to the ESXi system storage when upgrading to vSphere 7.

Storage Requirements Upgrades

The boot media requirements differ between a new vSphere 7 install, and an upgrade to vSphere 7. As mentioned in the first blog post, there’s a requirement for boot media to run a 4 GB storage device at minimum, when upgrading to vSphere 7.  Even though 4 GB boot media devices are supported, let me emphasize that it is good practice to adhere to the boot media requirements for a fresh vSphere 7 installation (8 GB for USB or SD devices, 32 GB for other boot devices). 32 GB or higher boot devices are recommended, check out this KB article for more information.

All the scenarios in this diagram are supported when upgrading to vSphere 7. Again, the recommended boot device would be a high endurance disk or flash device.

Partition Layout

To quickly recap what’s in the previous blog post, let’s look at how the partition layout changed between vSphere 6.x and vSphere 7. The small & large core-dump, locker, and scratch disk are consolidated into the new ESX-OSData partition.

Whether you freshly install or upgrade to vSphere 7, the partition layout as shown in the diagram above is applied. This partitioning reflects what happens in the vSphere upgrade process when the ESXi system storage media is HDD or SSD. The (system storage related) upgrade steps are:

  1. Backup potential partner VIBs (kernel modules), contents of the active boot-bank, locker and scratch partitions to memory (RAM).
  2. Cleanup all system partitions, non-datastore partitions are not destroyed.
  3. If the upgrade media does not have an existing VMFS partition, the upgrade process creates a new GPT partition lay-out.
  4. Create partitions (book-banks and ESX-OSData)
  5. Restore the contents from RAM to the appropriate partitions.

Upgrade Scenarios

But what happens from a ESXi system storage perspective if you have ESXi installed on a USB or SD device together with a HDD/SSD or you when you have a USB-only system?

Upgrade Scenario : USB with HDD

When the storage media is a USB  or SD card, and the scratch partition is on HDD or SDD storage media, the upgrade process is as follows:

  1. Backup potential partner VIBs (kernel modules), contents of the active boot-bank, locker and scratch partitions to memory (RAM).
  2. Cleanup all system partitions, non-datastore partitions are not destroyed.
  3. If the upgrade media does not have a VMFS partition, create a GPT partition layout.
  4. Create partitions (book-banks and ESX-OSData)
    • The dedicated scratch partition is converted to the ESX-OSData partition
  5. Restore the contents from RAM to the appropriate partitions.

In this scenario, the scratch partition on the hard drive is converted to ESX-OSDATA. Its size is limited to 4 GB because of VFAT restrictions. This size might be too small for customers, who have large memory systems and require a large core dump file. In this case, customers can take the following actions:

  • Create a core dump file on a datastore. To create a core dump file on a datastore, see the KB article 2077516.
  • Assign scratch to a directory in the datastore. To assign the scratch location to a directory in a datastore, see KB article 1033696.

Upgrade Scenario : USB-only

Having a USB or SD-only device setup in your ESXi host, you can still upgrade to vSphere 7 if the storage device is at least 4 GB. Although a higher endurance and capacity device is strongly recommended. See this KB article for more insights storage endurance requirements. To support the 4GB minimum when upgrading to vSphere 7, there’s a couple of things happening with the storage partition layout.

Note: using vSAN in a cluster with ESXi hosts that have more than 512GB of memory require larger than 4 GB boot devices (when upgrading to vSphere 7) because of a larger core dump partition.

In the scenario of using a 4 GB boot device and no local disk is found, ESXi is running in a so-called ‘degraded mode‘. This means ESXi is not running in an optimal state, with some functionalities disabled. Also, running in a degraded state could mean ESXi loses its state on a power cycle. Solving this requires adding a local disk or flash device and run the instructions found in KB article 77009.

This diagram shows the typical setup when upgrading using USB boot media. This scenario is also applicable for a setup where the scratch location points to a datastore. For security reasons, ESX-OSData cannot exist in those locations. The upgrade steps using USB or SD media are:

  1. Request remediation of unavailable scratch volume:
    • The user is prompted to create a compatible scratch volume or add a spare disk. The upgrade process terminates if the user chooses to remediate.
  2. If remediation is ignored, then a fallback mode will be used:
    • ESX-OSData is created on USB.
      • USB flash MUST be >= 4GB otherwise upgrade will terminate because VMFS requires at least 1.3GB. This space is necessary for pre-allocation of the core file, vmtools and vSAN traces.
    • RAM-disk is used for frequently written data.
    • Subsystems that require persistence storage of data, implement an equivalent backup.sh capability to allow buffered saving of the data from RAM-disk to ESX-OSData
    • This is a highly degraded mode of operation with boot messages displaying so. The user must accept that there is potential for data to be lost because of the use of a RAM-disk which may be storing data that ESXi considers to be persistent across reboots.

The backup.sh script is run at regular intervals to save the system state and sticky bit files to the boot-bank.

First Boot Tasks

After the ESXi upgrade, or a new installation, the first boot tasks of the ESXi host are executed. These include:

  • Scan for unpartitioned disks and partition them as datastores.
  • Create symbolic links to file systems, ensuring that the necessary namespaces for subsystem are available.
  • Initialize subsystems to reference the correct storage location. For example, logs and core dump locations.

To Conclude

Thanks goes out to our engineering team for providing the information. The goal of this blog post is for you to have a better understanding of what is happening with the ESXi system storage when upgrading to vSphere 7. A key takeaway here is to make sure you meet the storage requirements when installing or upgrading to vSphere 7, and to use a recommended boot device.


The post vSphere 7 – System Storage When Upgrading appeared first on VMware vSphere Blog.
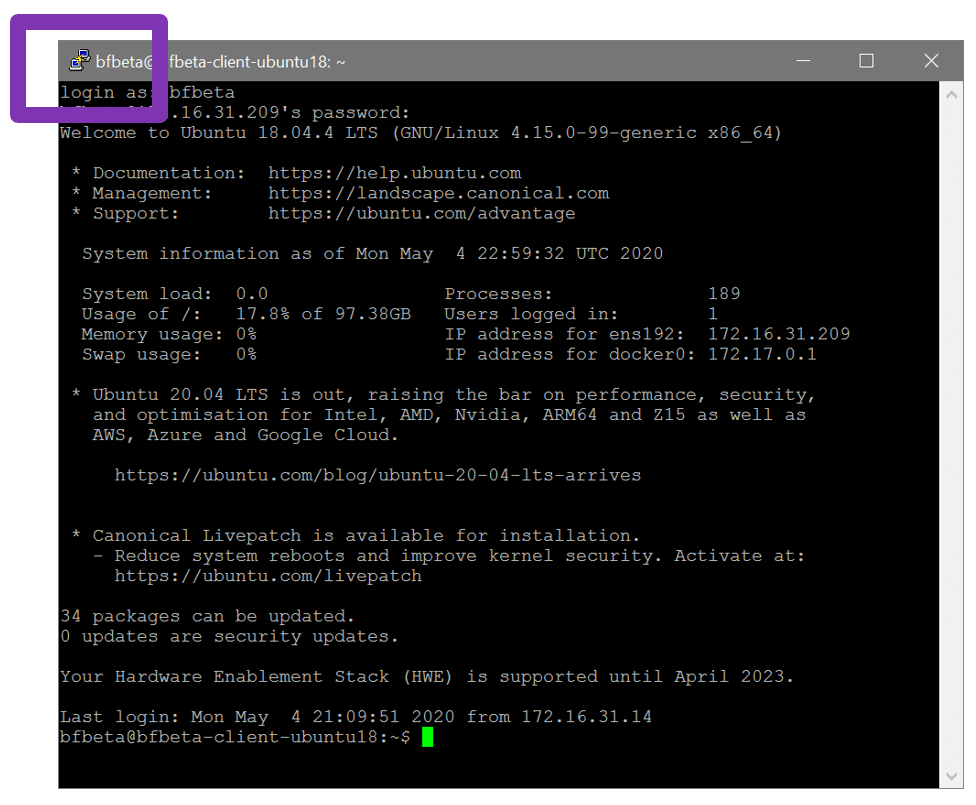
#vSphereChat Recap: What’s New with vSphere Bitfusion and AI/ML?

$
0
0


With the recent announcement and GA of vSphere Bitfusion, what better way to learn about all the features and use cases than with a #vSphereChat? Joining us to answer ten rapid-fire questions were our very own experts: Jim Brogan, (@brogan_record), Mike Adams (@mikej_adams), and Niels Hagoort (@nhagoort). From operating systems to GPU partitioning to vSphere integrations, they covered it all! Keep reading to check out any of the tweets you may have missed.

Q1. For those who are not familiar with vSphere Bitfusion, what are some of the key features?

Jim Brogan

A1-1. As the early days of VMware when compute resource sharing was introduced, VMware vSphere Bitfusion introduces GPU sharing for ML applications such as TensorFlow and Pytorch. Bitfusion shares GPUs in two ways

A1-2. Remote access: clients can allocate GPUs from pools of GPU servers across the network, then run their ML application with no modification.  CUDA API calls are intercepted and run on the remote GPUs.

A1-3. GPU partitioning: Bitfusion can allocate an arbitrarily-sized slice of a GPU.  Allowing multiple applications and clients to share a physical GPU concurrently. An important aspect of this sharing is that it is done dynamically; no machines need to be spun up or down. GPUs are deallocated and returned to the pool when an application or session completes.

A1-4. Bitfusion has a vCenter GUI plug-in for management and visibility of the GPUs in the pool.

Q2. What operating systems does vSphere Bitfusion run on?

Jim Brogan

A2. Bitfusion works on RHEL 7, CentOS 7, Ubuntu 16.04, and Ubuntu 18.04

Q3. How does vSphere Bitfusion work with partners to deliver AI/ML solutions?

 Mike Adams

A3. We work with many types of partners to promote and utilize Bitfusion. First, we have had a long standing relationship with NVIDIA and work together to utilize GPUs. We also work with Dell and many of their server models that contain GPUs (C4140 as an example).

Q4. What are some of the best use cases for vSphere Bitfusion?

 Jim Brogan

A4-1. On the one hand, we don’t really focus on particular use cases, or verticals because Pytorch and TensorFlow applications don’t. On the other, we do focus on PyTorch and TensorFlow themselves, though other applications also work.

A4-2. But on the “third” hand, some of the exciting use-cases and verticals we like are image recognition and classification, risk analysis, GPUaaS, loss prevention, financial services, retail, manufacturing, automotive, and Higher Ed/Research.

A4-3. And looking at infrastructure use cases, rather than apps, edge computing is a particularly tough or expensive place to populate with high GPU counts–sharing on the edge is very interesting.

A4-4. I should mention that Bitfusion works for both training and inference.

Q5. What GPU problems does vSphere Bitfusion help solve?

Jim Brogan

A5-1. The principal problem is that you can’t buy GPUs for everyone who wants them, who needs them.  They are expensive and tied to a single machine. Until now, they were hard to share.

A5-2. It’s hard to get good numbers, but on average they would seem to sit idle 85% the time. With Bitfusion GPU sharing, everyone gets what they need.

Q6. Why is vSphere Bitfusion a better alternative to traditional hardware accelerators?

 Jim Brogan

A6-1. The first answer is always aimed at admins who have limited budgets and want to get more use out of the GPUs they already own.

A6-2. Many AI and machine learning (ML) apps do so much computation that they run forever if you do not have a GPU for hardware acceleration.

A6-3. On the other hand, when an expensive GPU is dedicated to a single machine, it is very difficult to keep it busy. Users can have work to do in between runs, and can go home in the evening.

A6-4. Even production environments can be very bursty.  So sharing can increase the utilization.

A6-5. But there are benefits for the users too. Users a) don’t have to coordinate with each other to share GPUs; b) they don’t have to shut down machines to pass GPUs to other machines; c) they don’t have to port their applications;

A6-6. d) they can use more GPUs than they could previously afford; e) they can experiment with more GPU models than they would previously have access to (e.g. T4 vs. V100)

Q7. Explain the value or benefit to partitioning GPUs.

 Jim Brogan

A7-1. Some apps do not use all of a GPU’s resources.  Some models are small, some inference jobs may leave lots of headroom. Partitioning GPUs lets multiple applications share the same GPU concurrently.

A7-2. A paper we released with GA gives a detailed inference use case.

A7-3. Another interesting benefit is give a large partition, say 75% of a GPU, to a long running application, but leave 25% of the capacity to smaller applications that can sneak in without waiting for the long-running app to complete

Niels Hagoort

A7. Exactly! Increased efficiency. A use-case could be to support more users in the test and development phase.

Q8. What integrations does vSphere Bitfusion have with vSphere?

Jim Brogan

A8-1. Bitfusion registers a plug-in with vCenter. vCenter, then, manages the machines using Bitfusion. It authorizes and configures clients to use Bitfusion servers. It can expand or modify the pool of GPU servers.

A8-2. It displays allocation and utilization statistics, history, and charts. It can terminate sessions, set limits on clients, set idle timeouts — all to help with fair use of the resources.

Niels Hagoort

A8. The beauty of the vSphere integration is that Bitfusion is completely managed from within the vSphere Client. No need to log into another UI!!

Q9. What’s the number one reason to deploy vSphere Bitfusion?

 Niels Hagoort

A9. I would say; Efficiency! Both from a cost and performance perspective!!

Mike Adams

A9-1. I like that one too. Sharing always leads to better efficiency.

A9-2. The ability to share GPUs. Everyone we talk to wants a shared service or GPU as a Service capability.

Q10. If vSphere Bitfusion was a sports car, which one would it be and why?

 Jim Brogan

A10-1. It would be a lot of fun to compare Bitfusion to a Maserati or something, but like other infrastructure technologies, a truer analogy isn’t as exciting, even though it may be extremely useful or important.

A10-2. Bitfusion is more like a rental agency with a garage full of Maserati’s or passenger buses.  It lets a lot of people use vehicles a lot more economically.

Niels Hagoort

A10. Tough question. <insert any hypercar here> Maybe a high performance, remote controlled car??


Whether you followed along in real time or caught up with this recap, we hope you enjoyed our latest vSphere Tweet Chat. Stay tuned to our Twitter account (@VMwarevSphere) for details about our next chat. Have a topic idea? Reach out to us anytime on Twitter!

vSphere-TweetChat-Recap-Bitfusion

The post #vSphereChat Recap: What’s New with vSphere Bitfusion and AI/ML? appeared first on VMware vSphere Blog.

Bitfusion Client Service – The Bash in the Rue Morgue

$
0
0

This blog post shows you how to create a Bitfusion Client service for your VMs. Such VMs can boot with remote GPUs pre-allocated and available to applications without any need to invoke Bitfusion on the command line.

Introduction – Is That the Short Straw You Drew, Nancy?

The biggest value of Bitfusion is that you can share GPUs with other users from a pool of servers across the network. You invoke Bitfusion to allocate GPUs from the pool, to run an application, and to deallocate them when you are done. This increases the GPU utilization and makes sharing relatively painless—you don’t have to arrange schedules with other users, you don’t have to spin down your VM to allow someone else access, and you don’t have to port your code and its environment to special hosts with GPUs.

But maybe you want more. Maybe…

  • You want Bitfusion to be even more invisible; you don’t want to invoke it from the command line at all.
  • You want to allocate a set of GPUs for a whole session of application runs. This allows for apple-to-apple comparisons across runs. This guarantees that once you’ve begun a session, you’ll own the GPUs until you finish.

These “maybes” coincide with what you might want in a GPUaaS environment, paying (or at least being tracked) for a session that comes with GPUs, whether or not you run anything that needs them.

Well, you can have all of this by leveraging what happens when you use Bitfusion to launch a bash shell, instead of a regular ML application.

Bitfusion Bash Session – Is This the Road the Chicken Should Cross, Alex?

The bitfusion run -n <N> <application> command does three things:

  1. Allocates the number, N, GPUs and sets up a Bitfusion environment
  2. Runs the application in that Bitfusion environment which intercepts CUDA calls and forwards them to the remote GPUs
  3. Deallocates the GPUs and tears down the environment

Here is a specific example using CUDA sample code that comes with the CUDA toolkit.

cd /usr/local/cuda/samples/0_Simple/matrixMul
bitfusion run -n 1 -- ./matrixMul
...regular successful program output
#
#  Some comments
#  • alloc 1 GPU, create config file and set environment variables to intercept CUDA calls)
#  • run matrixMul, a CUDA app
#  • dealloc 1 GPU, unset environment variables

But you can use Bitfusion to run anything, including bash. Under bash, the Bitfusion environment will stay up until you explicitly exit bash. This provides a method to allocate the GPUs once, and use them to run several applications. And any commands you run inside the bash do not need to be prefixed with a Bitfusion command.

Figure 1

The Bitfusion Environment – Are There No Places Like Holmes, Sherlock?

The Bitfusion environment is one that intercepts calls to the CUDA driver (libcuda.so), in which a configuration file exists that identifies the previously allocated GPUs, and in which environment variables specify information needed by the Bitfusion software. We can see this environment from the inner bash command line.

Figure 2

Plan of Attack – Are You Digging a Garden, or a Grave with that Spade, Sam?

You now know the two things you need to set up a Bitfusion client service:

  • A Bitfusion bash shell lets you run sequential applications with no further Bitfusion commands
  • You can easily clone the Bitfusion bash shell by duplicating its environment variables

A client service needs:

  • To run a bash script under Bitfusion that captures the client environment
  • This “capture” script to generate a bash profile script that will replicate the environment variables in any new shells that are launched
  • This “capture” script to keep itself alive (or Bitfusion will detect completion and deallocate the GPUs)

This blog shows you how to set up the service with systemd. The service uses three files. You must write the service file and the “capture” shell script, but the profile script will be created dynamically by the “capture” script.

Figure 3

The Client Service File – Is This Done in the Service of the Queen, Ellery?

A Bitfusion cluster comprises vCenter, Bitfusion servers (appliances with GPUs), and Bitfusion clients (VMs running applications needing acceleration from the server GPUs). This client service, not surprisingly, is written on and will run on the Bitfusion clients. It provisions, invisibly, the Bitfusion GPUs that the applications need.

Below is the text of the systemd service file, which defines the Bitfusion client service.

cat /lib/systemd/system/bitfusion-client.service
#
[Unit]
Description=Start Bitfusion Client Environment
#
[Service]
# Set User (and/or Group) to not run as root and cause log files to be written in user's .bitfusion subdir
User=root
#User=<username>
#Group=<usergroup>
Type=simple
# Edit the bitfusion run command to allocate the number of GPUs and partial size which you need
ExecStart=/usr/bin/bitfusion run -n 1 -- bash /opt/bitfusion/bitfusion-client-env
ExecStopPost=/bin/rm /etc/profile.d/bitfusion-client-env.sh
#ExecStopPost=/bin/rm /home/<username>/.bitfusion-client-env.sh
RestartSec=5
Restart=always
KillMode=process
#
[Install]
WantedBy=multi-user.target
Alias=bfcenv.service

The key line is the one that runs the “capture” script under Bitfusion:

ExecStart=/usr/bin/bitfusion run -n 1 – bash /opt/bitfusion/bitfusion-client-env

This allocates a single GPU. Via the -n option, you can allocate a different number of GPUs. Via a -p or -m option, you can allocate partial GPUs to run your application within a partition of GPU memory (-p 0.314 would allocate 31.4% of GPU memory, -m 4000 would allocate four thousand MBs of GPU memory). See User Guide.

As written, the service will be launched by root and will provide the service for all users. To run it by and for a single user, uncomment the second User, Group, and second ExecStopPost lines, filling in the fields in angle brackets (<username> and <usergroup>).

The Capture Script – Are You Mimicking Me Like a Parrot, Hercule? Or — Can You Mirror the Big, Blue Marble, Jane? (Challenging names; do you purposely pose punning problems for us plain old, regular folk in Peoria or Corpus Christi, Agatha?)

To make a correct capture script, you need to identify all the environment variables created or modified by Bitfusion. You can do this by running diff on the output of env inside and outside of a Bitfusion shell. You may still need to do manual comparison if the variables are printed in different orders, but the diff output will at least be a starting point.

env > outside.txt
bitfusion run -n 1 – bash
env > inside.txt
exit
diff outside.txt inside.txt > bitfusionenv.txt

Once you have your list of environment variables, write a script that recreates each of those variables and place it in /opt/bitfusion/bitfusion-client-env, where the systemd service file expects it to be. Note: you can ignore the variable SHLVL.

Here is an example valid for version 2.0.1 of Bitfusion.

cat /opt/bitfusion/bitfusion-client-env
BITFUSIONTARGFILE=/etc/profile.d/bitfusion-client-env.sh
#BITFUSIONTARGFILE=/home/\<username>/.bitfusion-client-env.sh
#
/bin/chmod 644 $BF_ADAPTOR_CONFIG
#
/bin/echo "export LD_LIBRARY_PATH=\"/opt/bitfusion/lib/x86_64-linux-gnu/bitfusion/lib/nvml:/opt/intel/opencl/lib64:/opt/bitfusion/lib/x86_64-linux-gnu/bitfusion/lib/cuda:/etc/bitfusion/icd:/opt/bitfusion/lib/x86_64-linux-gnu/bitfusion/lib/opencl:/opt/bitfusion/lib/x86_64-linux-gnu/bitfusion/lib:\$LD_LIBRARY_PATH\"" > $BITFUSIONTARGFILE
/bin/echo "export BF_USER_COMMAND=bash" >> $BITFUSIONTARGFILE
/bin/echo "export BF_ENABLE_RDMA_TWO_HOPS=$BF_ENABLE_RDMA_TWO_HOPS" >> $BITFUSIONTARGFILE
/bin/echo "export BF_LICENSE_FILE=$BF_LICENSE_FILE" >> $BITFUSIONTARGFILE
/bin/echo "export BF_LOG_FILE=$BF_LOG_FILE" >> $BITFUSIONTARGFILE
/bin/echo "export BF_DISABLE_DEVPTR_BUF_SCAN=$BF_DISABLE_DEVPTR_BUF_SCAN" >> $BITFUSIONTARGFILE
/bin/echo "export BF_CACHE_STORE_ROOT=$BF_CACHE_STORE_ROOT" >> $BITFUSIONTARGFILE
/bin/echo "export OPENCL_VENDOR_PATH=$OPENCL_VENDOR_PATH" >> $BITFUSIONTARGFILE
/bin/echo "export BF_CACHE_STORE_CLEANUP_THRESHOLD=$BF_CACHE_STORE_CLEANUP_THRESHOLD" >> $BITFUSIONTARGFILE
/bin/echo "export BF_ENABLE_CUDA_CACHING_ALL=$BF_ENABLE_CUDA_CACHING_ALL" >> $BITFUSIONTARGFILE
/bin/echo "export LD_AUDIT=\"/opt/bitfusion/lib/x86_64-linux-gnu/bitfusion/lib/libBFAudit.so:\$LD_AUDIT\"" >> $BITFUSIONTARGFILE
/bin/echo "export NCCL_P2P_DISABLE=1" >> $BITFUSIONTARGFILE
#
/bin/echo "export BF_ADAPTOR_PATH=$BF_ADAPTOR_PATH" >> $BITFUSIONTARGFILE
/bin/echo "export BF_ADAPTOR_CONFIG=$BF_ADAPTOR_CONFIG" >> $BITFUSIONTARGFILE
/bin/echo "export IBV_FORK_SAFE=1" >> $BITFUSIONTARGFILE
/bin/echo "export BF_ADAPTOR_RDMA=$BF_ADAPTOR_RDMA" >> $BITFUSIONTARGFILE
/bin/echo "export LD_PRELOAD=\":/opt/bitfusion/lib/x86_64-linux-gnu/bitfusion/lib/libsyscall_intercept.so:\$LD_PRELOAD\"" >> $BITFUSIONTARGFILE
#
# If expecting service to be run by root...
#    Set log file so local user will succeed in writing it.
#    Set cache lock file so local user will be able to access it.
#/bin/echo "export BF_LOG_FILE=~/.bitfusion/bf_Global.log" >> $BITFUSIONTARGFILE
#/bin/echo "export BF_CACHE_STORE_ROOT=~/.bitfusion/cache/" >> $BITFUSIONTARGFILE
#
/bin/sleep infinity

Note the following about this file:

  • At the top, define BITFUSIONTARGFILE either for all users, or uncomment the subsequent line and define it for a single user, replacing <username> with the actual name. This is the file we create dynamically that brings up new shells with the Bitfusion environment.
  • The chmod command close to the top lets users access the Bitfusion configuration file their applications will need to identify the allocated GPUs.
  • The new value for the variable LD_LIBRARY_PATH is set by prefixing the previous value with Bitfusion directories.
  • If you are launching the service as root, uncomment the two lines before the sleep command. They set up logging and caching files which are accessible to normal users.
  • The last line prevents the shell script from completing, and in turn, keeps the Bitfusion session alive.

Private User Session – Are You a Lone Wolfe, Nero?

The files in the above two sections give you the option of launching the Bitfusion client service as root or as a regular, but specific, user. You just have to uncomment and complete the lines appropriate to your choice.

If the service is launched by root, then all users who log in to the VM (a Bitfusion client VM) can use the GPUs allocated by Bitfusion. Otherwise, only the specific user can use the GPUs provided by the service.

If you want to run the service by and for a specific user, there is one more file you must edit. The user’s file, ~/.profile, needs to find and execute the local copy of the dynamically-created profile script.

The lines to add are listed here:

cat ~/.profile
...
# use local Bitfusion profile if it exists
if [ -f "$HOME/.bitfusion-client-env.sh" ] ; then
. "$HOME/.bitfusion-client-env.sh"
fi
...

Ready, Set, Go – Can You Keep Up with the Joneses, Jupiter?

All that remains to be done is to enable the Bitfusion client service so it will start automatically when the VM boots up. To enable the service:
[sudo] systemctl enable bitfusion-client
Now if you reboot the system, the service will start. Just log in and you can successfully run your CUDA applications as if there were local GPUs. Any time you start the service, you will have to log in to a new shell to join the Bitfusion session; the current shell’s environment will not have been changed.

You may want to run other systemd commands, as well. Here is a list of common systemd service commands, each with a brief comment:

# Start (or re-start) the service
[sudo] systemctl [re]start bitfusion-client
#
# Stop the service
[sudo] systemctl stop bitfusion-client
#
# Is the service running? ":q" to quit
systemctl status bitfusion-client
#
# Automatically start the service
[sudo] systemctl enable bitfusion-client
#
# Run this between a start and stop if you’ve edited the service
[sudo] systemctl daemon-reload
#
# View the service log; ":q" to quit.
# Helps to debug launch problems.
journalctl -u bitfusion-client

Limitations – Are You Yet on the Side of the Angels, Charlie?

The client service you have created here, tautologically, is a service you have created yourself. It is not a feature built into Bitfusion. We expect to Bitfusion to introduce many enhancements, services, and features over the course of time. But for now, consider some limitations of what you have done.

If you are running this service for yourself, you might be satisfied. But if you are running it for other users, notice you have not constrained them to stay within the bounds of the service. For example, a user could:

  • Run Bitfusion from the command line to allocate and use different GPUs (while not deallocating the initial GPUs)
  • Modify or stop the service with systemd commands

Also, the service, by itself, could be judged to have rough edges:

  • The service does not terminate if the GPUs are left idle
  • While it’s true that an enabled service which experiences a temporary shutdown (a longish period of network congestion, etc) should restart itself, it’s also true that the current shell will lose access permanently—some of its environment variables become invalid—you will have to log out (say, of ssh) and log back in

The administrator, however, can ameliorate some of those shortcomings from the vCenter Bitfusion plug-in. See the Bitfusion User Guide to:

  1. Limit the number of GPUs a client may allocate
  2. Set a client “idle GPU” timeout to force GPUs to be deallocated if they sit unused for too long

On the other hand, if your users happen to be responsible human beings, the kind that can be trusted with a bit of responsibility, then their ability to access the systemd commands, means they can address issues or modify the service without requiring their VM to be restarted and without consuming any more of your valuable time.

Conclusion Is Latin Word Order Truly Unimportant in an Opus Magnum, Thomas?

This blog was more of howdunnit than a whodunnit…

But we done it.

(Irrelevant Aside and Challenge: want a short whodunnit parody of an iconic movie, in verse, with a surprising, yet inevitable conclusion? Find the text of Mae Z. Scanlan’s “Gone with the Wind Murder Case”. If I still have my copy, it’s in a box in the attic somewhere, but this blog has made me think it would be nice to read it again.)

We have built a Bitfusion Client service with aspects of GPUaaS. It gives you access to a Bitfusion session with GPUs available for your applications. You do not have to type Bitfusion commands at the prompt; the GPUs are allocated for the life of the service. The means of doing this was to run bash under Bitfusion, keeping bash alive under systemd, and then replicating its environment in any new log-ins.

Top-Ten Rejected Section Titles

  1. Should I buff high, but mar low, Philip?
  2. Is it into that good night I should not go gently, Dirk?
  3. Is that what you’d do in the mo-o-rning, if you had a hammer, Mike?
  4. Is that sandwich good and hardy, Frank and Joe?
  5. Are you reading pop psychology about Venus and Mars, Veronica?
  6. Are these biscuits golden brown, Father?
  7. Shall I traverse the wooden bridge or the rock ford, Jim?
  8. If the water could be liquid or frozen, would you want to warsh or ski, Vic?
  9. Who sang Me and Bobby McGee, Travis?
  10. Will you have, using the lead pipe on that billiard, room to apply the necessary mustard, Colonel?

The post Bitfusion Client Service – The Bash in the Rue Morgue appeared first on VMware vSphere Blog.

Introducing VMware Skyline Health Diagnostic Tool

$
0
0

Think about this: how much time do you spend reviewing the logs or coordinating with the VMware GSS team to get the support? Our GSS team members are indeed working hard 24*7 to ensure that you (our customers) get the best possible support experience. Today, when you log a case with GSS, our support teams respond to you within the defined SLAs. From raising a support ticket to getting support, the entire cycle may become a time-consuming part.

VMware introduces you to the Skyline Health diagnostics tool to enhance your support experience by providing log analysis and recommendations. These upfront recommendations provided by SHD may save your significant efforts, and it can further reduce your environment’s overall downtime.

What is VMware Skyline Health diagnostic tool?Architecture

VMware Skyline Health Diagnostics for vSphere is a self-service tool to detect issues using log bundles and suggest the KB remediate the issue. vSphere administrators can use this tool for troubleshooting issues before contacting the VMware Support. The tool is available to you free of cost.

What is the difference between Skyline advisor and Skyline Health Diagnostic Tool?

Skyline Advisor is a web service hosted by VMware, whereas the Skyline health diagnostic tool is an on-prem solution and doesn’t require you to have a cloud account. There are also differences in terms of the capabilities provided by these two products. Skyline advisor is a proactive analytics tool, whereas skyline health diagnostic is purely focused on logs analysis and recommendations.

Benefits of having Skyline Health Diagnostic 

  • Based on symptoms, VMware Skyline Health Diagnostics provides a Knowledge Base article or remediation steps to resolve the issue.
  • Self-service improves the time to get the recommendations to resolve the issue.
  • Quick recommendation helps to get the infrastructure back from failure and ensures that the business runs with less disruption.

Installation

The installation procedure is straightforward and can be broken into three stages, mainly

Install

You can access SHD management UI via a web browser. Just access the FQDN or IP address of SHD VM, and it will open-up the management UI. From there, you can configure Proxy settings, CEIP, and other management settings related to SHD.

Click here to know more about the installation steps.


Upgrade

Upgrade in SHD is a fairly simple process in SHD. You can navigate to Settings-> Upgrade & History.

Tool Update 

Keep VMware SHD appliance up-to-date

VCG Update 

VCG update keeps the latest VMware Compatibility Guide up-to-date

How to analyse the logs?

VMware Skyline Health Diagnostic tool provides you two ways to analyse the logs.

Online 

You can connect to the vCenter Server or an ESXi host directly and collect the logs. If connected to the vCenter Server, you have an option to select the inventory object, and in a single run, you can choose 32 hosts for the log analysis.

What if the vCenter Server is not online

You can select a checkbox “Connect to vCenter Appliance”,  This will connect to the vCenter appliance and fetch the logs for you. 

Offline

You can upload the logs manually. Logs must be “.TGZ” or “.zip” file

Once the report is generated, you can view the report in the “Show Reports” section and click on view, or you can also download the report to see the details

Log anayalysis

Product documentation

VMware Skyline health Diagnostic

Downloads


The post Introducing VMware Skyline Health Diagnostic Tool appeared first on VMware vSphere Blog.
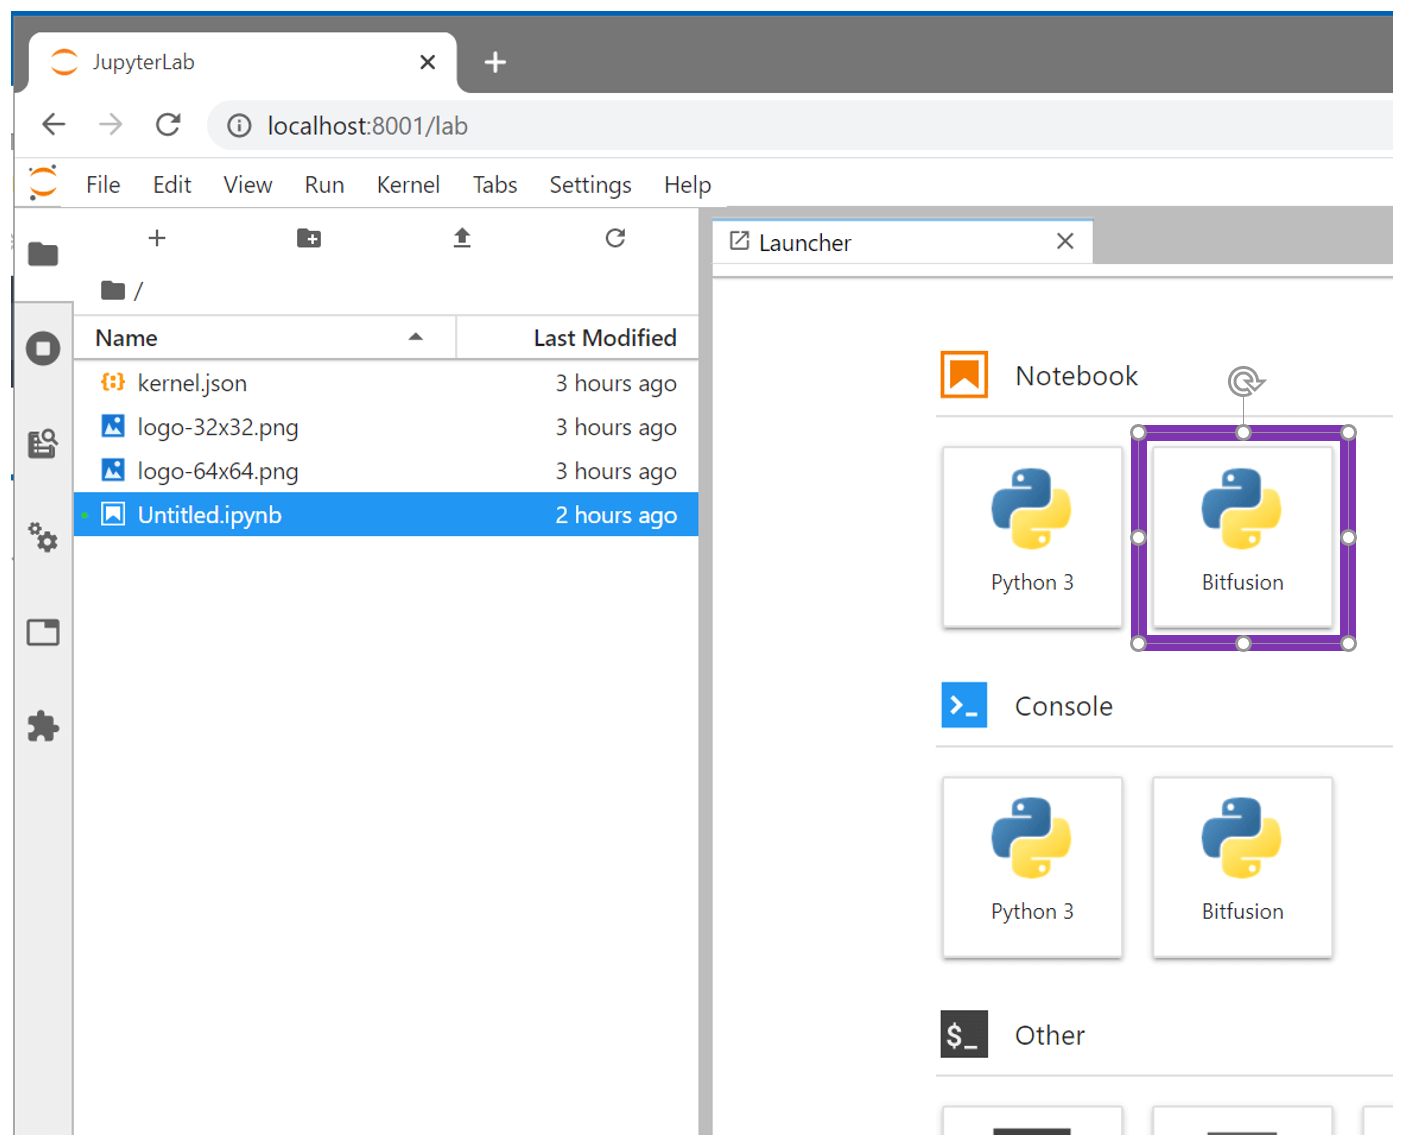
Viewing all 626 articles
Browse latest View live


<script src="https://jsc.adskeeper.com/r/s/rssing.com.1596347.js" async> </script>